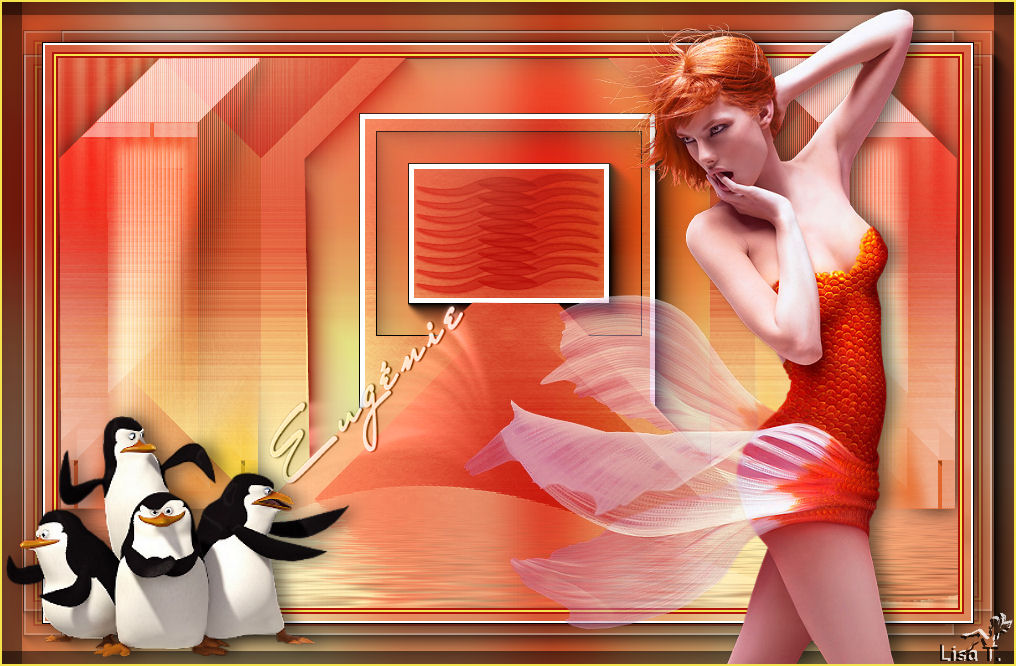
Eugenie

original can be found Here

I am member of TWInc
My translations are protected against copy


Material
tubes – alpha layer – preset (flood)
place the preset “flood” in the folder you like
open the tubes and the alpha layer in PSP, and reduce them
duplicate the alpha layer and work with the copy

thank you to the tubers : Alies – Claudia Viza
Filters used
Italian Editors Effects
Mehdi
AAA Frames
Simple
FM Tile Tools
Flaming Pear (Flood)
Colors palette

color 1 : #f3c0b1
color 2 : #04435d
use the paintbrush to follow the steps
left click to grab it
 |
Realization
activate the copy ofthe alpha layer “alpha_eugenie”
in the materials palette, set 2 contrasting colors chosen in your tubes
(light color as foreground (color 1) and dark color as background (color 2) )
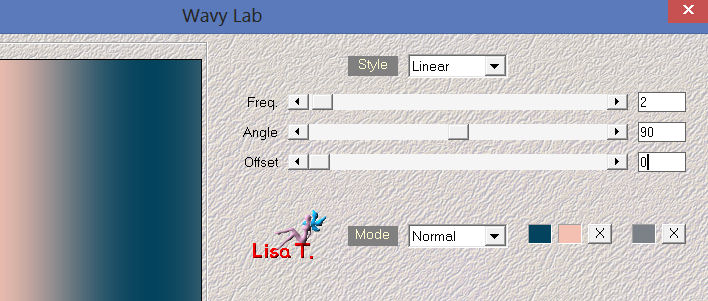
effects/plugins/Mehdi/Wavy Lab
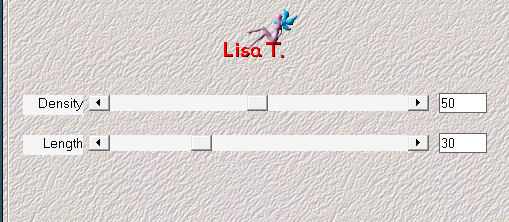
effects/plugins/Mehdi/Fur
effects/plugins/Simple/Pizza Slice Mirror
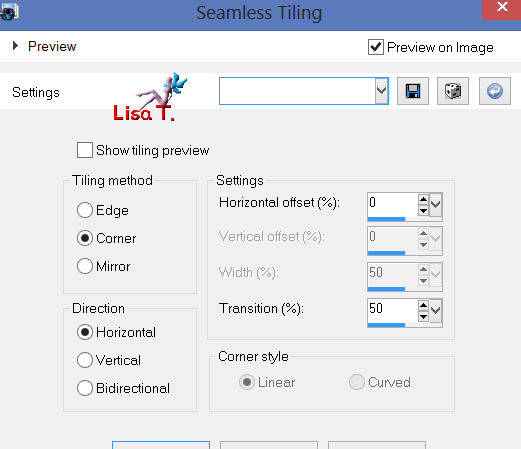
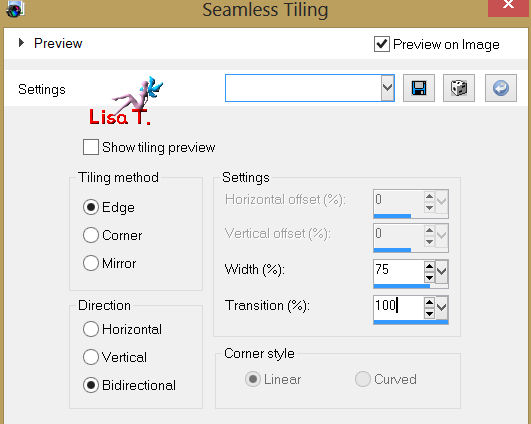
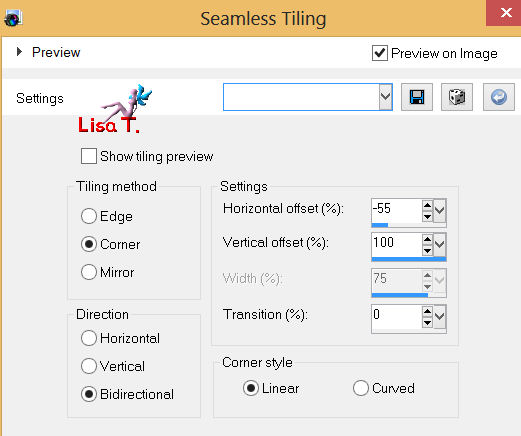
effects/image effects/seamless tiling
layers/duplicate
image/mirror
in the layers palette, set the blend mode on “overlay” or “hard light” (or other)
and the opacity between 50 and 55% according to your colors
layers/merge/merge visible
effects/plugins/It@lian Editors Effects/Effeto Fantasma ( 140 / 0 )

layers/new raster layer
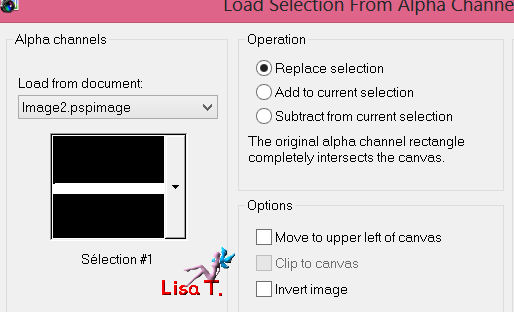
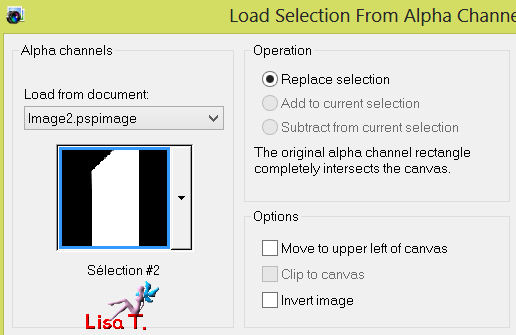
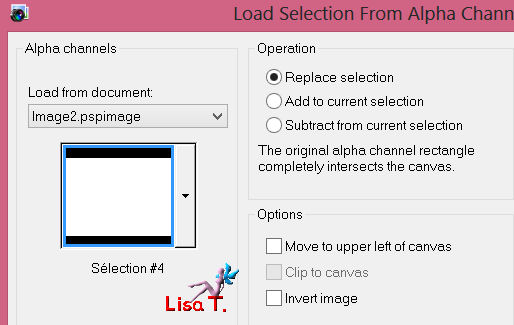
selections/load-save selections/from alpha channel/selection #1
set the opacity of the flood fill tool on 35% and paint the selection with color 1

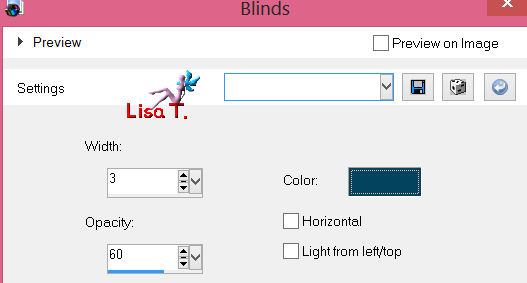
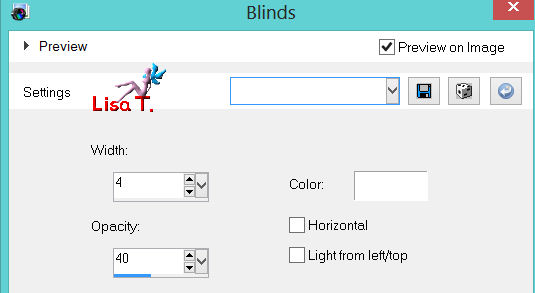
effects/texture effects/blinds/color 2
selections/select none
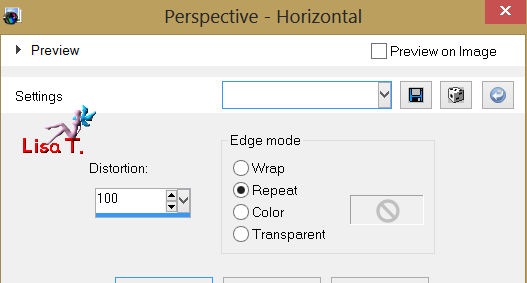
effects/geometric effects/ perspective-horizontal
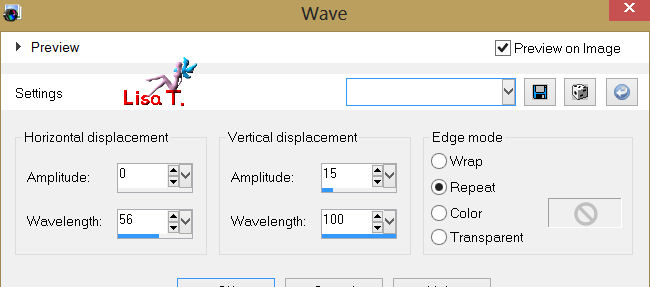
effects/distortion effects/wave
effects/image effects/seamless tiling
in the layers palette set the blend mode on “screen” and the opacity between 80 and 90%
according to your colors
adjust/sharpness/sharpen
activate the background layer (merged)
selections/load-save selection/from alpha channel/selection #2
selections/promote selection to layer
selections/select none
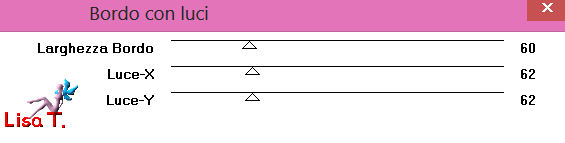
effects/plugins/It@lian Editors effects/Bordo con Luci
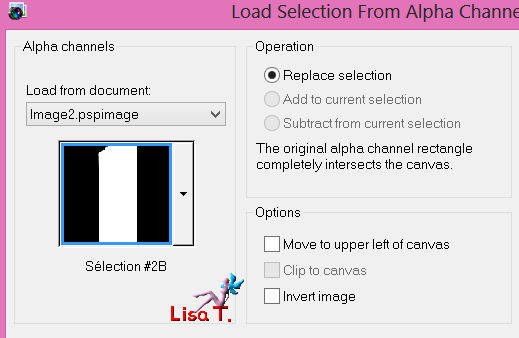
selections/load-save selection/from alpha channel/selection #2B
selections/promote selection to layer
effects/plugins/FM Tile Tools/Collage Circular (default settings)
your result might be slightly different, it depends on the colors, the PSP you use
and the plugin itself

layers/merge/merge down
selections/invert
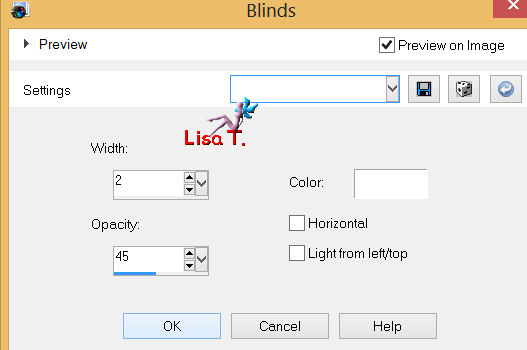
effects/texture effects/blinds (white)
selections/select none
effects/image effects/seamless tiling
layers/duplicate - image/mirror
layers/merge/merge down
effects/3D effects/drop shadow/ 0 / 0 / 50 / 30 / black
in the layers palette, set the blend mode on “luminance” or “luminance (legacy)
opacity on 100%
selections/load-save selection/from alpha channel/selections #5
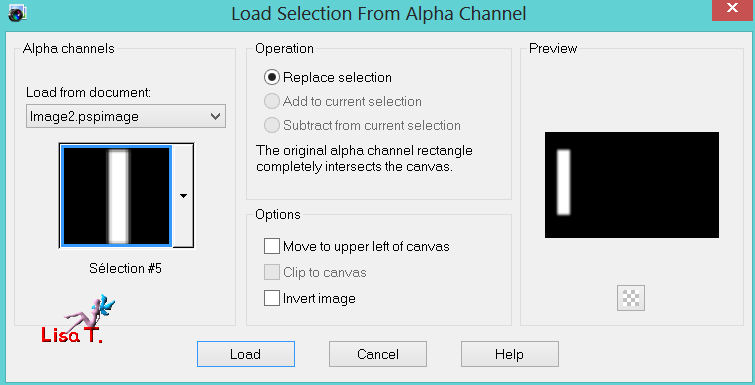
selections/promote selection to layer
effects/texture effets/blinds (white)
selections/select none
layers/duplicate - image/mirror ans merge down
in the layers palette, set tne blend mode on “screen” or “lighten” (or other)
opacity on 100%
activate the bottom layer of the stack (merged)
selections/load-save selection/from alpha channel/selection #3
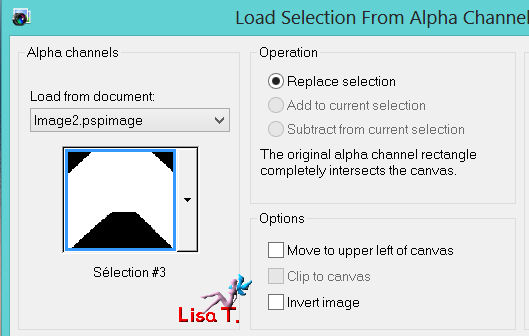
lselections/promote selection to layer
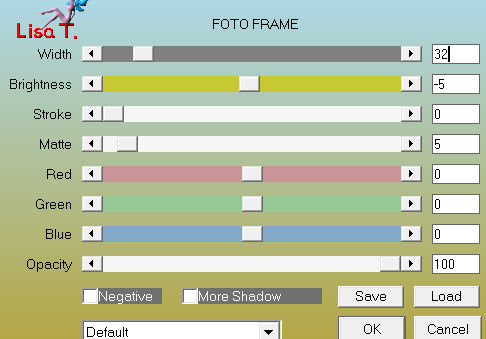
effects/plugins/AAA Frames/Foto Frame
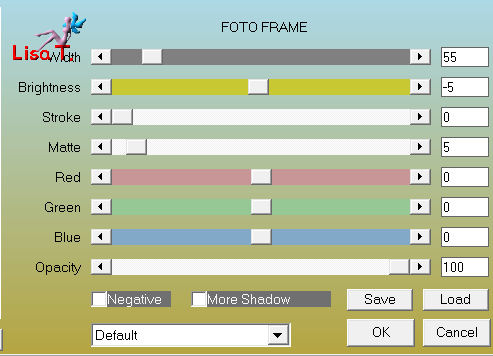
selections/load-save selection/from alpha channel/selection #4
effects/plugins/AAA Frames/Foto Frame
selections/select none
activate the tube “deco Eugenie”, copy and paste as a new layer
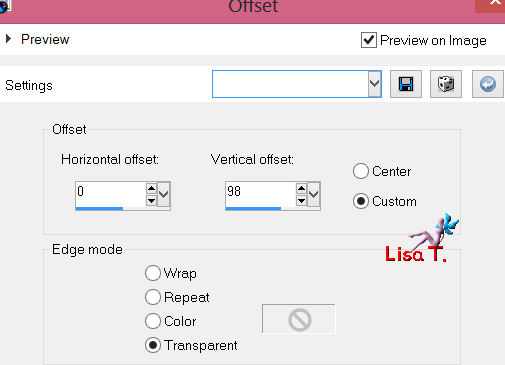
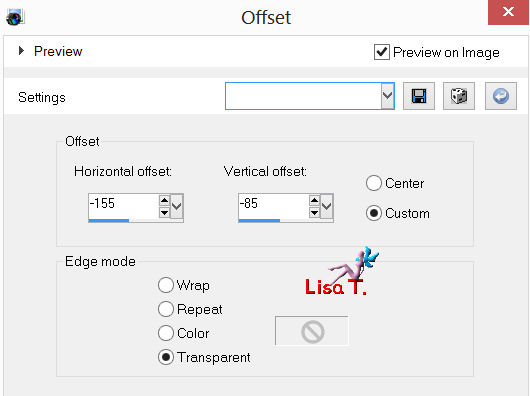
effects/image effects/offset
activate the botteom layer (merged)
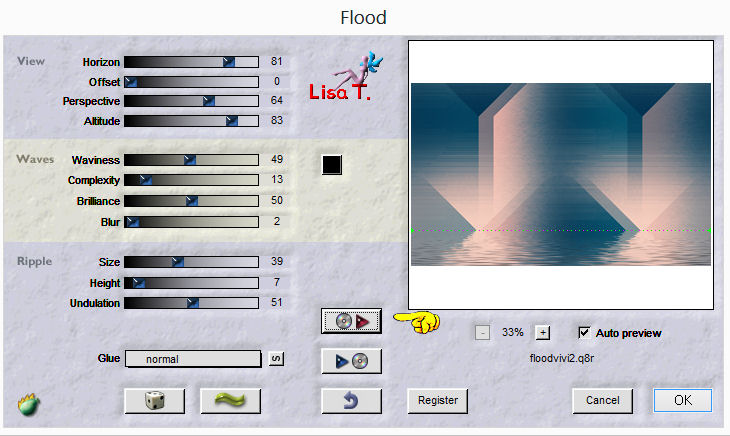
effects/plugins/Flaming Pear/Flood/preset Vivi 2
(you can find the preset in the material provided,
or enter the settings yourself as shown below)
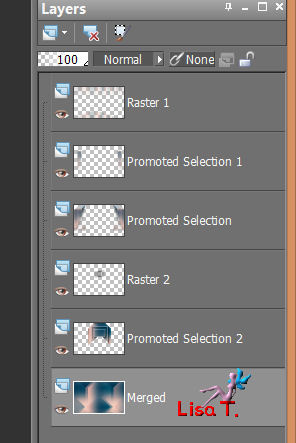
your layer palette must be like this
layers/merge/merge all (flatten)
image/add borders/check symmetric
2 pixels color 2
2 pixels color 1
2 pixels color 2
selections/select all - edit/copy
image/add borders/50 pixels/contrasting color
selections/invert
edit/paste into selection
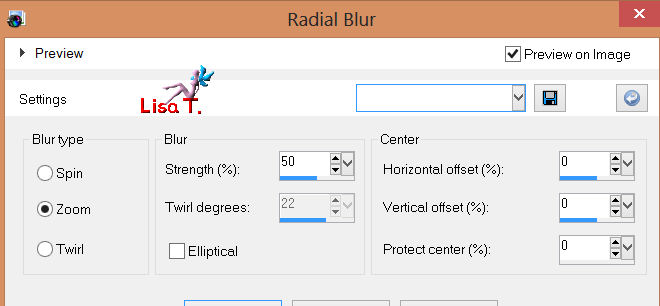
adjust/blur/radial blur
effects/plugins/AAAFrames/Foto Frame

selections/selecct all
selections/modify/contract/40 pixels
selections/invert
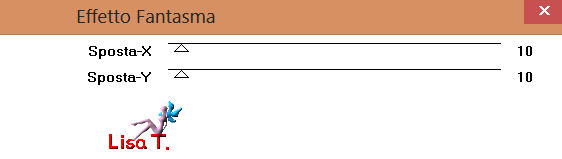
effects/plugins/It@lian Editors Effects/Effeto Fantasma/-> (10 /10)
selections/invert
effects/3D effects/drop shadow/ 0 / 0 /80 / 50 / black
selections/select none
activate the tube Alies “1 VR419”
image/resize (uncheck “resize all layers”)/85%
copy and paste as a new layer
move it to the right (see final result)
adjust/sharpness/sharpen
effects/3D effects/drop shadow/ 10 / 10 / 50 / 22 / black
actibate the tube “texte Eugenie”, copy and paste as a new layer
effects/image effects/offset
activate the decoration tube “claudia viza mix 242”, resize it to 55%
copy and paste as a new layer, move it to the left
drop shadow as you like
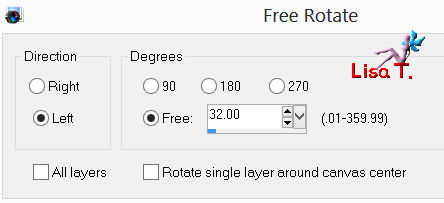
iamge/free rotate (if you need it, according to your tubes)
adjust/sharpness/sharpen
new layer and apply your signature
layers/merge/merge all (flatten)
image/add borders/2 pixels color 1
resize if necessary, save as... type JPEG

thank you for having realized this tutorial
if you want Vivi to present your creation on her site,
don’t hesitate it to send it to her

With my tubes
2 versions, animated and still

Back to the boards of Vivi's Tutorials
board 1  board 2 board 2

|