

You will find the original tutorial here :

This tutorial is a personal creation.
Any resemblance with another one would be only pure
coincidence.
It is stricly forbidden to modify tubes, to change
their name or take off the matermarks,
To present them on your sites or blog,
To share them in groups,
to make a bank of images, or to use them on lucrative purposes.

Thank you Sass and Garances for testing Cloclo’s
tutorials

Thank you to respect Cloclo’s work and the tubers
work.
Don’t hesitate to warn me if you have any trouble
with this translation,
and I’ll try to fix the problem as quickly as I can
If you create a tag mthi this translation, and wish me
to present it
don't hesitate to send it to me, and I'll add it at the
end of this translation with great pleasure


Material
alpha layer - tubes - frame - mask - selections -
Cloclo’s
watermark
open all the tubes into PSP and duplicate them. Work
with the copies to preserve orignals
Never work with original images.
open the mask and minimize to tray
selections are included in the alpha layer (they are invisible)

Hints and Tips
TIP 1 -> if you don’t want to install a
font -->
open it in a software as « Nexus Font » (or
other font viewer software of you choice)
as long as both windows are opened (software and font),
your font will be available in your PSP
TIP 2 -> from PSPX4, in the later versions of PSP the
functions « Mirror » and « Flip » have
been replaced by -->
« Mirror » --> image => mirror => mirror horizontal
« Flip » --> image => mirror => mirror vertical

Filters (plugins) used
Mehdi / Sorting Tiles
UnPlugged-X v2.0 by VanDerLee / Defocus
User Defined Filter / Emboss-3
Simple / Top left Mirror
Simple / Left Right Wrap
<I C.Net Software> / Fiters Unlimited 2.0 / VM Extravaganza
AP 01 / [Innovations] / Lines-SilverLining
If you don't have them, see below by clicking on the banner


colors
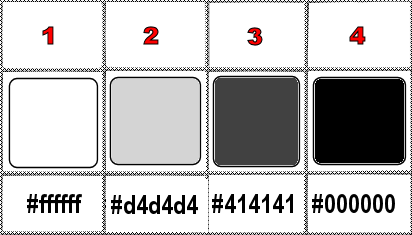
set colors 1 and 2 as FG & BG colors into the materials
palette

Use the pencil to mark your place
along the way
hold down left click to grab and move it
 |

Important
Cloclo works with PSP2020 ; I work with PSP pro 2020
too
if you follow this tutorial with another version
of PSP ; the result might be slightly different
don’t forget to save your work often

realization
1
open the alpha layer, duplicate and close the original
work with the copy
flood fill with color 2
selections => select all
copy / paste the woman tube into selection
don’t forget to erase the tuber’s watermark
selections => select none
2
effects => image effects => seamless tiling => default
settings
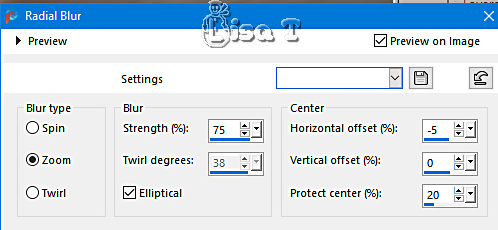
adjust => blur => radial blur
layers => duplicate
effects => Art Media Effects => Pencil / color 2
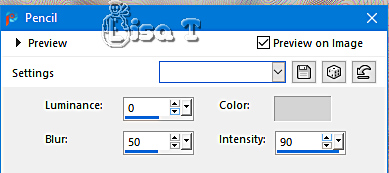
blend mode of the layer : Overlay
layers => merge => merge visible
3
effects => plugins => Mehdi => Sorting Tiles
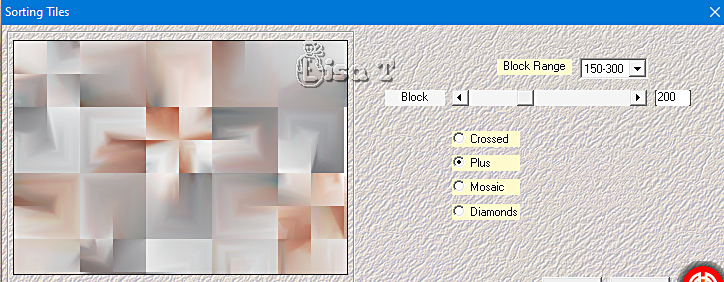
effects => User Defined Filter => Emboss 3
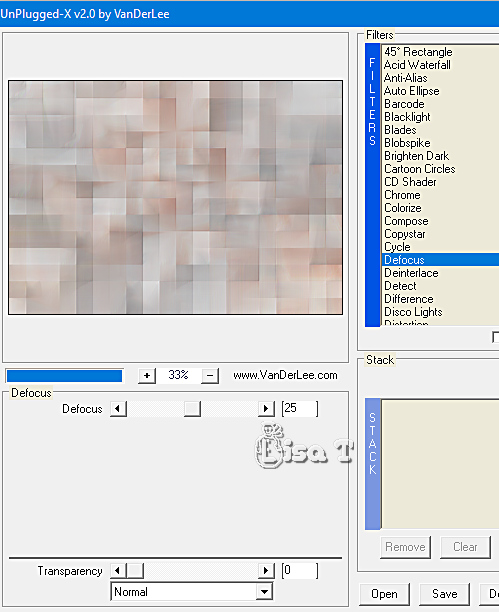
effects => plugins => VanDerLee => Unplugged-X
/ Defeocus
4
selections => load-save selection => from alpha channel
=> selection # 1
selections => promote selection to layer
effects => 3D effects => drop shadow => 0 / 0
/ 80 / 20 / black
selections => select none
effects = > plugins => Simple => Top Left Mirror
effects = > plugins => Simple => Left Right Wrap
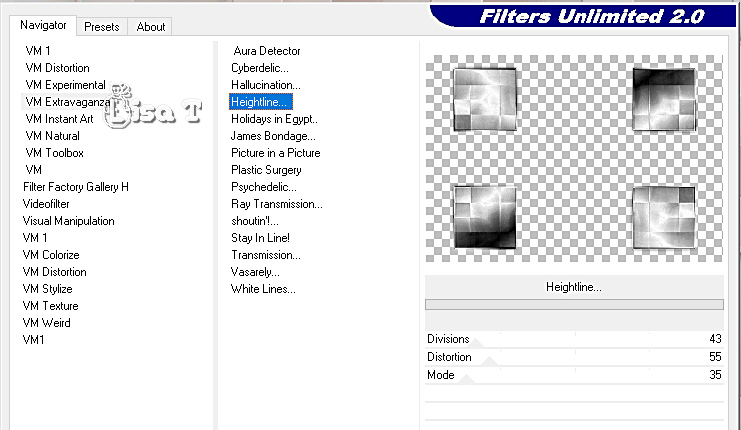
effects => plugins => Unlimited 2 => VM Extravaganza
=> Heightline
5
effects => geometric effects => Skew
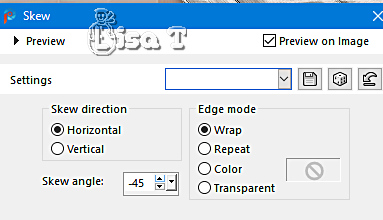
blend mode of the layer : Soft Light
layers => duplicate
image => mirror => mirror horizontal
layers => merge => merge down
highlight bottom layer
selections => load-save selection => from alpha channel
=> selection # 2
selections => promote selection to layer
layers => arrange => bring to top
effects => plugins => AP 01 [Innovations] / Lines
=> Lines Silverlining
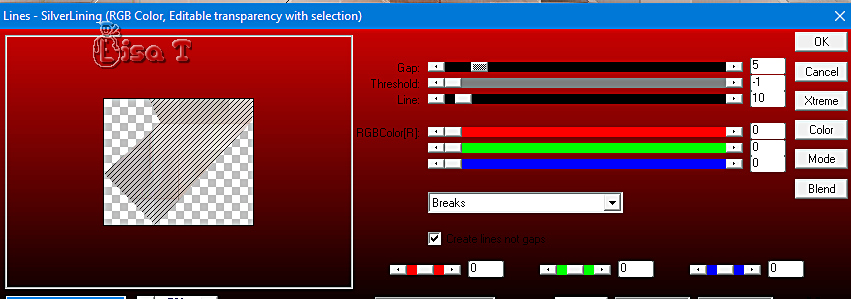
blend mode of the layer : Overlay
effects => 3D effects => drop shadow => 0 / 0
/ 80 / 20 / black
selections => select none
effects = > plugins => Simple => Top Left Mirror
6
layers => merge => merge down
blend mode of the layer : Soft Light / opacity of the layer
: 55%
adjust => sharpness => sharpen more
layers => new raster layer
flood fill white
layers => new mask layer => from image
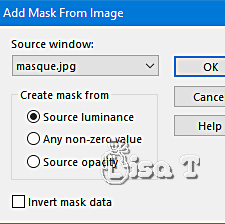
layers => duplicate
layers => merge => merge group
adjust => sharpness => sharpen more
copy / paste the misted landscape as new layer
enable the Pick tool with the following settings, to move
the layer acurately => position X : -77 / position Y
: -125
layers => arrange => move down
layers => duplicate
layers => merge => merge all (flatten)
edit => COPY
7
open the frame tube / you will now work with this new composition
select inside the frame with the magic wand tool
layers => new raster layer
edit => paste into selection
layers => new raster layer
effects => 3D effects => Cutout
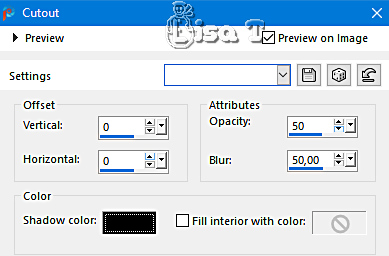
selections => select none
layers => merge => merge all (flatten)
copy / paste the woman tube as new layer
place on the right of the tag (see final result)
drop a shadow of your choice
copy / paste the branch tube as new layer
place on the left of the tag (see final result)
copy / paste the owl tube as new layer - don’t forget
to erase the tuber’s watermark
place on bottom left of the tag (see final result)
copy / paste the corner tube as new layer - don’t
forget to erase the tuber’s watermark
don’t move it
effects => 3D effects => drop shadow => 1 / 1
/ 80 / 1 / black
layers => merge => merge all (flatten)
resize to 1000px width (or other if you prefer)
adjust => sharpness => unsharp mask / 2 - 31 - 5
- tick « luminance onlya »
10
apply your watermark or signature
write your licence number if you used a licenced tube
apply Cloclo’s watermark
image => add borders => tick « symmetric » => 1
px color 1
layers => merge => merge all (flatten)
save your work as... type .jpeg

My tag with my tubes and misted image

Don't hesitate to write to me if you have any trouble
with this translation
If you create a tag with this tutorial
and wish it to be shown, send it to me !
It will be a real great pleasure for me to add it to the
gallery at the end of this translation


back to the boards of Cloclo’s tutorials
20 tutorials on each board
board 2 => 
at the bottom of each board you will find arrows allowing
you to navigate from one board to another


|