

You will find the original tutorial here
:

This tutorial is a personal creation.
Any resemblance with another one would be only pure coincidence.
It is stricly forbidden to modify tubes, to change their
name or take off the matermarks,
To present them on your sites or blog,
To share them in groups,
to make a bank of images, or to use them on lucrative purposes.

Thank you Sass for testing Cloclo’s
tutorials

Thank you to respect Cloclo’s work and the tubers
work.
Don’t hesitate to warn me if you have any trouble
with this translation,
and I’ll try to fix the problem as quickly as I can


supplies
mask - textures - background - decoration tubes - color
palette
The main tube is not provided
other tubes provided are licence free
translator's note : the woman tube I chose was created
by Colybrix HERE

open all the tubes into PSP and
duplicate them. Work with the copies to preserve orignals
open the mask(s) and minimize to tray
copy / paste selections into the folder « selections » of
Corel PSP General folder
double click on the presets to install them ( or import
)
TIP 1 -> if you don’t
want to install a font -->
open it in a software as « Nexus Font » (or
other font viewer software of you choice)
as long as both windows are opened (software and font),
your font will be available in your PSP
TIP 2 -> from PSPX4,
in the later versions of PSP the functions « Mirror » and « Flip » have
been replaced by -->
« Mirror » --> image -> mirror -> mirror horizontal
« Flip » --> image -> mirror -> mirror vertical

Plugins
FunHouse / Evanescence / Zoom
AP Lines / Lines Silverlining / Dotty Grid
Alien Skin / Eye Candy 5 Impact / Glass
Simple / Diamond

 
Use the pencil to mark your place
along the way
hold down left click to grab and move it
 |
 
Important
Open all images with PSP, duplicate them and close the
originals.
Never work with original images.
Cloclo works with PSPX9 ; I work with PSP pro 2019
but you can follow the steps with another version of PSP
don’t forget to save your work often

realization
1
open the alpha layer, duplicate, close the original and
work with the copy
in the materials palette, set colors 1 and 2 as FG and
BG colors

2
prepare a linear gradient
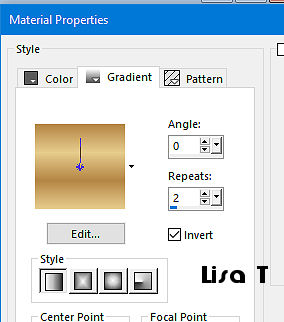
flood fill layer with the gradient
selections => select all
copy / paste the background « fond » into
selection
selections => select none
layers => duplicate
effects => plugins => FunHouse / Evanescence / Zoom
/ 110
effects => edge effects => enhance
effects => reflection effects => kaleidoscope
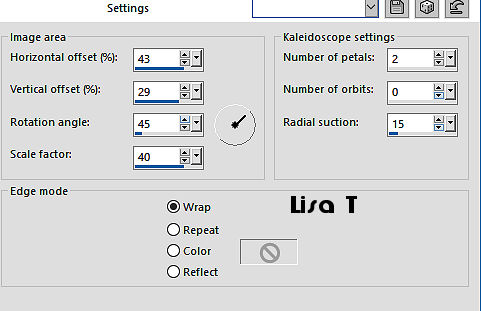
3
effects = > plugins => Simple => Diamonds
layers => new raster layer
flood fill with color 2
layers => new mask layer => from image
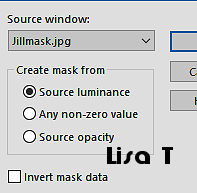
layers => duplicate
adjust => sharpness => sharpen
layers => merge => merge group
4
layers => new raster layer
selections => load-save selection => from alpha channel
=> selection # 1
flood fill selection with the gradient
effects => texture effects => texture
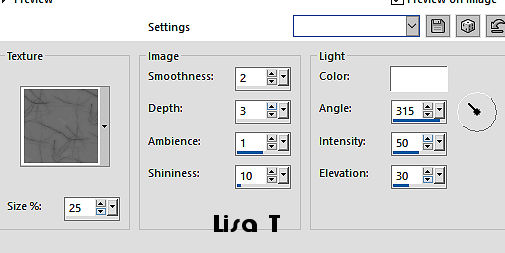
selections => modify => contract => 20
px
flood fill selection with color 2
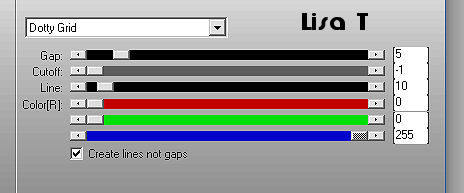
effects => plugins => AP Lines => Lines Silverlining
/ Dotty Grid
effects => plugins => Alien Skin Eye Candy 5 Impact
/ Glass / use the preset provided
selections => select none
layers => duplicate
image -> mirror -> mirror horizontal
layers => merge => merge down
layers => duplicate
image -> mirror -> mirror vertical
layers => merge => merge down
5
copy / paste the « deco 1 » tube
as new layer
copy / paste the « flower » tube as new layer
don’t move it
copy / paste the « deco 2 » tube as new layer
don’t move it
image => add borders => tick « symmetric » => 2
px color 1
image => add borders => tick « symmetric » => 1
px color 2
image => add borders => tick « symmetric » => 10
px color #fef5db
image => add borders => tick « symmetric » => 2
px color 1
image => add borders => tick « symmetric » => 1
px color 2
selections => select all
image => add borders => tick « symmetric » => 10
px any color
selections => invert
flood fill layer with the gradient
selections => invert
effects = > plugins => [AFS IMPORT] => sqborder2
selections => invert
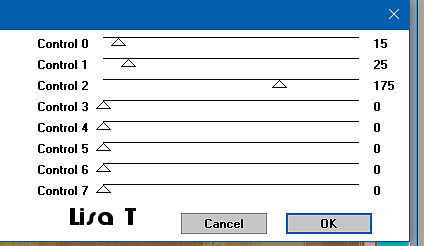
effects => 3D effects => drop shadow => 3 / 3
/ 55 / 10 / black
effects => 3D effects => drop shadow => -3 / -3
/ 55 / 10 / black
selections => select none
6
image => add borders => tick « symmetric » => 2
px color 1
image => add borders => tick « symmetric » => 1
px color 2
image => add borders => tick « symmetric » => 10
px color #fef5db
image => add borders => tick « symmetric » => 2
px color 1
image => add borders => tick « symmetric » => 1
px color 2
image => add borders => tick « symmetric » => 35
px color #fef5db
copy / paste the « deco 3 » tube as new layer
don’t move it
effects => 3D effects => drop shadow => 2 / 32
/ 30 / 10 / black
copy / paste the « perfume » tube as new layer
move bottom left
effects => plugins => Alien Skin Eye Candy 5 Impact
/ Perspective Shadow / preset provided
apply your watermark or signature
write your licence number if you used a licenced tube
adjust => sharpness => unsharp mask / 2 / 20 / 2
/ tick « luminance »
image => resize => tick « resize all layers » => 950
px width
 
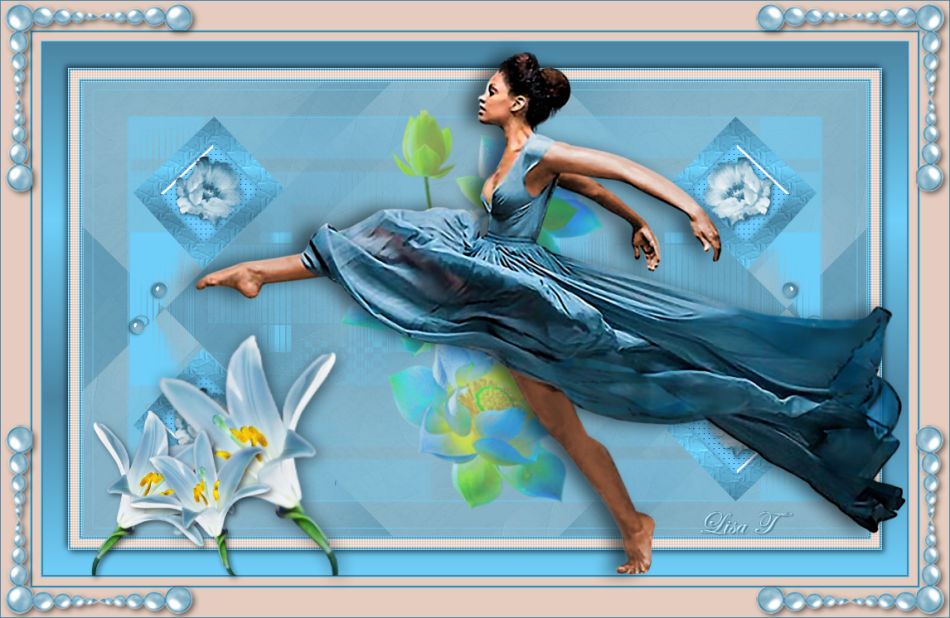
My tag with my tubes (woman and background flower)
Lily flower by Colibrix
Don't hesitate to write to Cloclo if you
have any trouble with her tutorial
If you create a tag with this tutorial
and wish it to be shown, send it to Cloclo !
It will be a real pleasure for her to add it to the gallery
at the end of the tutorial


back
to the boards of Cloclo’s tutorials
board 1 board
2 board
2

|