

You will find the original tutorial here
:

This tutorial is a personal creation.
Any resemblance with another one would be only pure coincidence.
It is stricly forbidden to modify tubes, to change their
name or take off the matermarks,
To present them on your sites or blog,
To share them in groups,
to make a bank of images, or to use them on lucrative purposes.

Thank you Sass for testing Cloclo’s
tutorials

Thank you to respect Cloclo’s work and the tubers
work.
Don’t hesitate to warn me if you have any trouble
with this translation,
and I’ll try to fix the problem as quickly as I can


Material
tubes - masks - color palette - alpha layer (selections
included) - script
The main tube is not provided
translator's note : I used one of my
tubes
other
tubes provided are licence free

open all the tubes into PSP and duplicate
them. Work with the copies to preserve orignals
open (or import) the supplies provided into the appropriate
folders of My Corel PSP
open the mask(s) and minimize to tray
copy / paste selections into the folder « selections » of
Corel PSP General folder
script is to be placed into the folder « Script Restricted » of
my Corel PSP

Hints and Tips
TIP 1 -> if you don’t want to install a
font -->
open it in a software as « Nexus Font » (or
other font viewer software of you choice)
as long as both windows are opened (software and font),
your font will be available in your PSP
TIP 2 -> from PSPX4, in the later versions of PSP the
functions « Mirror » and « Flip » have
been replaced by -->
« Mirror » --> image => mirror => mirror horizontal
« Flip » --> image => mirror => mirror vertical

Filters (plugins) used
Mura's meister / Perspective Tiling
Filtre / I.C.Net Software / Fiters unlimited 2.0 / Filter
Factory Galery G / Magnetic North
Filtre / I.C.Net Software / Fiters unlimited 2.0 / Willy
/ Takinami Bambou Web
Filtre / I.C.Net Software / Fiters unlimited 2.0 / Sapphire
Filters 11 / SapphirePlugins1006
Filtre / Graphics Plus / Cross Shadow
Filtre /A A A Frame / Foto frame

don’t worry about the alert, this site is safe

colors


Use the pencil to mark your place
along the way
hold down left click to grab and move it
 |

Important
Open all images with PSP, duplicate them and close the
originals.
Never work with original images.
Cloclo works with PSP2019 ; I work with PSP pro 2020 Ultimate
if you follow this tutorial with another version of PSP
; the results might be slightly different
don’t forget to save your work often

realization
1
set colors 1 and 2 as FG & BG colors into the
materials palette
2
open the alpha layer, duplicate, close the original and
work with the copy
Rename « Raster 1 »
prepare a linear gradient into the materials palette
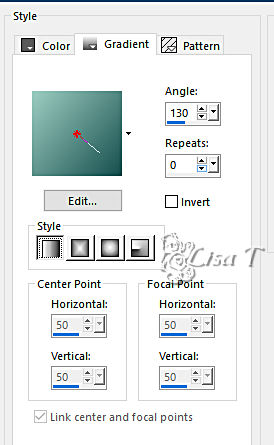
flood fill layer with the gradient
layers => new raster layer
flood fill with color 1
layers => new mask layer => from image
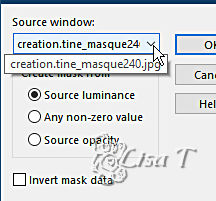
layers => merge => merge group
layers => merge => merge down
layers => duplicate
image => mirror => mirror horizontal
opacity of the layer : 55%
3
effects => plugins => Filter Factory => Gallery
Q / Magnetic North
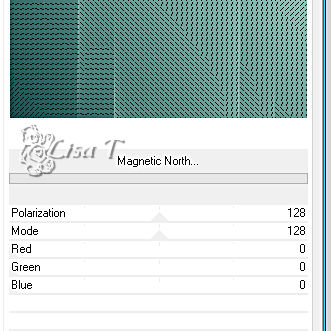
layers => merge => merge down
layers => new raster layer
flood fill with color 2
layers => new mask layer => from image
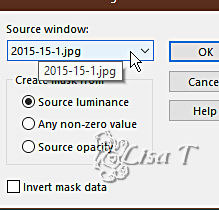
adjust => sharpness => sharpen
layers => merge => merge group
effects => image effects => seamless tiling => default
settings
layers => merge => merge down
copy / paste « déco_Cloclo2 » as new
layer
don’t move it
highlight bottom layer
layers => duplicate
layers => arrange => bring to top
effects => plugins => Mura’s Meister => Perspective
Tiling
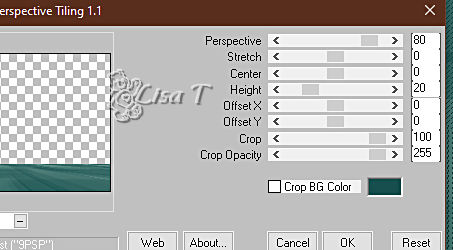
effects => 3D effects => drop shadow => 0 / 0
/ 100 / 15 / black
4
layers => new raster layer
selections => select all
copy / paste « Misted_Cloclo » into selection
selections => select none
place as shown on final result
selections => load-save selection => from alpha channel
=> selection ©Cloclo1
hit the DELETE key of your keyboard
selections => select none
copy / paste « déco_Cloclo3 » as new
layer
objects => align => top
copy / paste « déco_Cloclo1 » as new
layer
objects => align => top
layers => merge => merge all (flatten)
image => add borders => tick « symmetric » => ...
2 px color 2
4 px color 1
selections => select all
image => add borders => tick « symmetric » => ...
15 px color 2
selections => invert
flood fill selection with the gradient
effects => plugins => Unlimited 2 => Willy /
Takinami Bamboo Web
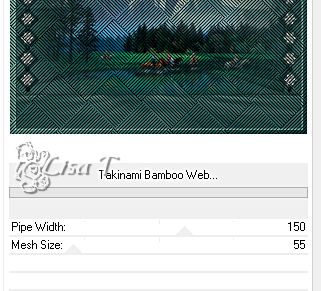
adjust => sharpness => sharpen
selections => select none
5
***** begining of the script *****
image => add borders => tick « symmetric » => ...
2 px color 2
4 px color 1
2 px color 2
selections => select all
image => add borders => tick « symmetric » => ...
45 px color 2
selections => invert
flood fill selection with the gradient => tick « invert » when
changing the settings of the gradient
effects => plugins => Graphic Plus => Cross Shadow
/ default settings
selections => invert
effects => 3D effects => drop shadow => 0 / 0
/ 100 / 15 / black => twice
selections => invert
selections => promote selection to layer
***** end of the script *****
effects => plugins => Unlimited 2 => Sapphire
Filters 11 / SapphirePlugins1006
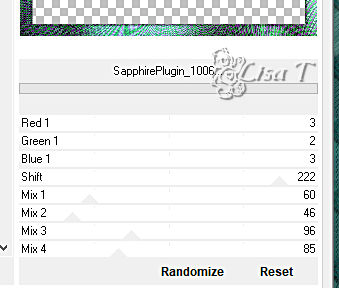
blend mode of the layer : Luminance (Legacy)
selections => select none
6
image => add borders => tick « symmetric » => ...
1 px color 1
effects => plugins => AAA Frames => Foto Frame
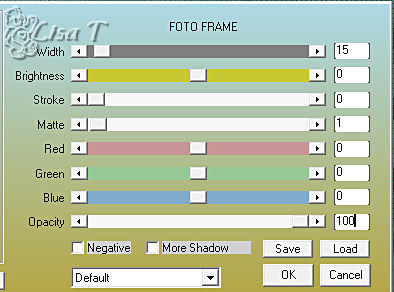
copy / paste « déco_Cloclo » as new
layer / don’t move it
copy / paste the character tube as new layer / place where
you like
drop a shadow of your choice
Or
use the preset provided for => Alien Skin Eye Candy
5 / Impact / Perspective Shadow
layers => merge => merge all (flatten)
apply your watermark or signature
write your licence number if you used a licensed tube
adjust => sharpness => unsharp mask / 4 / 20 / 2
/ tick « Luminance only »
save your work as... type .jpeg

My tag with my tube and misted landscape

Don't hesitate to write to Cloclo if you
have any trouble with her tutorial
If you create a tag with this tutorial
and wish it to be shown, send it to Cloclo !
It will be a real pleasure for her to add it to the gallery
at the end of the tutorial


back to the board of Cloclo’s tutorials
board 1 board 2 board 2


|