

You will find the original tutorial here :

This tutorial is a personal creation.
Any resemblance with another one would be only pure
coincidence.
It is stricly forbidden to modify tubes, to change
their name or take off the matermarks,
To present them on your sites or blog,
To share them in groups,
to make a bank of images, or to use them on lucrative purposes.

Thank you to respect Christ’s work and the tubers
work.
Don’t hesitate to warn me if you have any trouble
with this translation,
and I’ll try to fix the problem as quickly as I can

Christ worked with PSP X2 and I worked with PSP2020
you can follow this tutorial with another version of PSP,
but the result might be slightly different

Supplies
tubes– selections – palette – masks
.gif)

Hints and Tips
TIP 1 -> if you don’t want to install a
font -->
open it in a software as « Nexus Font » (or
other font viewer software of you choice)
as long as both windows are opened (software and font),
your font will be available in your PSP
TIP 2 -> from PSPX4, in the later versions of PSP the
functions « Mirror » and « Flip » have
been replaced by -->
« Mirror »has become --> image => mirror => mirror
horizontal
« Flip » has become --> image => mirror => mirror
vertical

Plugins needed
Toadies
Unlimited 2.0
Flaming Pear’s / Flexify 2
Alien Skin / Eye Candy 5 Impact
AAA Frames

Use the pencil to mark your place
along the way
hold down left click to grab and move it
 |

prepare your work
duplicate all the tubes and work with the copies
to preserve originals
save your work often in case of problems with your psp
place selections into the dedicated folder of your PSP
general folder
open the masks and minimize to tray
use the Dropper tool to pick up your colors into your tubes
and misted images
Christ chose these :
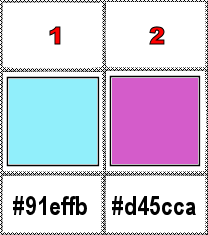
don’t hesitate to change blend modes and opacities
of the layers to match your personal colors and tubes
1
open a new image => transparent => 900 * 600
px
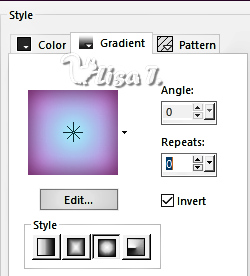
prepare a sunburst gradient in the materials palette
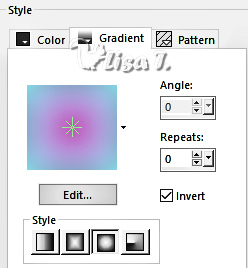
2
flood fill layer with the gradient
effects => plugins => Toadies => Weaver

effects => distortion effects => Twirl => -105
adjust => sharpness => sharpen more
effects => image effects => seamless tiling
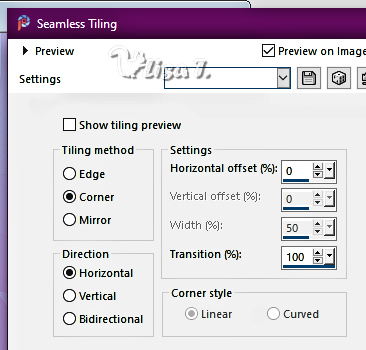
effects => edge effects => enhance
3
layers => duplicate
effects => plugins => Unlimited 2 => Funhouse
=> Quantum Tile
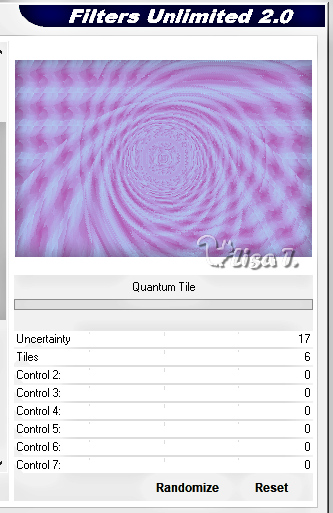
opacity of the layer : 50%
optional => adjust => Brightness and Contrast => Brightness/Contrast
settings to suit your colors
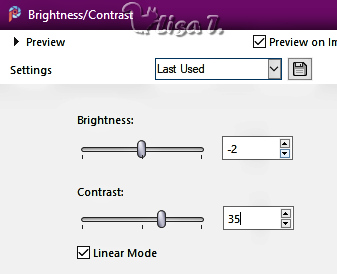
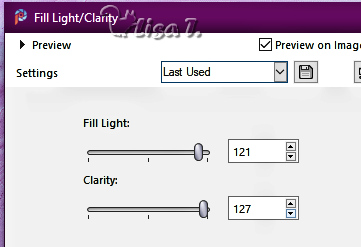
optional adjust => Brightness and Contrast => Fill
Light/Clarity
settings to suit your colors
4
layers => new raster layer
flood fill white
layers => new mask layer => from image
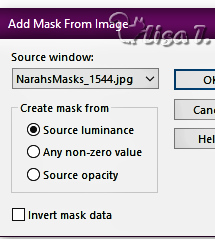
layers => merge => merge group
effects => 3D effects => drop shadow => 0 / 0
/ 80 / 5 / color 1
effects => edge effects => enhance
layers => duplicate
layers => merge => merge down
5
layers => new raster layer
flood fill with color 1
layers => new mask layer => from image
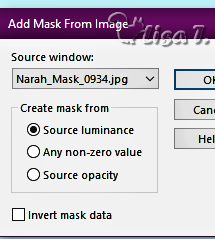
layers => merge => merge group
effects => plugins => Flaming Pear => Flexify
2
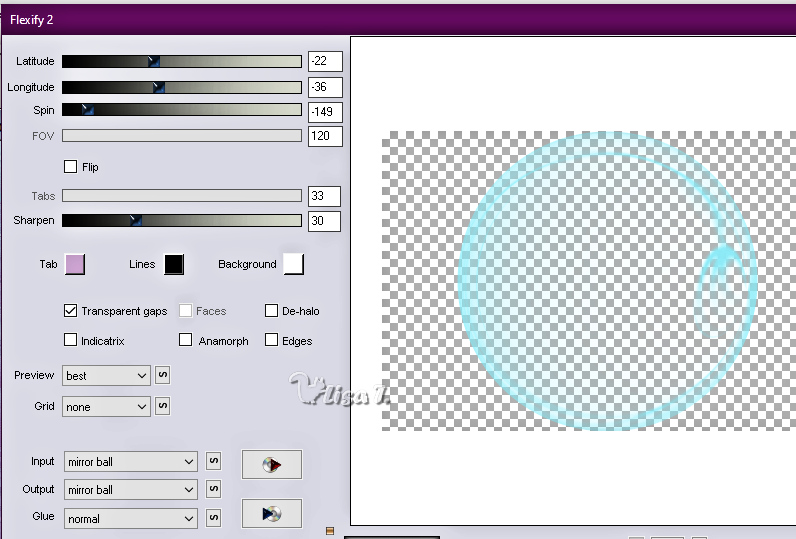
image => resize => untick « resize all layers » => 80%
effects => 3D effects => drop shadow => 0 / 0
/ 29 / 7 / black
6
layers => new raster layer
selections => load-save selection => from disk => selection
#Sylou
copy / paste the landscape tube into selection
kreep selection active
layers => arrange => move down
layers => new raster layer
effects => 3D effects => cutout
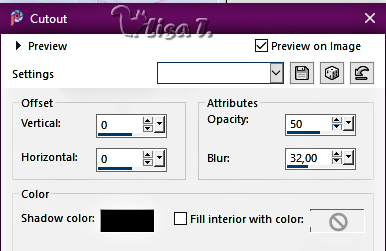
layers => merge => merge down
highlight top layer
7
layers => new raster layer
effects => plugins => Alien Skin Eye Candy 5 Impact
/ Glass
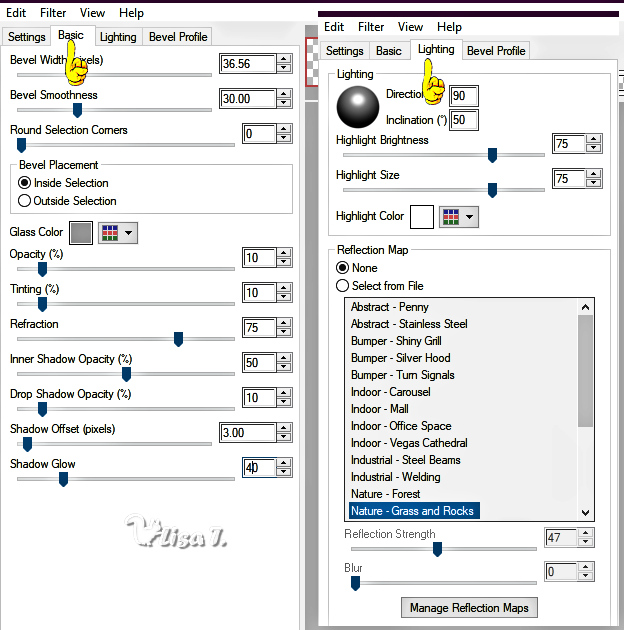
layers => merge => merge down TWICE
selections => modify => expand => 21 px
selections => modify = > select selection borders
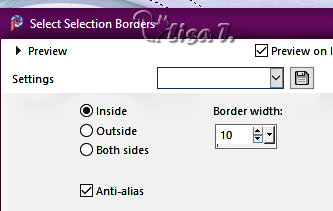
invert colors of the halo gradient in the materials palette
8
layers => new raster layer
flood fill selection with the gradient
effects => edge effects => enhance
selections => select none
effects => plugins => Unlimited 2 => FunHouse
=> Circus Maximus
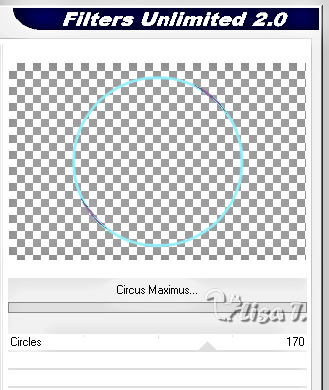
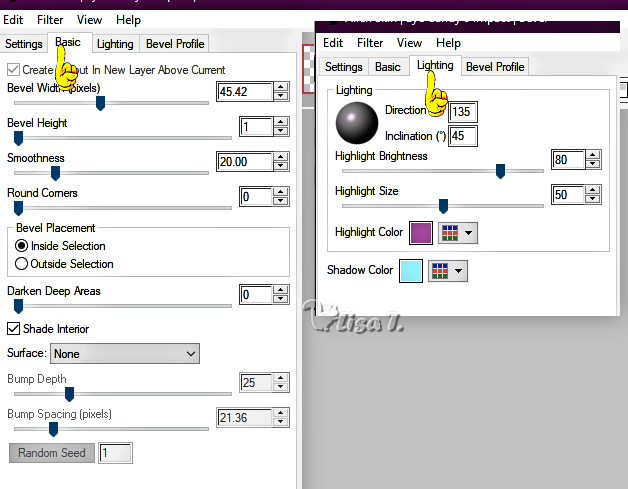
effects => plugins => Alien Skin Eye Candy 5 Impact
/ Bevel / colors 1 & 2
effects => 3D effects => drop shadow => 0 / 0
/ 100 / 0 / black
highlight « group Raster 2 » (middle
layer)
9
layers => new raster layer
flood fill white
layers => new mask layer => from image
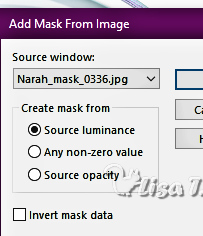
DON’T merge group
effects => image effects => offset => H : 112
/ V : 0 / tick « custom » and « color
(black) »
effects => distortion effects => Warp
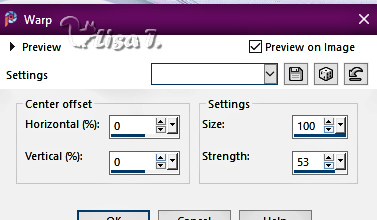
effects => image effects => offset => H : -91
/ V : 0 / tick « custom » and « color
(black) »
layers => merge => merge group
layers => duplicate
image => mirror => mirror horizontal
layers => merge => merge down TWICE
10
this step is optional, if you want to create the animation
if not, go directly to step 11
highlight Raster 2 => edit => copy
edit => paste as new image
set aside for a later use (minimize to tray)
11
go back to your work
highlight « copy of Raster 1 »
selections => load-save selection => from disk => selection
#Sylou 2
selections => promote selection to layer
selections => select none
effects => plugins => Unlimited 2 => Distort => Radial
Zig Zag
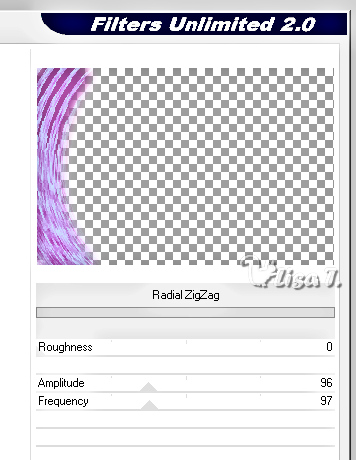
effects => edge effects => enhance
layers => duplicate
image => mirror => mirror horizontal
image => mirror => mirror vertical
layers => merge => merge down
effects => plugins => AAA Frames => Foto Frame
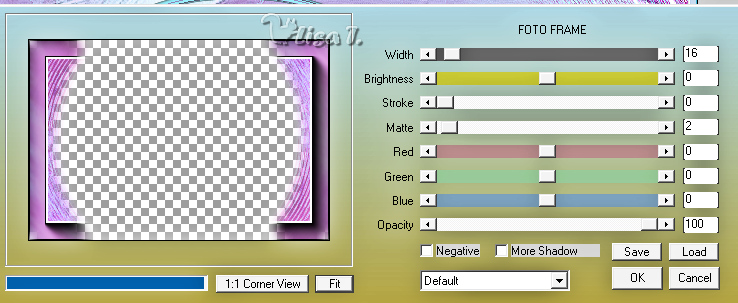
highlight top layer
12
layers => new raster layer
selections => select all
effects => 3D effects => cutout
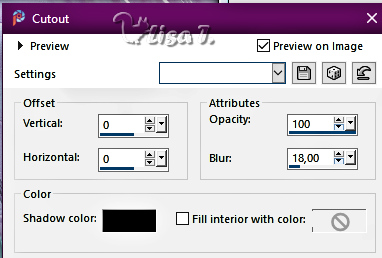
selections => select none
edit => copy special => copy merged
13
image => add borders => tick « symmetric » => ...
2 px color 1
2 px color 2
30 px white
select the 30 px border with the Magic Wand tool
edit => paste into selection
adjust => blur => gaussian blur => 2
effects => 3D effects => Inner Bevel
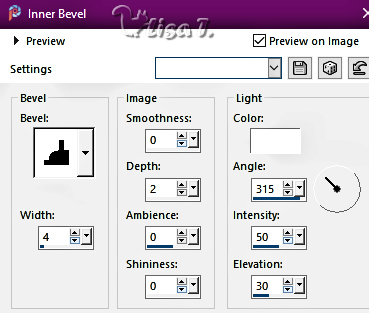
selections => modify => contract => 9 px
effects => plugins => Unlimited 2 => Special Effects
1 / Shiver
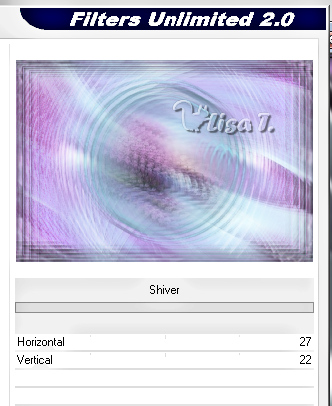
effects => edge effects => enhance
14
layers => new raster layer
effects => 3D effects => cutout
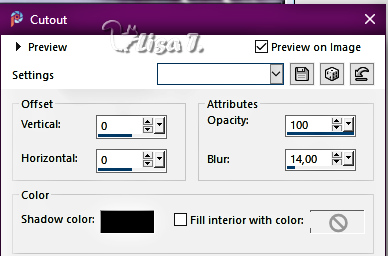
selections => select none
layers => merge => merge down
effects => plugins => Unlimited 2 => Buttons & Frames
/ Glass Frame 2
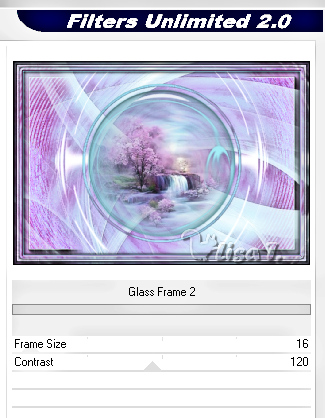
15
copy / paste the character tube as new layer
don’t forget to erase the watermark
image => resize => untick « resize all layers » => 61%
effects => image effects => offset => H : -285
/ V : -7 / tick « custom » and « transparent »
effects => 3D effects => drop shadow => 0 / 0
/ 50 / 30 / black
16
apply your watermark or signature on a new layer
write your licence number if you used a licenced tube
layers => merge => merge all (flatten)
Animation
17
activate the image set aside in step 10
layers => new raster layer
selections => load-save selection => from disk => selection
#Sylou 3
flood fill selection with the gradient

selections => select none
layers => arrange => move down
18
highlight top layer
effects => plugins => Unlimited 2 => Distort => Radial
Zig Zag

layers => merge => merge down
edit => COPY
back to your main work
edit => paste as new layer
layers => arrange => move down
this layer must be in the second position from the bottom
of the layers in the materials palette
effects => 3D effects => drop shadow => 0 / 0
/ 30 / 30 / black
19
edit => copy special => copy merged
open Animation Shop
edit => paste as new animation
20
back to your main work
view => tick « Rulers »
enable the Pick tool
push the middle node on the right to left side => 720
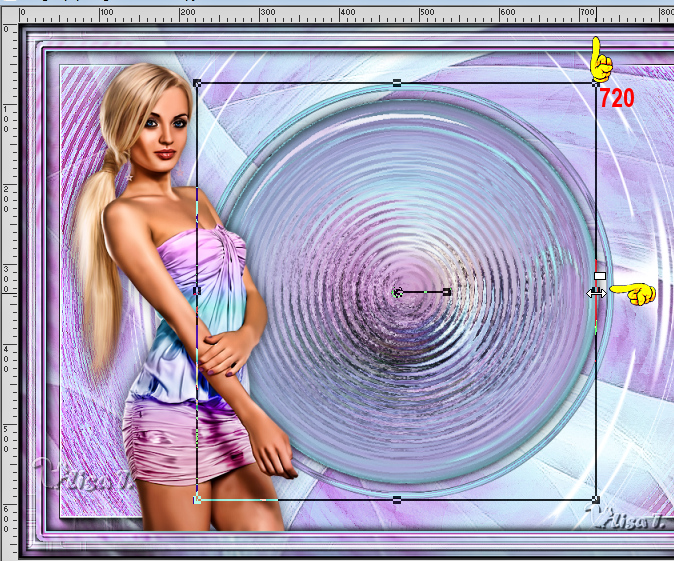
edit => copy special => copy merged
in AS => edit => paste after current frame
21
back to PSP
push the middle node to left side => 690
edit => copy special => copy merged
in AS => edit => paste after current frame
22
back to PSP
push the middle node to left side => 660
edit => copy special => copy merged
in AS => edit => paste after current frame
23
back to PSP
push the middle node to left side => 630
edit => copy special => copy merged
in AS => edit => paste after current frame
24
back to PSP
push the middle node to left side => 600
edit => copy special => copy merged
in AS => edit => paste after current frame
25
back to PSP
push the middle node to left side => 570
edit => copy special => copy merged
in AS => edit => paste after current frame
26
back to PSP
push the middle node to left side => 540
edit => copy special => copy merged
in AS => edit => paste after current frame
27
back to PSP
push the middle node to left side => 510
edit => copy special => copy merged
in AS => edit => paste after current frame
28
back to PSP
push the middle node to left side => 480
edit => copy special => copy merged
in AS => edit => paste after current frame
29
back to PSP
push the middle node to left side => 450
edit => copy special => copy merged
in AS => edit => paste after current frame
30
back to PSP
push the middle node to left side => 420
edit => copy special => copy merged
in AS => edit => paste after current frame
31
back to PSP
push the middle node to left side => 390
edit => copy special => copy merged
in AS => edit => paste after current frame
32
back to PSP
push the middle node to left side => 360
edit => copy special => copy merged
in AS => edit => paste after current frame
33
back to PSP
push the middle node to left side => 330
edit => copy special => copy merged
in AS => edit => paste after current frame
34
back to PSP
push the middle node to left side => 300
edit => copy special => copy merged
in AS => edit => paste after current frame
35
back to PSP
push the middle node to left side => 270
edit => copy special => copy merged
in AS => edit => paste after current frame
36
the last image is active => animation => image properties
=> 30
37
highlight the first image of the animation => animation
=> image properties => 30
38
edit => select all
edit => COPY
highlight last image
edit => paste after selected frame
leave selection active
animation => reverse frames
39
view the animation to make sure everything is all right
file => save your work as... type .gif

Another version with my tube and misted image


Don't hesitate to write to me if you have any trouble
with this tutorial
If you create a tag (using other tubes and colors than
those provided) with this translation
and wish it to be shown, don’t hesitate to send it
to me
It will be a real pleasure for me to add it to the gallery
at the bottom of this translation


cretaed by  Knipledamen Knipledamen
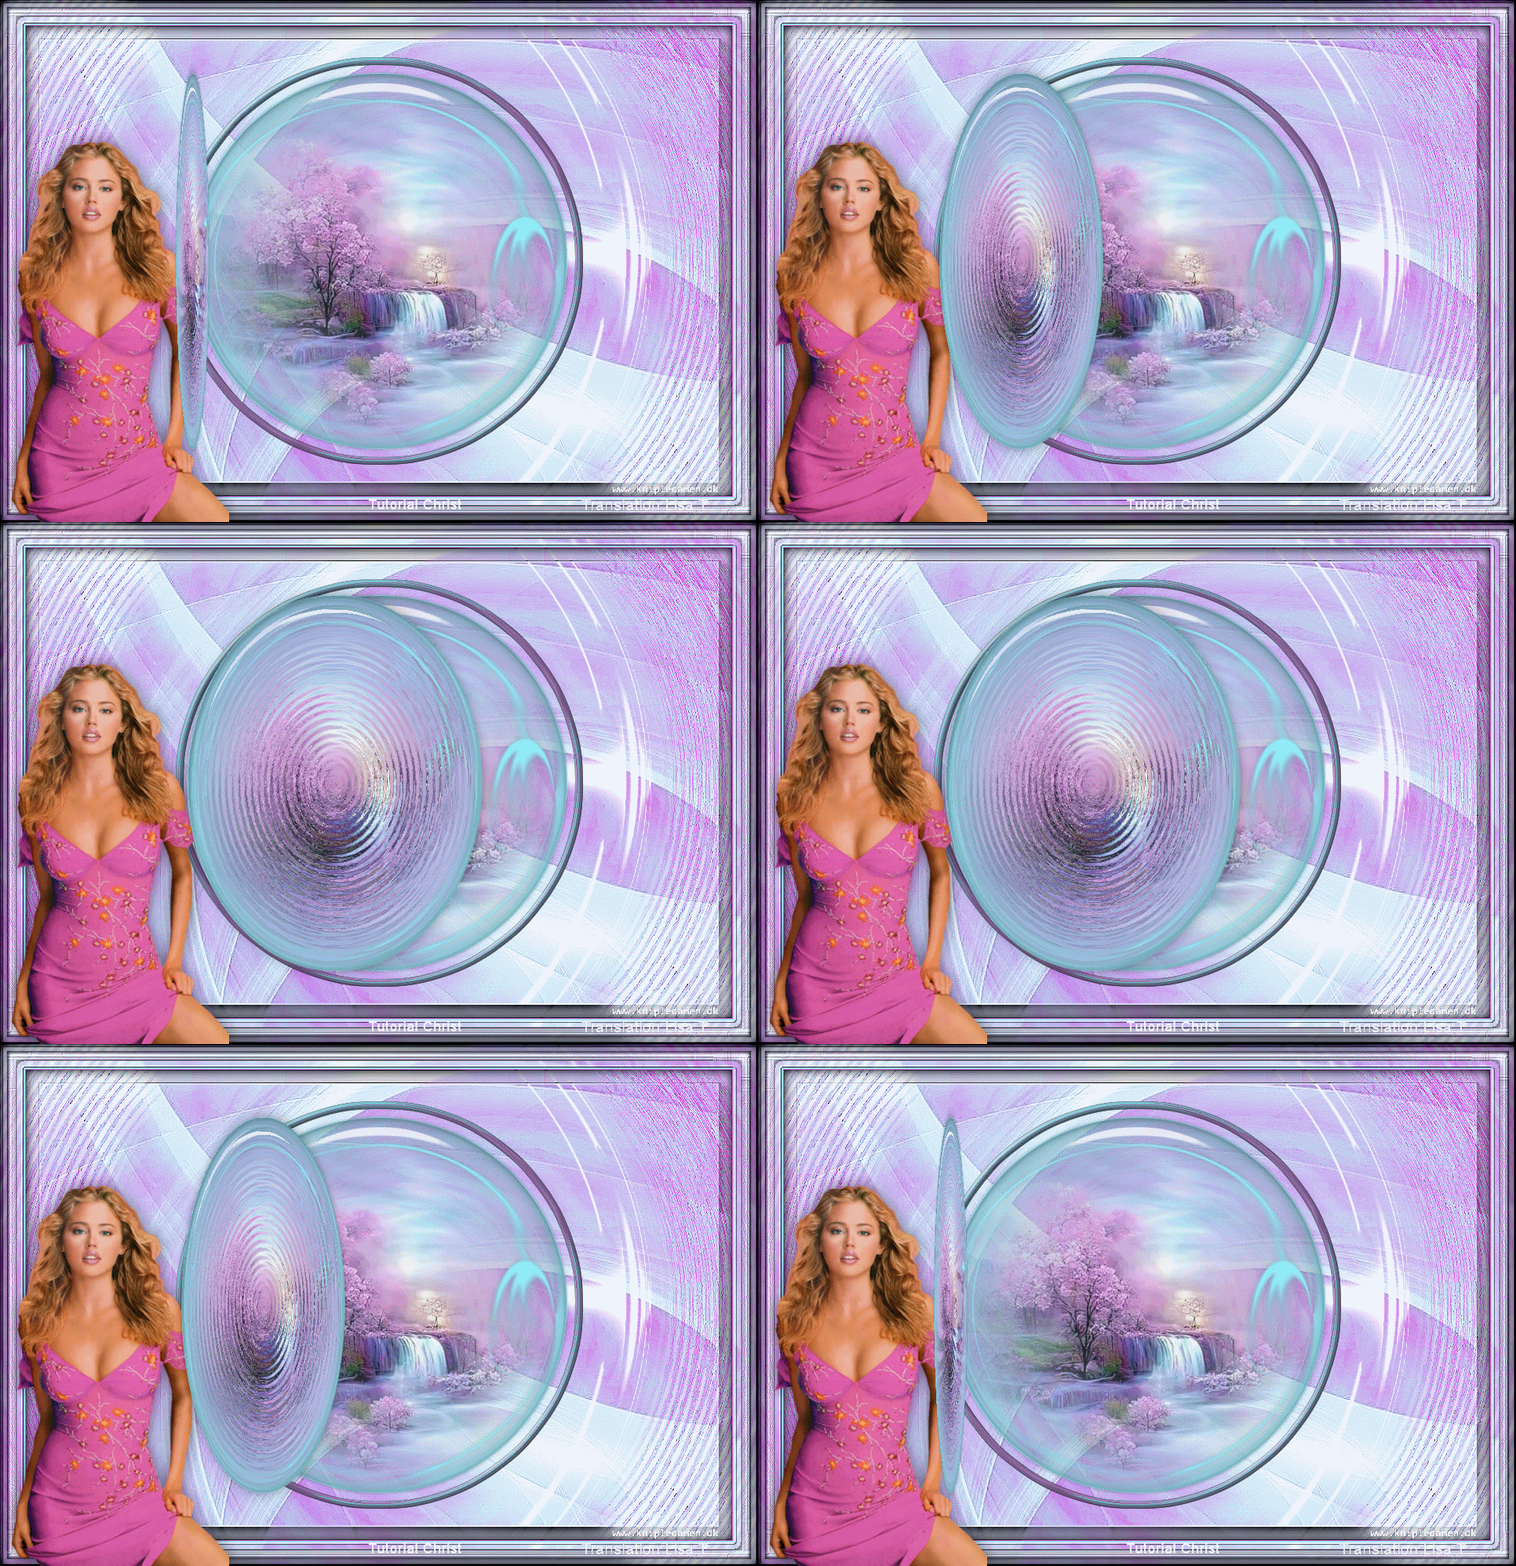

back to the boards of Christ’s tutorials
20 tutorials on each board
board 2 => 
at the bottom of each board you will find arrows allowing
you to navigate from one board to another


|