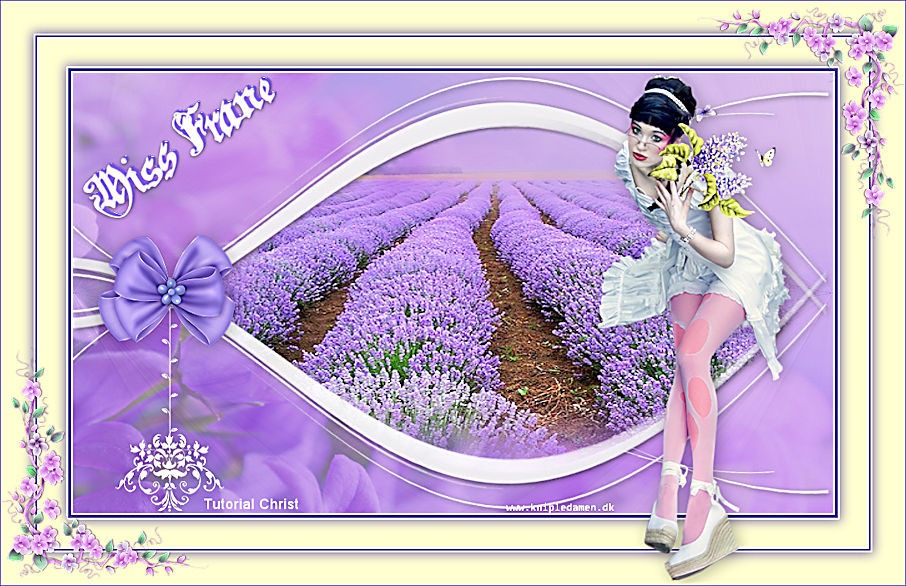

You will find the original tutorial here :

This tutorial is a personal creation.
Any resemblance with another one would be only pure
coincidence.
It is stricly forbidden to modify tubes, to change
their name or take off the matermarks,
To present them on your sites or blog,
To share them in groups,
to make a bank of images, or to use them on lucrative purposes.

Thank you to respect Christ’s work and the tubers
work.
Don’t hesitate to warn me if you have any trouble
with this translation,
and I’ll try to fix the problem as quickly as I can

Christ worked with PSP X2 and I worked with PSP2020
you can follow this tutorial with another version of PSP,
but the result might be slightly different

Supplies
tubes and images – selection – palette – mask

place the selection into the dedicated folder of
My Corel PSP
open the mask and minimize to tray

Hints and Tips
TIP 1 -> if you don’t want to install a font -->
open it in a software as « Nexus Font » (or
other font viewer software of you choice)
as long as both windows are opened (software and font),
your font will be available in your PSP
TIP 2 -> from PSPX4, in the later versions of PSP the
functions « Mirror » and « Flip » have
been replaced by -->
« Mirror »has become --> image => mirror => mirror
horizontal
« Flip » has become --> image => mirror => mirror
vertical

Plugins needed
no plugin needed

Use the pencil to mark your place
along the way
hold down left click to grab and move it
 |

prepare your work
duplicate all the tubes and work with the copies
to preserve originals
save your work often in case of problems with your psp
double-click on the preset to install
place selections into the dedicated folder of your PSP
general folder
open the masks and minimize to tray
use the Dropper tool to pick up your colors into your tubes
and misted images
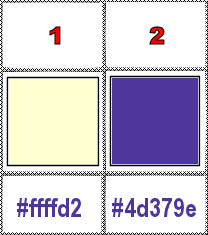
Christ chose these :

don’t hesitate to change blend modes and opacities
of the layers to match your personal colors and tubes
1
open a new image => transparent => 950 * 570
px
selections => select all
copy / paste « Fond image violette » into
selection
selections => select none
2
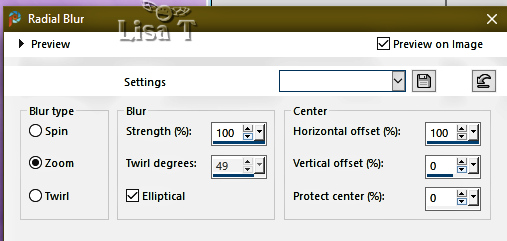
adjust => blur => radial blur

3
layers => duplicate
image => mirror => mirror horizontal
opacity of the layer : 50%
layers => merge => merge down
effects => edge effects => enhance more
effects => edge effects => enhance
depending on your image and colors, you may only need to
apply once, as color stripes could degrade the effect
4
layers => new raster layer
selections => select all
copy / paste « Floral Fond » into selection
opacity of the layer : 40%
selections => select none
5
layers => new raster layer
flood fill white
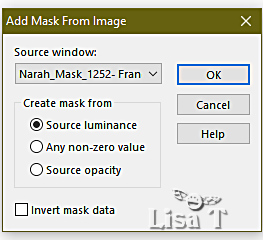
layers => new mask layer => from image

layers => merge => merge group
layers => duplicate
layers => merge => merge down
6
selections => load-save selection => from disk => selection
#Frane Selection
selections => modify => expand => 6 px
layers => new raster layer
copy / paste « Tubes Lavande du Net » into
selection
adjust => sharpness => sharpen
selections => select none
layers => arrange => move down
highlight top layer
layers => merge => merge down
effects => 3D effects => drop shadow => 2 / 2
/ 60 / 10 / black / Tick « shadow on new layer »
selections => load-save selection => from disk => selection
#Frane Selection
hit the DELETE key of your keyboard
selections => select none
highlight top layer
layers => merge => merge down
7
copy / paste « Déco Miss Frane » as
new layer
effects => image effects => offset => H : -354
/ V : -29 / tick « custom » and « transparent »
effects => 3D effects => drop shadow => 2 / -2
/ 30 / 20 / black / UN-Tick « shadow on new layer »
8
copy / paste « Déco Nœud Lavande » as
new layer
effects => image effects => offset => H : -358
/ V : 3 / tick « custom » and « transparent »
effects => 3D effects => drop shadow => 2 / -1
/ 30 / 30 / black / UN-Tick « shadow on new layer »
9
layers => merge => merge visible
image => add borders => tick « symmetric » => 2
px white
image => add borders => tick « symmetric » => 4
px color 2
image => add borders => tick « symmetric » => 2
px white
image => add borders => tick « symmetric » => 35
px color 1
10
enable the Magic Wand tool

select the 35 px border with the Magic Wand tool
selections => invert
effects => 3D effects => drop shadow => 3 /3 /
50 / 20 / color 2 / UN-Tick « shadow on new layer »
effects => 3D effects => drop shadow => -3 /-3
/ 50 / 20 / color 2 / UN-Tick « shadow on new layer »
selections => select none
11
image => add borders => tick « symmetric » => 2
px white
image => add borders => tick « symmetric » => 2
px color 2
image => add borders => tick « symmetric » => 2
px white
image => add borders => tick « symmetric » => 40
px color 1
12
select the 40 px border with the Magic Wand tool
selections => invert
effects => 3D effects => drop shadow => -3 /-3
/ 50 / 20 / color 2 / UN-Tick « shadow on new layer »
effects => 3D effects => drop shadow => 3 /3 /
50 / 20 / color 2 / UN-Tick « shadow on new layer »
selections => select none
13
copy / paste « Tube Femme Colybrix » as new
layer
image => resize => untick « resize all layers » => 90%
effects => image effects => offset => H : 302/
V : -44 / tick « custom » and « transparent »
effects => 3D effects => drop shadow =>=3 / 3
/ 30 / 30 / black
14
image => add borders => tick « symmetric » => 1
px white
image => add borders => tick « symmetric » => 1
px color 2
15
copy / paste « Coin fleurs Frane » as new layer
effects => image effects => offset => H : 436/
V : 212 / tick « custom » and « transparent »
layers => duplicate
image => mirror => mirror horizontal
image => mirror => mirror vertical
16
copy / paste « Titre Miss Frane » as new layer
effects => image effects => offset => H : -341/
V : 180 / tick « custom » and « transparent »
apply your watermark or signature on a new layer
write your licence number if you used a licenced tube
layers => merge => merge all (flatten)
file => save your work as... type .jpeg

Another version with
my tube and a my misted image (with one of my personal
photos)


Don't hesitate to write to me if you have any trouble
with this tutorial
If you create a tag (using other tubes and colors than
those provided) with this translation
and wish it to be shown, don’t hesitate to send it
to me
It will be a real pleasure for me to add it to the gallery
at the bottom of this translation


created by  Knipledamen Knipledamen


back to the boards of Christ’s tutorials
20 tutorials on each board
board 2 => 
at the bottom of each board you will find arrows allowing
you to navigate from one board to another


|