

You will find the original tutorial here :

This tutorial is a personal creation.
Any resemblance with another one would be only pure coincidence.
It is stricly forbidden to modify tubes, to change their name or take off the matermarks,
To present them on your sites or blog,
To share them in groups,
to make a bank of images, or to use them on lucrative purposes.

Thank you to respect Christ’s work and the tubers work.
Don’t hesitate to warn me if you have any trouble with this translation,
and I’ll try to fix the problem as quickly as I can

Christ worked with PSP X2 and I worked with PSP2020
you can follow this tutorial with another version of PSP, but the result might be slightly different

Supplies
tubes – selections – palette - mask


Hints and Tips
TIP 1 -> if you don’t want to install a font -->
open it in a software as « Nexus Font » (or other font viewer software of you choice)
as long as both windows are opened (software and font), your font will be available in your PSP
TIP 2 -> from PSPX4, in the later versions of PSP the functions « Mirror » and « Flip » have been replaced by -->
« Mirror »has become --> image => mirror => mirror horizontal
« Flip » has become --> image => mirror => mirror vertical

Plugins needed
Effets / Unlimited 2.0 / &‹Bkg Designers sf10 II› MURUs Wave
Effets / Unlimited 2.0 / &‹Bkg Designer sf10 III› / Tremors
Effets / AAA Frames / Foto Frame
Effets / Unlimited 2.0 / &‹Bkg Designers sf10 IV› / ‹Light Burst…›
Effets / Flaming Pears / Flexify 2

Use the pencil to mark your place
along the way
hold down left click to grab and move it
 |

prepare your work
duplicate all the tubes and work with the copies to preserve originals
save your work often in case of problems with your psp
place selections into the dedicated folder of your PSP general folder
open the mask and minimize to tray
don’t forget to erase the tuber’s watermark
use the Dropper tool to pick up your colors into your tubes and misted images
Christ chose these :
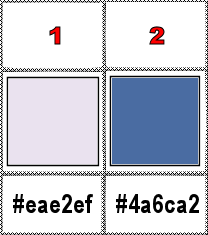
don’t hesitate to change blend modes and opacities of the layers to match your personal colors and tubes
1
prepare a sunburst gradient in the materials palette
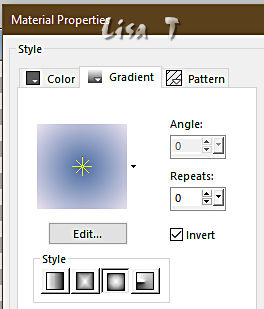
open a new image => transparent => 900 * 600 px
flood fill with the gradient
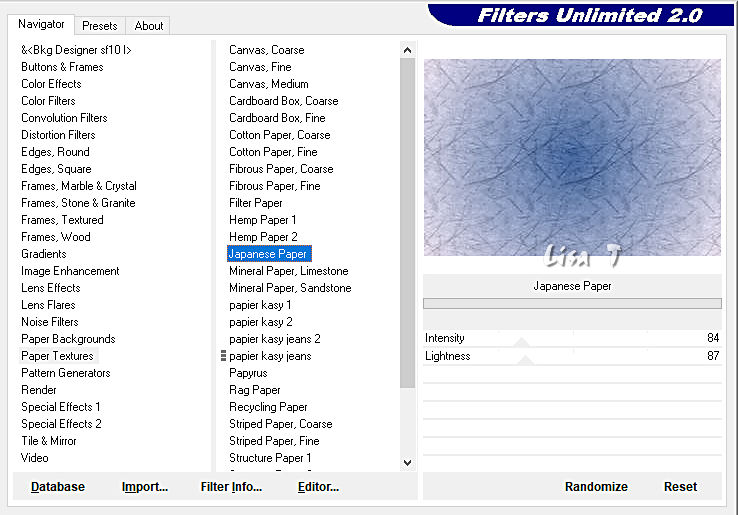
effects => plugins => Unlimited 2 => Paper Textures / Japanese Paper
2
layers => duplicate
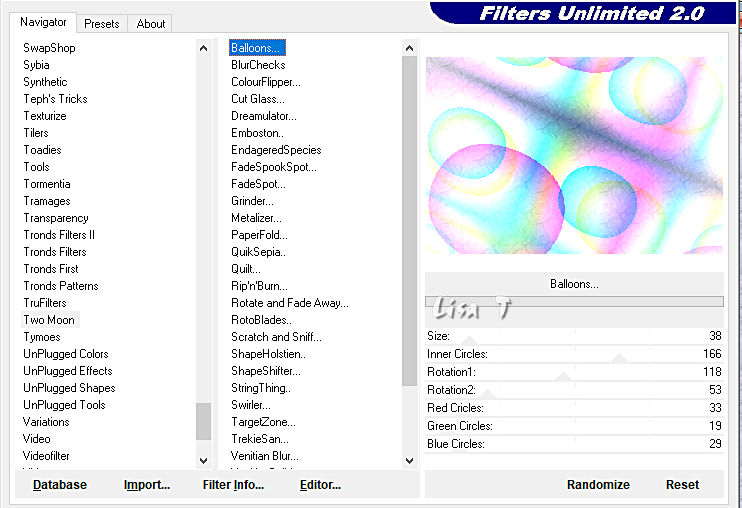
effects => plugins => Unlimited 2 => Two Moon => Baloons
opacity of the layer => 50%
blend mode of the layer : Luminance (Legacy)
effects => image effects => seamless tiling
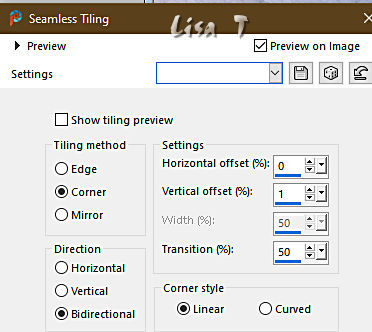
effects => edge effects => enhance
layers => new raster layer
selections => load-save selection => from disk => selection #1
flood fill selection White
selections => select none
opacity of the layer => 40%
3
layers => new raster layer
flood fill layer with color 2
layers => new mask layer => from image
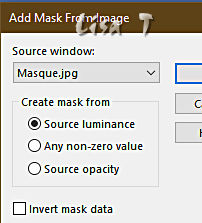
effects => edge effects => enhance more
layers => merge => merge group
layers => duplicate TWICE
layers => merge => merge down TWICE
4
layers => new raster layer
selections => load-save selection => from disk => selection #2
flood fill selection with color 2
selections => select none
effects => plugins => Freeware Filters => Needles & Pins

effects => 3D effects => drop shadow => 1 / 1 / 100 / 2 / WHITE and tick “Shadow on new layer”
layers => duplicate
layers => merge => merge down
highlight top layer
5
layers => new raster layer
selections => load-save selection => from disk => selection #3
copy / paste « Wisteria_colorel » into selection
selections => select none
adjust => sharpness => sharpen more
6
image => add borders => tick « symmetric » => ...
2 px color 2
4 px white
2 px color 2
Edit => COPY
40 px any color
select the 40 px border with the Magic Wand tool
edit => paste into selection
7
effects => distortion effects => Ripples / color 2
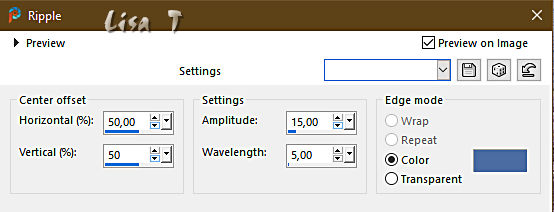
selections => select none
8
image => add borders => tick « symmetric » => ...
2 px color 2
4 px white
2 px color 2
9
copy / paste the character tube as new layer
image => resize => untick « resize all layers » => 75%
effects => image effects => offset => H : -285 / V : -6 / tick « custom » and « transparent »
effects => 3D effects => drop shadow => 2 / 2 / 100 / 35 / Balck and UN-tick “Shadow on new layer”
10
selections => load-save selection => from disk => selection #4
hit the DELETE key of your keyboard
selections => select none
11
copy / paste the text tube as new layer
image => resize => untick « resize all layers » => 45%
effects => image effects => offset => H : 132 / V : -208 / tick « custom » and « transparent »
colorize to match your personal colors
12
apply your watermark or signature on a new layer
write your licence number if you used a licenced tube
layers => merge => merge all (flatten)
file => save your work as... type .jpeg

Another version with my tube and misted image


Don't hesitate to write to me if you have any trouble with this tutorial
If you create a tag (using other tubes and colors than those provided) with this translation
and wish it to be shown, don’t hesitate to send it to me
It will be a real pleasure for me to add it to the gallery at the bottom of this translation


coming  soon soon

back to the boards of Christ’s tutorials
20 tutorials on each board
board 3 => 
at the bottom of each board you will find arrows allowing you to navigate from one board to another


|