
The original tutorial can be found HERE
Conditions of use of the material provided
It is forbidden to modifiy, change the name, take off the
watermarks or alter the tubes.
It is forbidden to share them in groups or offer them on
your site, blog or forum without permission
If you want to use them to create a tutorial, you must ask
the permission to the authors.
This is a personal work.
any resemblance with another tutorial would be pure coincidence
it is forbidden to share it or distribute it on the Web,
to present it in a group or forum without the author’s
permission
« Chez Douceur » is happy to share her work with you
she hopes it will help you dream and get away from your eveyday
life

Material

thank you to the tubers for their great work
open tubes, duplicate them and work with the copies
open the mask and minimize it to tray
copy / paste selections into the folder « selections » of
Corel PSP Folder
TIP 1 -> if you don’t want to install
a font -->
open it in a software as « Nexus Font » (or
other font viewer software of you choice)
as long as both windows are opened (software and font),
your font will be available in your PSP
TIP 2 -> from PSPX4, in the later versions
of PSP the functions « Mirror » and « Flip » have
been replaced by -->
« Mirror » --> image -> mirror -> mirror horizontal
« Flip » --> image -> mirror -> mirror vertical
to prevent the theft of tubes, they are no longer provided
in the ZIP material
the only material provided is : decorations, masks
and selections
you will have to use your personal collection

Filters
AAA / Texture Frames
Thank you Tine for sharing your plugins page


translator’s note
« Chez Douceur » works with PSP X, I use PSPX9 to create
my personal tags and write my translations
but this tutorial can be realized with another version
according to the version of PSP you use, the results might
be slightly differents
don’t hesitate to change the blend modes of the layers
to match your tubes and colors
I dropped a shadow on each element, but Chez Douceur
didn’t

colors

color 1 --> foreground color --> FG --> left click
--> #485f57
color 2 --> background color --> BG --> right
click --> #bdccc9
if you change the colors, chosse them into your main tube
and set a dark color as FG color, and a light color as
BG color

Use the pencil to follow the steps
hold down left click to grab it and move it


Realization
1
open a new transparent image 950 * 550 pixels
2
flood fill with color 1
3
layers -> new raster layer
flood fill with color 2
4
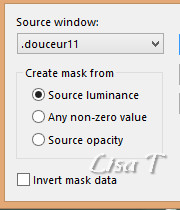
layers -> new mask layer -> from image
5
layers -> merge -> merge group
6
effects -> image effects -> seamless tiling / default
settings
7
blend mode of the layer : Multiply - opacity :
65%
8
copy / paste as new layer « ial-ser-frame »
9
image -> resize -> untick « resize all
layers » -> 80%
don’t move it
adjust -> sharpness -> sharpen
10
resize « NLD Overlay with snow » -> untick « resize
all layers » -> 80%
copy / paste as new layer
11
enable the Pick Tool with the following settings (to move
the tube in a very precise way)

12
layers -> arrange -> move down
adjust -> sharpness -> sharpen
13
copy / paste as new layer the « déco
Boule » tube
14
enable the Pick Tool with the following settings (to move
the tube in a very precise way)

15
copy / paste as new layer « clarey_christmascharm_candles »
16
enable the Pick Tool with the following settings (to move
the tube in a very precise way)

17
copy / paste as new layer the character tube
move it to the right of the tag
layers -> arrange -> bring to top
18
copy / paste as new layer « World Art Deco_text »
move it where you like
19
colorize to match you colors
adjust -> sharpness -> sharpen
20
apply your watermark
21
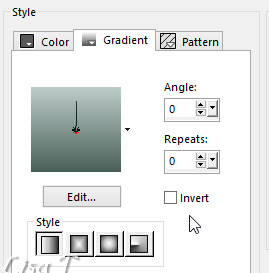
in the materials palette, prepare a linear gradient
22
image -> add borders -> tick « symmetric » -> ...
3 pixels color 2
3 pixels color 1
3 pixels color 2
35 pixels black
23
select the large border with the magic wand tool
24
selections -> promote selection to layer
flood fill selection with the gradient
25
effects -> plugins -> AAA Frame / Texture Frame
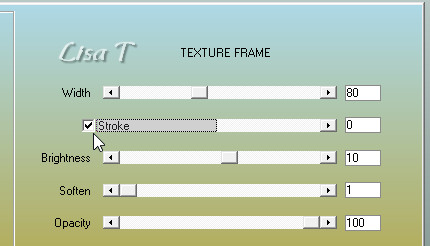
selections -> select none
26
layers -> duplicate
image -> mirror -> mirror vertical
opacity of the layer : 50%
layers -> merge -> merge down
27
effects -> 3D effects -> inner bevel
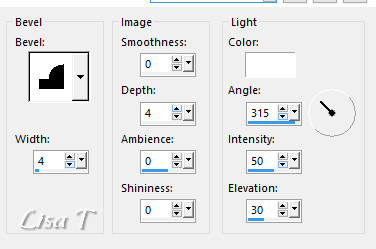
28
effects -> 3D effects -> drop shadow
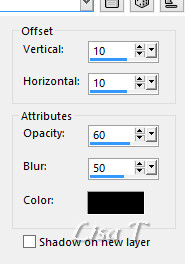
drop shadow again changing (10) by (-10)
29
image -> add borders -> 3 pixels color 2
file -> save as... type .jpeg

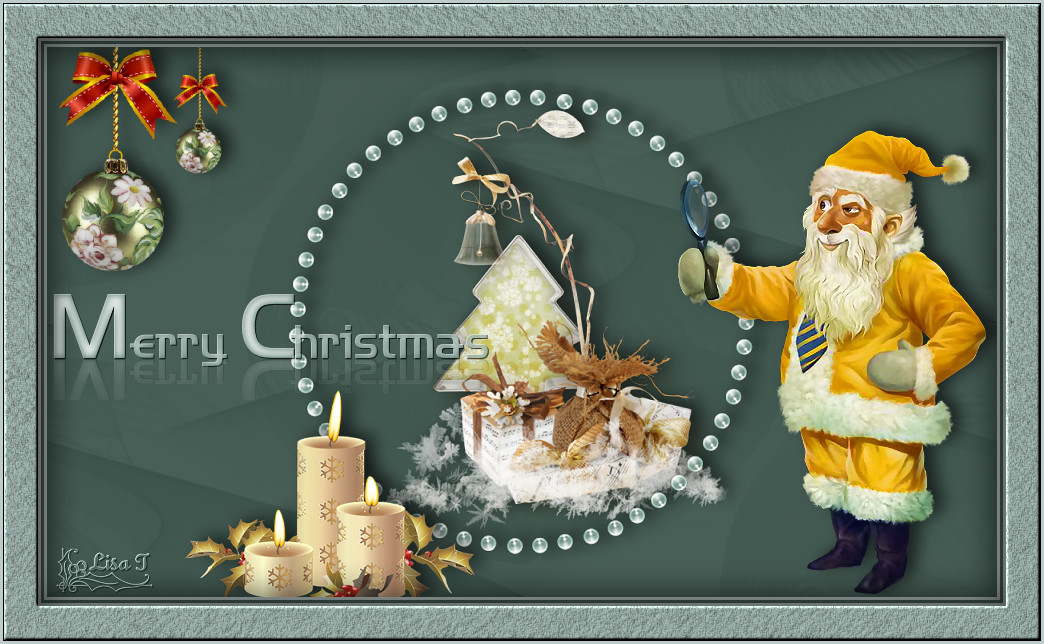
Your tag is finished.
Thank you for following this tutorial
Don’t forget to sign (to avoid plagiarism) and save
file as… type JPEG

Don’t hesitate to send your creations
to Chez Douceur

It will be a real pleasure for her to show them in the
gallery at the bottom of the tutorial page
Don’t forget to indicate her your name and the adress
of your blog or site if you have one

Back to the boards of « Chez Douceur’s » tutorials
Board 1 

|