

The original tutorial can be found HERE
Conditions of use of the material provided
It is forbidden to modify, change the name, take off the
watermarks or alter the tubes.
It is forbidden to share them in groups or offer them on
your site, blog or forum without permission
If you want to use them to create a tutorial, you must
ask the permission of the authors.
This is a personal work.
any resemblance with another tutorial would be pure coincidence
it is forbidden to share or distribute on the Web,
to present it in a group or forum without the author’s
permission
« Chez Douceur » is happy to share her work with you
she hopes it will help you dream and get away from your
everyday life
 
Supplies

thank you to the tubers for their great
work
the main tube is not provided, choose one in you personal
collection
open the tubes, duplicate and work with the copies
open the mask(s) and minimize to tray
copy / paste selections into the folder « selections » of
Corel PSP general Folder
copy / paste the selection into the folder « selections » of
PSP general folder
TIP 1 -> if you don’t
want to install a font -->
open it in a software as « Nexus Font » (or
other font viewer software of you choice)
as long as both windows are opened (software and font),
your font will be available in your PSP
TIP 2 -> from PSPX4,
in the later versions of PSP the functions « Mirror » and « Flip » have
been replaced by -->
« Mirror » --> image => mirror => mirror horizontal
« Flip » --> image => mirror => mirror vertical
 
Plugins
AFS IMPORT/WIN-053 (provided - import into Unlimited 2)
Flaming Pear/Flexify2
Alien Skin Impact/Perspective shadow
Foto Frame
thank you Tine for sharing your plugins page

 
translator’s note
« Chez Douceur » works with PSP X, I use PSP2019 to create
my personal tags and write my translations
but this tutorial can be realized with any other version
of PSP
according to the version of PSP you use, the results might
be slightly different from the example
don’t hesitate to change the blend modes and opacities
of the layers to match your tubes and colors
 
colors

color 1 --> foreground color --> FG --> left click
--> #dacfd5
color 2 --> background color --> BG --> right click
--> #cac5c9
 
Use the pencil to mark your place
along the way
hold down left click to grab and move it
 |
 
Realization
1
open « fond douceur », change the
color, or choose another flower background,
according to the tubes and colors you will use
this tag’s dimensions are : 900 * 550 px
edit => copy your background => edit => paste
as new image and set aside for a later use
2
layers => merge => merge down
3
layers => duplicate
4
effects => plugins => Unlimited 2 => AFS IMPORT/Win-053
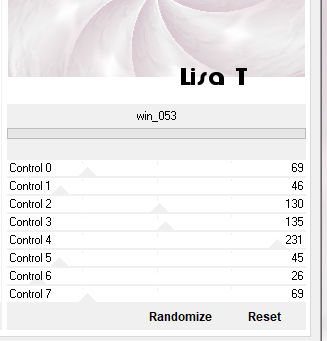
5
blend mode of the layer : Multiply
layers => new raster layer
selections => select all
copy / paste into selection « etoile Douceur »
layers => merge => merge down
selections => select none
layers => duplicate
image => resize => untick « resize all
layers » => 80%
6
effects => plugins => Flaming Pear => Flexify
2
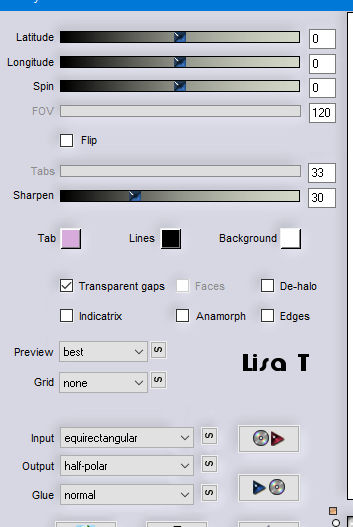
image => resize => untick « resize all layers » => 80%
TWICE
7
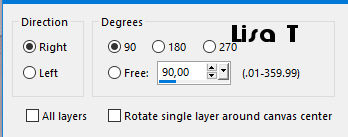
image => free rotate
8
enable the Pick tool (to move the layer accurately) with
the following settings => Position X : 9 / position
Y : 28
layers => duplicate
image => mirror => mirror horizontal
layers => merge => merge down
9
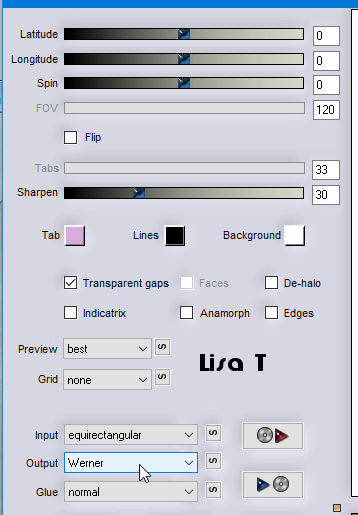
effects => plugins => Flaming Pear => Flexify
2
10
effects => plugins => Alien Skin Eye Candy 5 Impact
/ Perspective Shadow
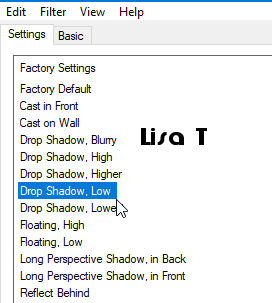
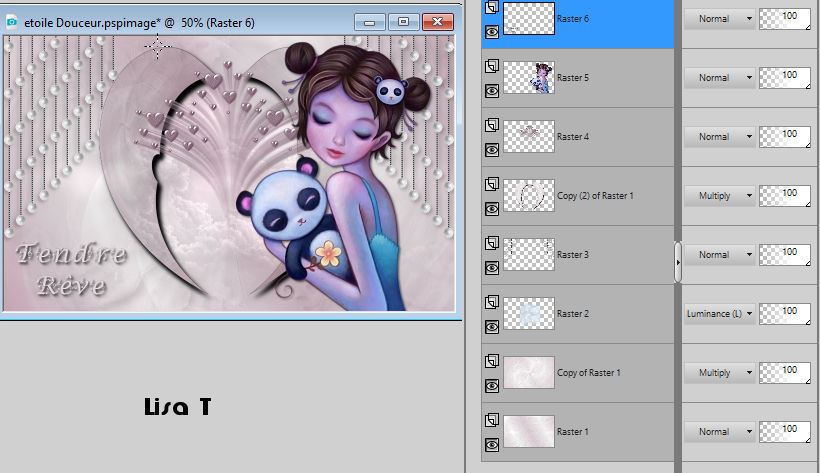
your tag and layers palette look like
this

11
copy / paste as new layer « 06heavenlyclouds_sw »
don’t move it
12
layers => arrange => move down
blend mode of the layer : Multiply Luminance (Legacy)
13
copy / paste as new layer « rideau de perle »
enable the Pick tool with the following settings => Position
X : 671 / position Y : -2
14
layers => duplicate
mirror => mirror horizontal
layers => merge => merge down
15
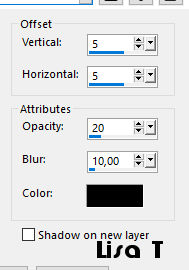
effects => 3D effects => drop shadow
16
selections => load-save selection => load selection
=> from disk => selection « tendre reve »
17
highlight the Pearls layer => hit the DELETE key on
your keyboard
selections => select none
18
copy / paste as new layer « anghearts9 »
enable the Pick tool with the following settings => Position
X : 258 / position Y : 50
19
colorize if necessary to match your colors
layers => arrange => bring to top
20
copy / paste as new layer the character tube
place to the right of the tag
21
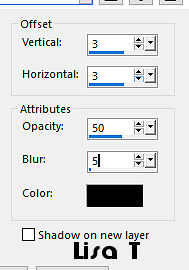
effects => 3D effects => drop shadow
22
copy / paste as new layer the title tube
OR
write your own text whith the font provided(size 45) (or
use another font of your choice)
23
effects => 3D effects => drop shadow (same settings
as previously)
24
enable the Pick tool with the following settings => Position
X : 13 / position Y : 406
25
effects => 3D effects => drop shadow (same settings
as previously)
26
your tag and layers palette look like this
27
layers => merge => merge all (flatten)
28
image => add borders => tick « symmetric » => 2
px white / 2 px with color 1
29
image => add borders => tick « symmetric » => 35
px white
30
image => add borders => tick « symmetric » => 40
px black
select this obrder with the magic wand tool
copy / paste into selection the image you set aside in
step 1
31
selections => invert
effects => 3D effects => drop shadow
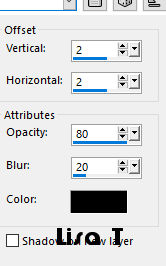
selections => invert
32
(if you changed the colors, duplicate the layer before
applying the Foto Frame effect
and colorize to match your colors)
effects => plugins => AAA Frames / Foto Frame
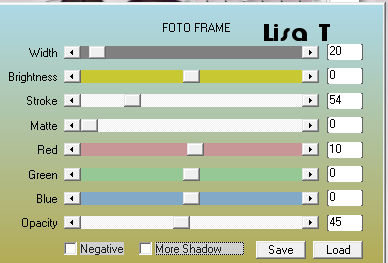
33
effects => 3D effects => drop shadow / same settings
as previously
selections => select none
34
selections => select none
layers => merge => merge all (flatten)
apply your watermark
image => resize => 950 px width
 
My tag with my tube
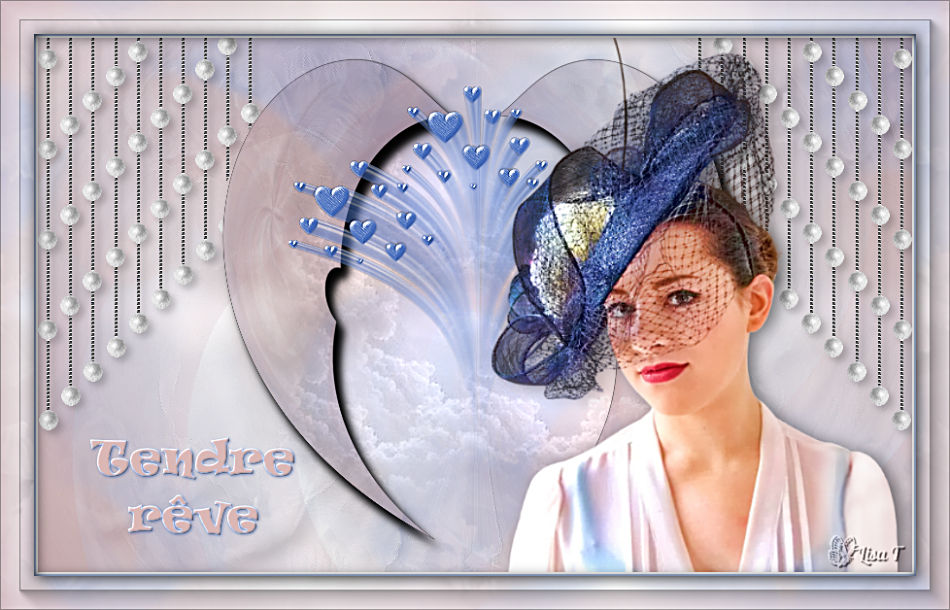
Your tag is finished.
Thank you for following this tutorial
Don’t forget to sign (to avoid plagiarism) and save
file as… type JPEG
 
Don’t hesitate to send your creations
to Rose des Sables

It will be a real pleasure for her to show them in the
gallery at the bottom of the tutorial page
Don’t forget to indicate her your name and the adress
of your blog or site if you have one
 
Back to the boards of « Chez Douceur’s » tutorials
Board 1 
home page ==> 
|