
The original tutorial can be found HERE

Conditions of use of the material provided
It is forbidden to modifiy, change the name, take off the
watermarks or alter the tubes.
It is forbidden to share them in groups or offer them on
your site, blog or forum without permission
If you want to use them to create a tutorial, you must
ask the permission to the authors.
This is a personal work.
any resemblance with another tutorial would be pure coincidence
it is forbidden to share it or distribute it on the Web,
to present it in a group or forum without the author’s
permission
« Chez Douceur » is happy to share her work with you
she hopes it will help you dream and get away from your
eveyday life

Material
tubes - mask - gradient

thank you to the tubers for their great
work
open tubes, duplicate them and work with the copies
open mask and minimize it to tray
copy / paste gradient into the folder « gradients » of
Corel PSP Folder
open mask and minimize to tray
TIP 1 -> if you don’t want to install
a font -->
open it in a software as « Nexus Font » (or
other font viewer software of you choice)
as long as both windows are opened (software and font),
your font will be available in your PSP
TIP 2 -> from PSPX4, in the later versions
of PSP the functions « Mirror » and « Flip » have
been replaced by -->
« Mirror » --> image => mirror => mirror horizontal
« Flip » --> image => mirror => mirror vertical
to prevent the theft of tubes, they are no longer provided
in the ZIP material
the only material provided is : decorations, masks
and selections
you will have to use your personal collection
translator’s note : the Girl tube I chose in
one of mine

Plugins
AP Lines / Lines Silverlining


translator’s note
« Chez Douceur » works with PSP X, I use PSP2019 to create
my personal tags and write my translations
but this tutorial can be realized with another version
according to the version of PSP you use, the results might
be slightly differents
don’t hesitate to change the blend modes of the layers
to match your tubes and colors

colors
color 1 --> foreground color --> FG --> left click
--> #e5d4cb
color 2 --> background color --> BG --> right click
--> #000000 (black)

Use the pencil to follow the steps
hold down left click to grab and move it
 |
 
Realization
1
open a new transparent image 950 * 550 px
2
prepare the colors into the materials palette
prepare the gradient provided

layers => duplicate
3
effects => geometric effects => Skew

4
effects => geometric effects => Circle ==> 3
times

5
your work looks like this

6
enable the Pick tool (K) => Position X : 2 / position
Y : 10
hit the (M) Key to disable the tool
layers => duplicate
image => mirror => mirror horizontal
layers => merge => merge down
layers => new raster layer
flood fill with color 1 (light color)
layers => new mask layer => from image

7
layers => duplicate
layers => merge => merge group
layers => arrange => move down
8
highlight Copy of Raster 1
selections => select all / selections => float /
selections => defloat
effects => plugins => AP Lines / Silverlining /
Zag Accross

9
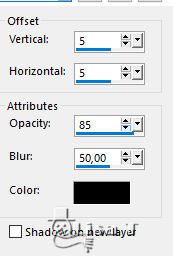
effects => 3D effects => drop shadow
 
10
your work and your layers palette look like this

selections => select none
11
highlight Group Raster(2) (the mask)
layers => merge => merge down
12
layers => duplicate
image => resize => untick « resize all
layers » => 80%
close the eyes of « Raster 1 » and « Copy
of Raster 1 »
13
selections => select all / selections => float /
selections => defloat
selections => select selection borders => 5 px

selections => promote selection to layer
close the eyes of « Copy of Raster 1 »
layer « promoted selection » is highlighted
opacity of the flood fill tool : 50%
flood fill selection with color 1
reset opacity of the tool to 100%
14
effects => plugins => AP Lines / Silverlining /
Zag Accross

15
effects =< edge effects => enhance more (TWICE)
selections => select none
close the eyes of all the layers except the one with the
frame
selection inside with the magic wand tool

16
copy / paste « angeledesign_hiver9 » into
selection
selections => select none
open the eyes of all the layers
highlight top layer
17
copy / paste as new layer « eglisenoel39tresors »
18
enable the Pick tool (K) => Position X : 56 / position
Y : 26
layers => duplicate
image => mirror => mirror horizontal
layers => merge => merge down
19
effects => 3D effects => drop shadow

20
copy / paste as new layer the child tube of your choice
21
reise if necessary and move to the irght as shwon in the
final result
22
copy / paste as new layer « kwr_901 »
don’t forget to erase the watermark
enable the Pick tool (K) => Position X : 94 / position
Y : 296
23
copy / paste the Word Art
don’t forget to erase the watermark
image => resize => untick « resize all layers » => 80%
enable the Pick tool (K) => Position X : 172 / position
Y : 91
24
apply your waterlmark or signature
25
image => add borders => tick « symmetric » => ...
2 px color 1
3 px black
35 px white
5 px color 1
3 px black
26
adjsut => sharpness => high pass sharpen

file => save as... type .jpeg
 
Your tag is finished.
Thank you for following this tutorial
Don’t forget to sign (to avoid plagiarism) and save
file as… type JPEG

Don’t hesitate to send your creations
to Rose des Sables

It will be a real pleasure for her to show them in the
gallery at the bottom of the tutorial page
Don’t forget to indicate her your name and the adress
of your blog or site if you have one

Back to the boards of « Chez Douceur’s » tutorials
Board 1 


|