

The original tutorial can be found HERE

Conditions of use of the material provided
It is forbidden to modify, change the name, take off the
watermarks or alter the tubes.
It is forbidden to share them in groups or offer them on
your site, blog or forum without permission
If you want to use them to create a tutorial, you must
ask the permission of the authors.
This is a personal work.
any resemblance with another tutorial would be pure coincidence
it is forbidden to share or distribute on the Web,
to present it in a group or forum without the author’s
permission
« Chez Douceur » is happy to share her work with you
she hopes it will help you dream and get away from your
eveyday life

Supplies
selections - tubes

the main tube is not provided. I chose
one of mine
thank you to the tubers for their great work
open the tubes, duplicate and work with the copies
copy / paste selections into the folder « selections » of
Corel PSP general Folder
TIP 1 -> if you don’t
want to install a font -->
open it in a software as « Nexus Font » (or
other font viewer software of you choice)
as long as both windows are opened (software and font),
your font will be available in your PSP
TIP 2 -> from PSPX4,
in the later versions of PSP the functions « Mirror » and « Flip » have
been replaced by -->
« Mirror » --> image => mirror => mirror horizontal
« Flip » --> image => mirror => mirror vertical

Plugins
Eye Candy Impact/Glass/Clear-Filtre Xero / porcelain (new
version of Porcelain => you can find it in Tine's page)
Filtre Adjust
Graphic plus / Cross Shadow


translator’s note
« Chez Douceur » works with PSP X, I use PSP2019 to create
my personal tags and write my translations
but this tutorial can be realized with any other version
of PSP
according to the version of PSP you use, the results might
be slightly different from the example
don’t hesitate to change the blend modes and opacities
of the layers to match your tubes and colors

colors
color 1 --> foreground color --> FG --> left click
--> #f4d4d7
color 2 --> background color --> BG --> right click
--> #e1cacc
 
Use the pencil to mark your place
along the way
hold down left click to grab and move it
 |
 
Realization
1
open the background « tag fond Roserouge » => window
=> duplicate
work with the copy and close the original
2
layers => new raster layer
3
selections => load-save selection => from disk => selection « rose
rouge 1 »
4
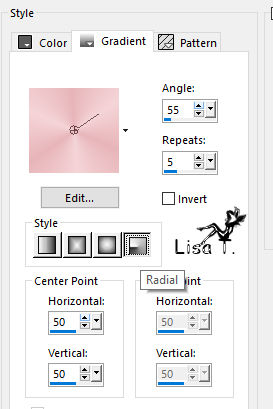
prepare a radial gradient into the materials palette
5
flood fill selection with the gradient
6
selections => select none
7
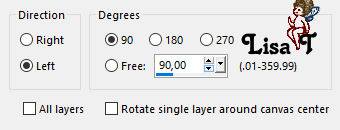
image => free rotate
8
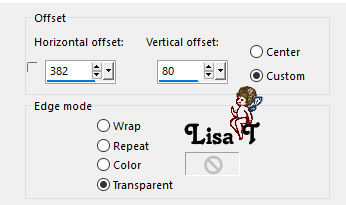
effects => image effects => offset
9
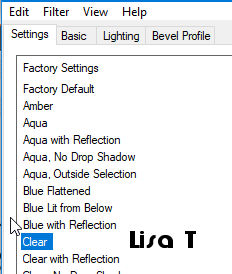
effects => plugins => Alien Skin Eye Candy 5 Impact
/ Glass / preset « Clear »
10
layers => duplicate
image => mirror => mirror horizontal
layers => merge => merge down
11
copy / paste as new layer the « lacet » tube
12
effects => image effects => offset
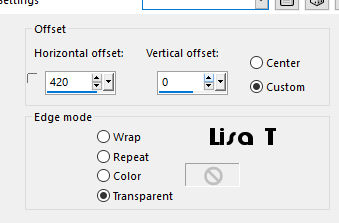
13
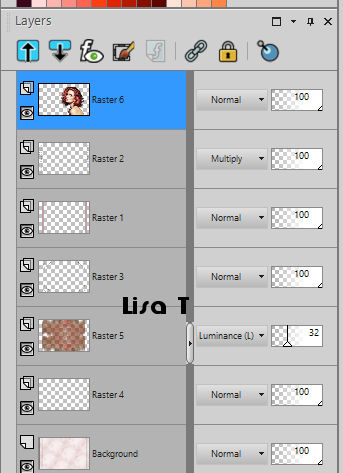
blend mode of the layer : Multiply - Opacity :
70%
adjust => sharpness => sharpen
14
layers => duplicate
image => mirror => mirror horizontal
layers => merge => merge down
15
copy / paste as new layer the corner tube
16
don’t move this layer
layers => arrange => move down twice
(second layer from the bottom of the stack)
17
highlight the Background layer
layers => new raster layer
18
copy / paste as new layer the flower tube (fleur)
19
selections => load-save selection => from disk => selection « rose
rouge 2 »
20
your tag looks like this

hit the DELETE key of your keyboard
21
selections => select none
22
blend mode of the layer : Luminance (Legacy) - Opacity
: 32%
23
effects => plugins => Xero / Porcelain => apply
this effect twice
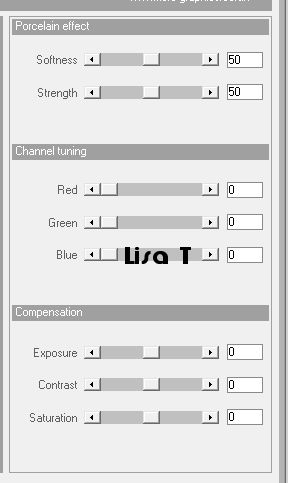
if you changed the colors, match these
settings with your colors
24
highlight top layer
open the woman tube, resize if necessary if you choose
another tube
on the example, the tube’s dimensions are => 355
/ 534
copy / paste as new layer
25
effects => image effects => offset
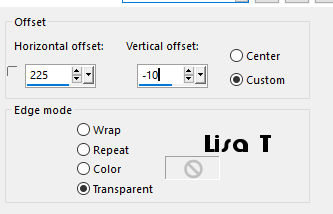
26
your layers palette, and your tag, look like this
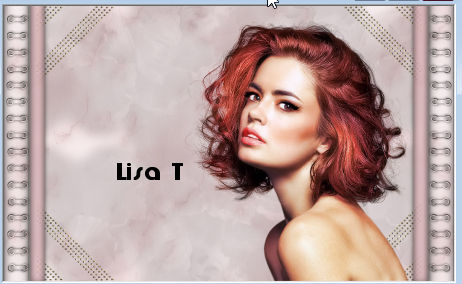
27
copy / paste as new layer the antique rose « mistedpayeGini »
28
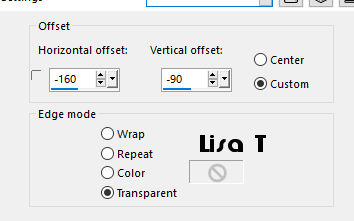
effects => image effects => offset
29
effects => plugins => Filtre Adjust Variations
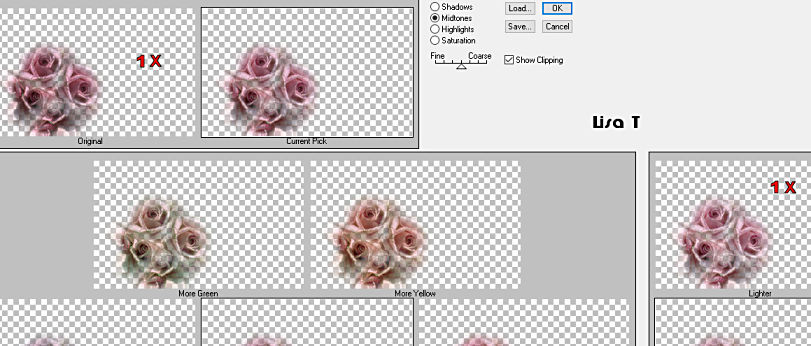
translator’s note : I lowered the opacity
of this layer to 45% and moved it under the woman tube
30
highlight top layer
copy / paste as new layer the Word Art
31
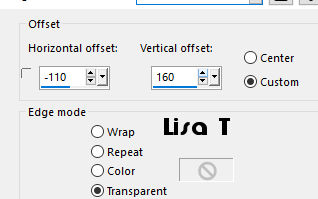
effects => image effects => offset
32
effects => 3D effects => drop shadow
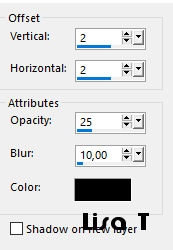
33
image => add borders => tick « symmetric » => 2
px color 2
34
image => add borders => tick « symmetric » => 2
px color 1
35
image => add borders => tick « symmetric » => 2
px color 2
36
image => add borders => tick « symmetric » => 2
px color 1
37
selections => select all
38
image => add borders => tick « symmetric » => 30
px white
selections => invert
39
prepare a linear gradient into the materials palette
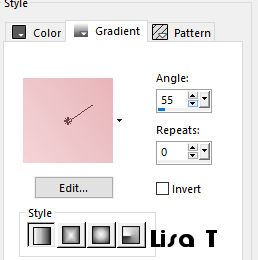
40
flood fill selection with the gradient
41
effects => plugins => Graphic Plus / Cross Shadow
/ default settings
42
selections => invert
effects => 3D effects => drop shadow / color 2
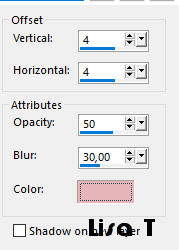
drop shadow once more, replacing (4) by
(-4)
selections => select none
43
apply your watermark (or signature)
44
open the tube « AM-corner58 » / resize
to 60%
copy / paste as new layer
45
place in the top left corner
layers => duplicate
image => mirror => mirror horizontal
image => mirror => mirror vertical
layers => merge => merge down
46
effects => 3D effects => drop shadow / same settings
as in step 42, but replace color 2 by Black
drop shadow once more, replacing (4) by (-4)
47
image => add borders => tick « symmetric » => 3
px color 2
save your file type .jpeg
 
another version - Thank you Animabelle for the lovely
tube
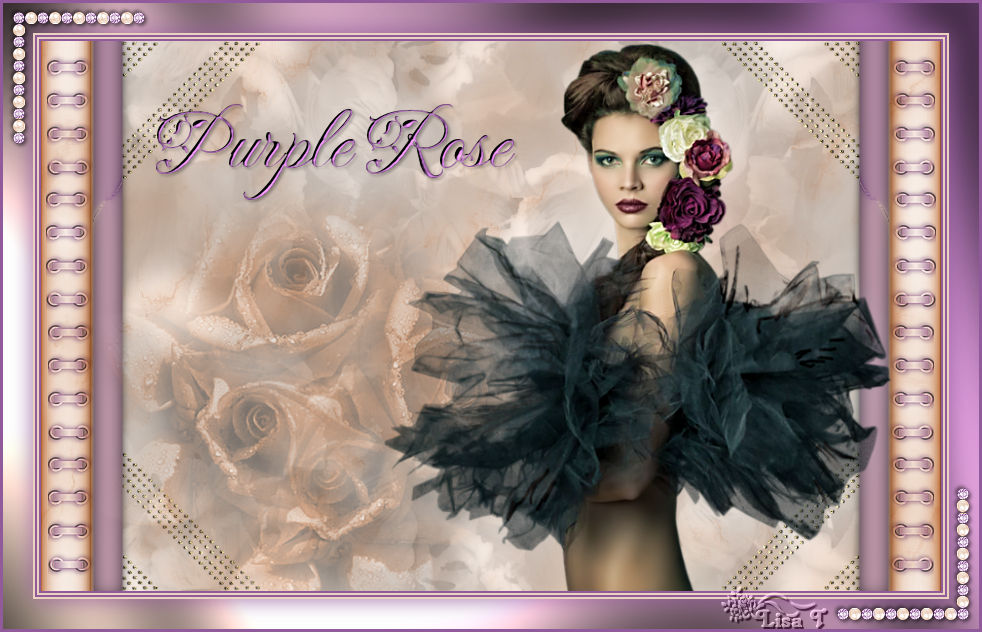
Your tag is finished.
Thank you for following this tutorial
Don’t forget to sign (to avoid plagiarism) and save
file as… type JPEG

Don’t hesitate to send your creations
to Rose des Sables

It will be a real pleasure for her to show them in the
gallery at the bottom of the tutorial page
Don’t forget to indicate her your name and the adress
of your blog or site if you have one

Back to the boards of « Chez Douceur’s » tutorials
Board 1 

|