

The original tutorial can be found HERE


Conditions of use of the material provided
It is forbidden to modifiy, change the name, take off the
watermarks or alter tubes provided.
It is forbidden to share them in groups or offer them on
your site, blog or forum,
you are allowed to use them in another creation for your
personal use
If you want to use them to create a tutorial, you must ask
the permission to the authors.
this tutorial is a personal creation. Any resemblance with
another would be pure coincidence
Material
thank you to the tubers : Ysa-Pink-STBD-Drevers- Personal
Tube Rose
I created th woman tube, fre"e downlaod page 15 -> heading
"woman tube"
you will need (not provided) : character tube

Filters Used
Mura’s Filter Meister/Perspective tilling1/1
Nik Software
Alien Skin/Drop Shadow/ LOW
Background Designers IV/Night Shadow
Buttons & Frames/3D Glass Frame(Sunken)
AAAFrame/Foto Frame

translator’s note
«Chez Douceur » works with PSP X, I use PSPX9 to create
my tag and write my translations
but this tutorial can be realized with any other version
of PSP
according to the version of PSP you use, the results might
be slightly differents
don’t hesitate to change blend modes of layers matching
your tubes and colors
tips
** from PSP X4 to recent version, the functions « Mirror » and « Flip » have
been replaced by ---->...
mirror -> mirror horizontal
flip -> mirror vertical
** if you want to use a font without having to install it,
open it with a font software (Nexus Font, or other...)
and minimize it to tray keeping the software opened
as long as you don’t close both windows (software
and font) the font will be available into PSP Text tool
** save your work as often as possible
Colors

color 1 --> foreground color --> FG --> left click
--> #ffffff
color 2 --> background color --> BG --> right click
--> #b7b7c2
Use this pencil to follow the steps
hold down left click to grab it and move it

Realization
1
open e new transparent image 900 * 650 pixels / Raster
1
2
flood fill with color 2
3
layers -> new raster layer / Raster 2
4
selections -> select all
5
copy / paste into selection the Tube Rose 2
blend mode of the layer : Luminance (Legacy)
6
layrs -> merge -> merge down
layers -> duplicate
effects -> plugins -> Mura’s Meister / Perspective
Tilling1/1

7
effects -> 3D effects -> drop shadow -> balck

8
drop shadow again, changing (10) by (-10)
9
highlight Raster 1
copy / paste as new layer the snow tube « Neige
DIAMANDS »
10
copy / paste « STBD_EtchedGlass » as
new layer
don’t move it
11
effects -> plugins -> Nik Color Efex Pro 3.0 / color
#c0c0c0 / Colorize / Method 2

12
highlight top layer
copy / paste as new layer « silver 1 »
move it to the left of the tag (see final result)
13
layers -> duplicate
image -> mirror -> mirror horizontal
move it to the right in the continuity of the first decoration
tube (see example)
layers -> merge -> merge down
14
activate the Eraser Tool

translator’s note : I chose size 4 pixels to erase more precisely
erase the pearls of the decoration as shown below

15
drop shadow on decoration, same settings as in step 7
16
copy / paste the character tube as new layer
17
image -> mirror -> mirror horizontal
image -> resize -> untick « resize all
layers » -> 80%
18
adjust -> sharpness -> sharpen
19
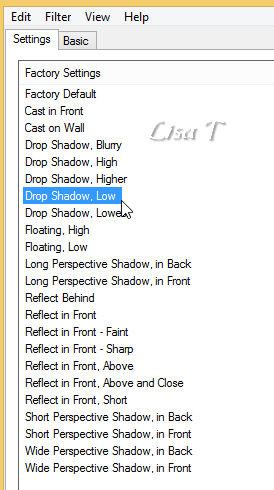
effects -> plugins -> Alien Skin Eye Candy 5-Impact
/ Perspective Shadow / Drop Shadow LOW

translator’s note : my result is different, I chose different
settings
20
copy / paste as new layer « Drevers flower »
move it bottom left (see final result)
21
drop shadow as you like
22
apply your watermark on a new layer
23
highlight Raster 1
edit -> copy
24
image -> add borders -> tick « symmetric » -> ....
2 pixels white
2 pixels color 2
2 pixels white
30 pixels color 2
25
layers -> promote background layer
select large border withe magic Wand Tool
26
layers -> new raster layer
edit -> paste into selection
27
effects -> plugins -> Unlimited 2 -> Background
Designers IV / Night Shadow / default settings

28
effects -> plugins -> Unlimited 2 / Buttons and Frames
/ 3D Glass Frame (Sunken) / default settings

29
effects -> plugins -> AAA Frame / Foto Frame / 20

30
effects -> plugins -> AAA Frame / Foto Frame / 10

31
selections -> select none
32
copy / paste « corners_pink_diamonds » as
new layer
33
move it to the right
blend mode of the layer : Luminance (Legacy)

34
effects -> 3D effects -> drop shadow

35
layers -> duplicate
image -> mirror -> mirror horizontal
layers -> merge -> merge down
layers -> duplicate
image -> mirror -> mirror vertical
36
image -> add borders -> tick « symmetric » -> 2
pixels white
save your work as... type .jpeg
Your tag is finished.
Thank you for following this tutorial
Don’t hesitate to send your creations
to Chez Douceur

It will be a real pleasure for her to show them in the
gallery at the bottom of the tutorial page
Don’t forget to indicate her your name and the adress
of your blog or site if you have one
If you want to receive Chez Douceur’s Newsletter,
sign up ...

Back
to the boards of Chez Douceur’s tutorials
Board 1 

|