

The original tutorial can be found HERE

Conditions of use of the material provided
It is forbidden to modifiy, change the name, take off the
watermarks or alter the tubes.
It is forbidden to share them in groups or offer them on
your site, blog or forum.
If you want to use them to create a tutorial, you must
ask the permission to the authors.
the tubes used for this tutorial have been received in
sharing groups
Béa has the permission of the tubers to use them

respect the tubers’ work : never use tubes without
a watermark or a signature : they are stolen tubes
the tubes you find « on the web » without
the tuber’s name are ALWAYS stolen tubes
if you think Bea used one of your tubes, please let her
know,
and if this proves to be true, a link to your site or blog
will ba added.
Or if you prefer, the tube wil be removed from the material’s
folder

Tips and Hints
TIP 1-> if you don’t
want to install a font -->
open it in a software as « Nexus Font » (or
other font viewer software of you choice)
as long as the software’s window is opened, your
font will be available in your PSP
TIP 2 -> from PSPX4,
in the later versions of PSP the functions « Mirror » and « Flip » have
been replaced by -->
« Mirror » --> image => mirror
=> mirror horizontal
« Flip » --> image => mirror => mirror
vertical

Supplies
tubes - color palette - decoration - mask

open the masks and minimze to tray
duplicate the tubes and work with the copies in order to
preserve originals

colors
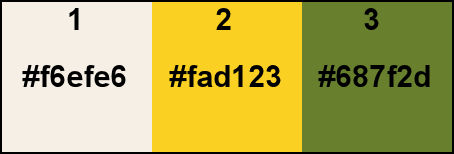
set colors 1 and 3 as FG and BG colors

Plugins needed
Unlimited
Graphic Plus
It@lian Editors Effect
AP Lines
Simple
Alien skin eye Candy 5 Impact

translator’s note
I use PSP2019 to create my tag and write my translation
but this tutorial can be realized with another version
according to the version of PSP you use, the results might
be slightly different
don’t hesitate to change blend modes and opacities
of the layers to match your tubes and colors

Use the pencil to mark your place
along the way
hold down left click to grab and move it
 |

Realization
1
open the alpha layer, and duplicate
work with the copy
2
flood fill with color 3
selections => select all
copy / paste into selection the woman tube
don’t forget to erase the watermark
selections => select none
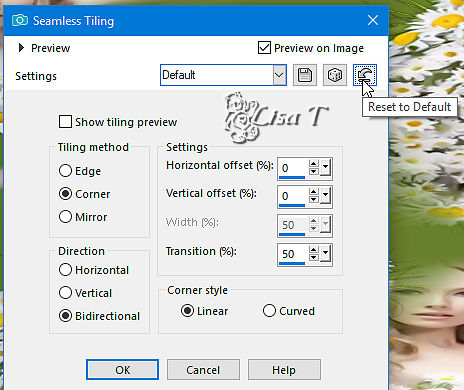
effects => image effects => seamless tiling => default
settings
3
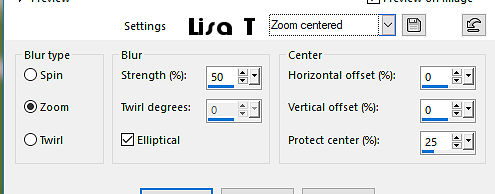
adjust => blur => radial blur
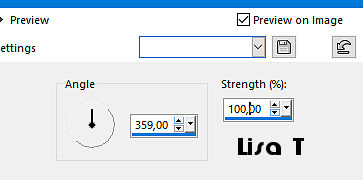
adjust = > blur => motion blur
effects => plugins => Unlimited 2 => Vm
Distortion / Vision Impossible
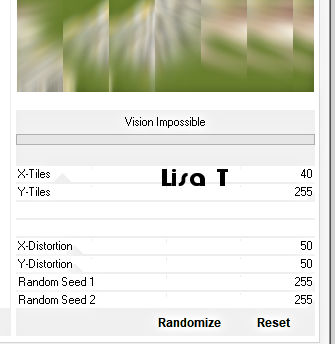
effects => edge effects => enhance more
4
effects => plugins => Graphic Plus / Horizontal Mirror
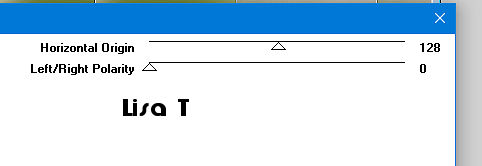
adjust => sharpness => sharpen more
5
selections => load-save selection => from alpha channel
=> selection # 1
selections => promote selection to layer
effects => plugins => Unlimited 2 => &<Background
Designers IV> sf10 Diamond Mountian
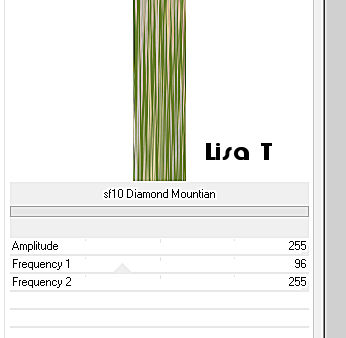
selections => select none
6
layers => duplicate
image => mirror => mirror horizontal
layers => merge => merge down
effects => plugins => It@lian Editors Effect / Effetto
Fantasma

effects => plugins => Unlimited 2 => &<BKgDesigner
sf10 I> / Cruncher / 20 / 20
effects => edge effects => enhance
blend mode of the layer : Screen / opacity :
62%
7
image => rotate left
effects => distortion effects => Wave

image => rotate right
effects => 3D effects => drop shadow
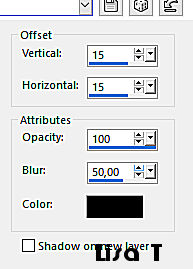
effects => plugins => Mura’s Seamless / Emboss
at Alpha / default settings
edit => repeat Emboss at Alpha
8
highlight Raster 1 (Bottom layer)
selections => load-save selection => from alpha channel
=> selection # 2
selections => promote selection to layer
effects => plugins => AP Lines / Lines Silverlining
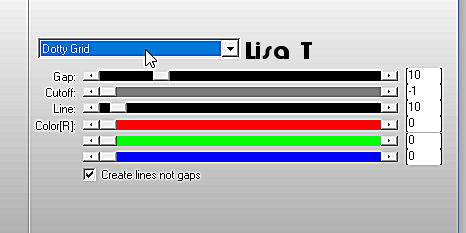
effects => 3D effects => drop shadow => 0 / 0
/ 100 / 50 / black
selections => select none
9
layers => duplicate
image => mirror => mirror horizontal
layers => merge => merge down
10
layers => duplicate
effects => plugins => Simple => Diamonds
effects => plugins => Unlimited 2 => VM Toolbox
/ MirrororriM
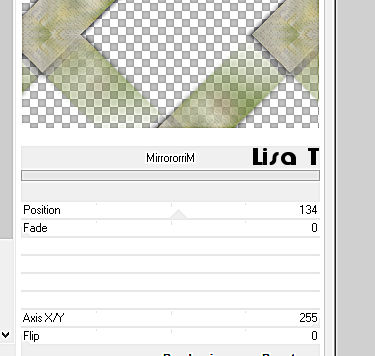
layers => arrange => move down
blend mode of the layer : Soft Light (or other)
effects => edge effects => enhance more
effects => 3D effects => drop shadow => 0 / 0
/ 100 / 50 / black
11
highlight top layer
layers => new raster layer
flood fill with color 1
layers => new mask layer => from image
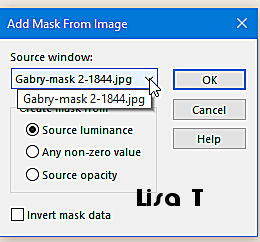
layers => duplicate
layers => merge => merge group
effects => texture effects => weave / black
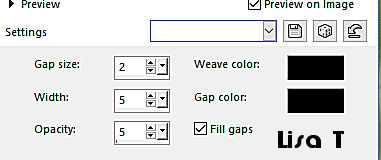
12
your layers palette looks like this
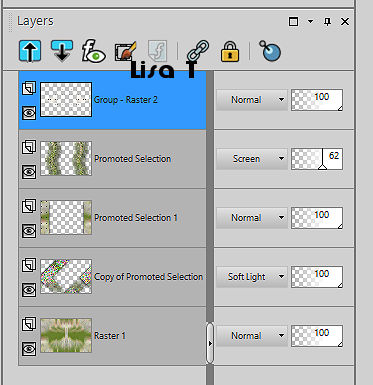
13
layers => new raster layer
selections => load-save selection => from alpha channel
=> selection # 2
flood fill selection with color 2
effects => texture effects => weave / black (don’t
change the settings)
selections => select none
14
effects => plugins => Unlimited 2 => &<BKgDesigner
sf10 I> / Cruncher / 20 / 20
effects => image effects => seamless tiling => Side
by Side
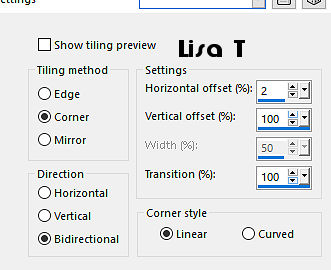
layers => duplicate
blend mode of the layer : Soft Light
15
layers => new raster layer
flood fill selection with color 2
layers => new mask layer => from image
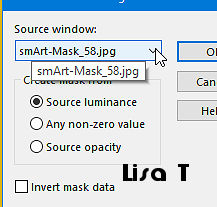
layers => duplicate
layers => merge => merge group
effects => plugins => Simple => Diamonds 3 times
opacity of the layer : 17%
effects => edge effects => enhance more
16
layers => merge => merge visible
layers => new raster layer
selections => load-save selection => from alpha channel
=> selection # 4
flood fill selection with color 2
effects => 3D effects => inner bevel
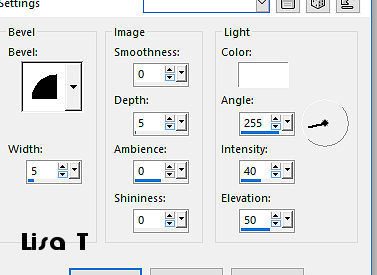
selections => select none
effects => 3D effects => drop shadow => 1 / 1
/ 50 / 1 / black
layers => duplicate
image => mirror => mirror horizontal
17
image => add borders => tick « symmetric » =>...
3 px color 1
3 px color 2
3 px color 3
3 px color 1
3 px color 3
20 px white
3 px color 3
25 px white
3 px color 3
40 px white
18
select the 25 px border with the magic wand tool
flood fill selection with color 2
effects => plugins => Graphhic Plus / Cross Shadow
/ default settings
effects => texture effects => weave / black / same
settings as before
effects => 3D effects => drop shadow => 2 / 2
/ 100 / 2 / black
selections => select none
19
copy / paste the corner tube as new layer
don’t forget to erase the watermark
selections => select all / selections => float / selections
=> defloat
flood fill selection with color 2
effects => 3D effects => inner bevel / same settings
as before
effects => 3D effects => drop shadow => 1 / 1
/ 50 / 1 / black
selections => select none
20
copy / paste the woman tube as new layer
objects => align bottom / or place as you like
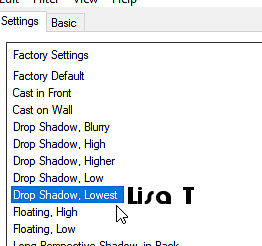
effects => plugins => Alien Skin Eye Candy 5 Impact
/ Perspective Shadow
21
copy / paste the title tube as new layer
image => free rotate => tick « left » /
20
place as you like
selections => select all / selections => float / selections
=> defloat
flood fill selection with color 2 (or other color of your
choice)
effects => 3D effects => inner bevel / same settings
as before
effects => 3D effects => drop shadow => 1 / 1
/ 50 / 1 / black
selections => select none
22
apply your watermark or signature
add Béa’s Watermark
image => add borders => tick « symmetric » => 1
px black
image => resize => tick « resize all layers « => 950
px width
adjust => sharpness => unsharp mask

save your work as ... type .jpeg

Your tag is finished.
Thank you for following this tutorial
Don’t forget to sign (to avoid plagiarism) and save
file as… type JPEG
My creation with a tube created by Valy Scrap Passion


Don’t hesitate to send your creations
to Béa

It will be a real pleasure for her to show them in the
gallery at the bottom of the tutorial page
Don’t forget to indicate her your name and the adress
of your blog or site if you have one

If you want to receive Béa’s
Newsletter, sign up ...


Back to the boards of Béa’s tutorials
Board 1 Board 2 Board 2 Board
3 Board
3

|