Louis
Vuitton

The original tutorial can be found HERE

Conditions of use of the material provided
It is forbidden to modifiy, change the name, take off the watermarks
or alter the tubes.
It is forbidden to share them in groups or offer them on your
site, blog or forum.
If you want to use them to create a tutorial, you must ask the
permission to the authors.

Material
1 Mask -> open and minimize to tray
1 Image 21 -> open and minimize to tray
1 deco_bdn
4 Tubes_bdn
1 color palette
you will need :
1 character tube (not provided)


Filters Used
ASF IMPORT sqBorder2
Mura's Meister / perspectiveTiling
UNLIMITED 2
Ecosse / Flutter


translator’s note
« Belle de Nuit » works with PSP X, I use PSPX9
to create my tag and write my translations
but this tutorial can be realized with another version
according to the version of PSP you use, the results might be
slightly differents
don’t hesitate to change blend modes of layers matching
your tubes and colors
Colors

color 1 --> foreground color --> FG --> left click
--> #e5cbb4
color 2 --> background color --> BG --> right click
--> #513c39
color 3 --> #d48b60

Use the pencil to follow the steps
hold down left click to grab it and move it


Realization
1
open a new transparent layer 950 * 550 pixels
2
flood fill with color 2
layers -> new raster layer -> flood fill with color 1
3
layers -> newx mask layer -> from image
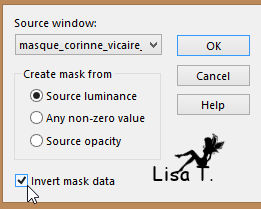
4
layers -> merge -> merge group
effects -> edge effects -> enhance
5
layers -> duplicate / image -> mirror -> mirror horizontal
image -> mirror -> mirror vertical
6
layers -> merge -> merge down
effects -> 3D effects -> drop shadow / color 2
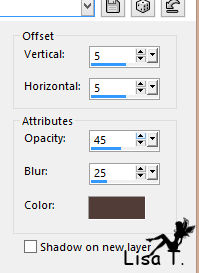
7
layers -> new raster layer
flood fill with color 3
8
layers -> new mask layer -> from image
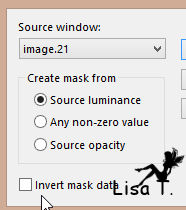
9
layers -> merge -> merge group
blend mode : Multiply - opacity : 75%
10
layers -> merge -> merge visible
your tag looks like this

11
layers -> duplicate
effects -> plugins -> Mura’s Meister / Perspective
Tiling
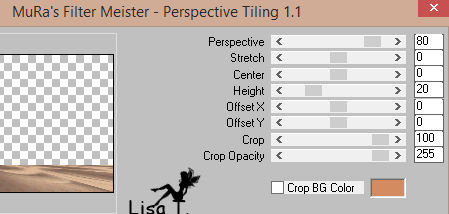
12
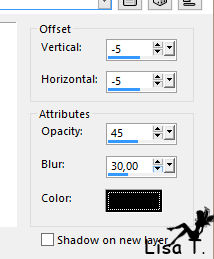
effects -> 3D effects -> drop shadow / black
13
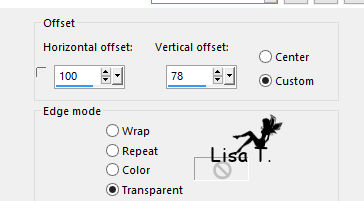
copy / paste decoration « bdn_1 » as
new layer
effects -> image effects -> offset
14
copy / paste as new layer your character tube
move it to the left (see final result)
15
effects -> 3D effects -> drop shadow / black

16
copy / paste as new layer « corinne.vicaire - sac_vuitton-2016 » (handbag)
17
effects -> 3D effects -> drop shadow as before
18
copy / paste as new layer text tube
19
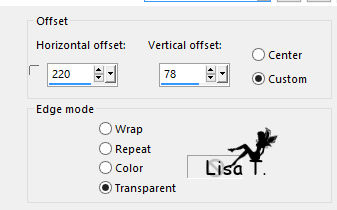
effects -> image effects -> offset
20
image -> add borders -> check « symmetric » ->...
1 pixel color 2
2 pixels color 1
1 pixel color 2
2 pixels color 3
1 pixel color 2
21
selections -> select all
22
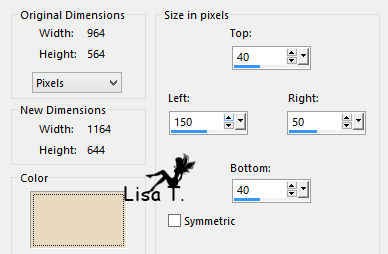
image -> add borders -> uncheck « symmetric » /
color 1 ->
23
selections -> invert
selections -> promote selection to layer
24
effects -> plugins -> AFS IMPORT / sqborder 2

25
effects -> plugins -> Unlimited 2 -> Ecosse / Flutter

26
selections -> select none
copy / paste as new layer « corinne.vicaire-chaussures
LV-2016 » (shoes)
27
move this tube bottom left
effects -> 3D effects -> drop shadow as before (don’t
change settings)
28
copy / paste as new layer « corinne.vicaire - LV-2-2016 » (Monogram)
colorize if necessary using color 2’s Hue and saturation
move it top left (see final result)
29
apply your watermark
image -> add borders -> check « symmetric » -> 1
pixel color 1
30
image -> resize -> check « all layers » -> 900
pixels (width)
31
save as... type .jpeg

Your tag is finished.
Thank you for following this tutorial
Don’t forget to sign (to avoid plagiarism) and save file
as… type JPEG

Don’t hesitate to send your creations to
Belle de Nuit

It will be a real pleasure for her to show them in the gallery
at the bottom of the tutorial page
Don’t forget to indicate her your name and the adress
of your blog or site if you have one

If you want to receive Belle de Nuit’s Newsletter,
sign up ...


My tag with my tubes

Back to the boards of Belle de Nuit ’s tutorials
Board 1 

|