

The original tutorial
can be found HERE


Conditions of use of the material provided
It is forbidden to modify, change the name, take off the
watermarks or alter tubes provided.
It is forbidden to share them in groups or offer them on
your site, blog or forum,
you are allowed to use them in another creation for your
personal use
If you want to use them to create a tutorial, you must
ask the permission to the authors.
this tutorial is a personal creation. Any resemblance with
another would be pure coincidence
this tutorial can be followed with another version of PSP,
but the results might be slightly different

Supplies
tubes - mask - color palette

the character tube is not provided
Belle de Nuit chose a tube created by Corinne Vicaire -
Thank you Corinne
open the tubes, duplicate and work with the ocopies to
preserve originals
open the mask(s) and minimize to tray
save selections into the folder « selections » of
Corel PSP general folder
save gradients into the folder « gradients » of
PSP general folder
save patterns into the folder « patterns » of
PSP general folder

Plugins
Mehdi - L en K’s - Graphic Plus - Alien Skin Eye
Candy 5 - Impact
Thank you Tine for sharing your plugins page


translator’s note
« Belle de Nuit » works with PSP X, I use PSPX9
to create my tag and write my translations
but this tutorial can be realized with any other version
of PSP
according to the version of PSP you use, the results might
be slightly differents
don’t hesitate to change blend modes of layers to
match your tubes and colors

Colors

color 1 --> foreground color => FG => left click
--> #b0ddf3
color 2 --> background color => BG => right click
=> #45a5dd
color 3 --> #ffffff (white)

Hints and Tips
TIP 1 -> if you don’t want to install
a font -->
open it in a software as « Nexus Font » (or
other font viewer software of you choice)
as long as both windows are opened (software and font),
your font will be available in your PSP
TIP 2 -> from PSPX4, in the later versions of PSP the functions « Mirror » and « Flip » have
been replaced by -->
image -> Mirror --> image => mirror => mirror
horizontal
image -> Flip --> image => mirror
=> mirror vertical

use this paint brush to mark your
place along the way
 |

Realization
1
open a new transparent image 900 * 500 px
2
prepare a linear gradient into the materials palette
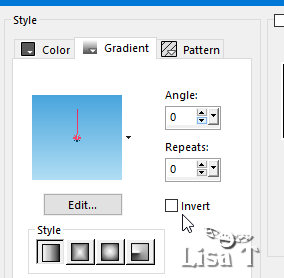
3
flood fill layer with the gradient
4
copy / paste the main tube (character, or other of your
choice) as new layer
5
effects => plugins => Mehdi => Weaver
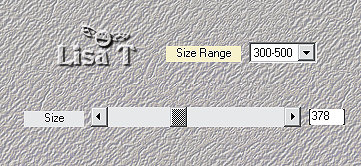
6
effects => image effects => seamless tiling => default
settings
7
blend mode of the layer : Screen / opacity : 100%
effects => edge effects => enhance
8
effects => plugins => L en K’s => Zitah
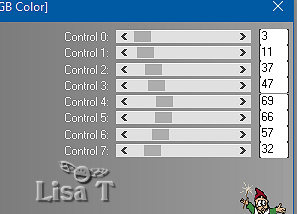
9
layers => new raster layer
flood fill layer with color 3
10
layers => new mask layer => from image
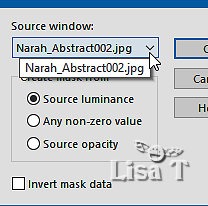
11
effects => edge effects => enhance
layers => merge => merge group
12
copy / paste decoration 1 as new layer
13
don’t move it
14
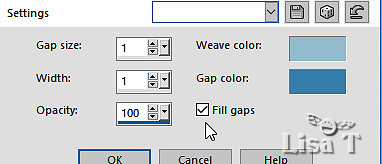
effects => texture effects => weave / color 1 and
2
15
adjust => sharpness => sharpen
16
effects => 3D effects => drop shadow => 1 / 1
/ 50 / 1 / black
17
blend mode of the layer : Hard Light / opacity : 100%
18
layers => duplicate
image => mirror => mirror horizontal
image => mirror => mirror vertical
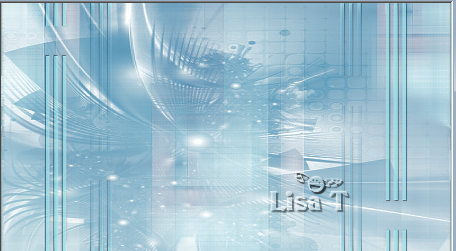
your tag looks like this
19
copy / paste the corner tube as new layer
20
enable the Pick tool with the following settings, to move
the layer acurately => position X : 61 / position
Y : 38
21
blend mode of the layer : Luminance
22
layers => duplicate
image => mirror => mirror horizontal
image => mirror => mirror vertical
23
layers => merge => merge down
24
effects => 3D effects => drop shadow => 1 / 1
/ 50 / 1 / black
25
copy / paste decoration 2 as new layer
26
enable the Pick tool with the following settings, to move
the layer acurately => position X : 263 / position
Y : 231
27
blend mode of the layer : Luminance
adjust => sharpness => sharpen
28
copy / paste decoration 3 as new layer
29
enable the Pick tool with the following settings, to move
the layer acurately => position X : 153 / position
Y : - 2
30
blend mode of the layer : Luminance (Legacy)
31
copy / paste the Word Art tube as new layer
32
enable the Pick tool with the following settings, to move
the layer acurately => position X : 221 / position
Y : 170
33
effects => 3D effects => drop shadow => 1 / 1
/ 50 / 1 / black
34
blend mode of the layer : Overlay
35
highlight Raster 1 / edit => copy
36
image => add borders => tick « symmetric » => ...
1 px color 2
2 px color 3
1 px color 1
10 px color 3
1 px color 2
2 px color 3
1 px color 1
37
selections => select all
38
image => add borders => tick « symmetric » => 40
px color 3
39
selections => invert
edit => paste into selection
40
effects => plugins => Unlimited 2 => Graphic Plus
=> Cross Shadow 50 / 50 / 50 / 50 / 50 / 50 / 50 / 128
41
selections => invert
effects => 3D effects => drop shadow => 5 / 5
/ 30 / 20 / black
effects => 3D effects => drop shadow => - 5 /
- 5 / 30 / 20 / black
42
selections => select none
43
image => add borders => tick « symmetric » => ...
2 px color 3
1 px color 2
10 px color 3
1 px color 2
44
copy / paste your main tube as new layer
place as shown on final result
45
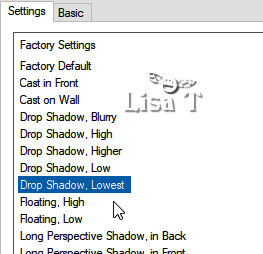
effects => plugins => Alien Skin Eye Candy 5 Impact
/ Perspective Shadow / Drop Shadow Lowest
46
copy / paste the bow as new layer (choose your color)
place as shown on final result
47
copy / paste the decoration Heart as new layer
place as shown on final result
adjust => sharpness => sharpen
48
apply your watermark or signature
write your licence number if you used a licenced tube
layers => merge => merge all (flatten)
49
image => resize => tick « resize all layers » => 950
px width
adjust => sharpness => sharpen
save your work as... type .jpeg

Your tag is finished.
Thank you for following this tutorial
Don’t hesitate to send your creations
to Belle de Nuit

It will be a real pleasure for her to show them in the
gallery at the bottom of the tutorial page
Don’t forget to indicate her your name and the adress
of your blog or site if you have one
my tag with one of my tubes


If you want to receive Belle de Nuit’s Newsletter,
sign up ...


Back to the boards of Belle de Nuit’s tutorials
Board 1 board
2 board
2
Home page

|