

The original tutorial can be found HERE

Conditions of use of the material provided
It is forbidden to modifiy, change the name, take off the
watermarks or alter tubes provided.
It is forbidden to share them in groups or offer them on
your site, blog or forum,
you are allowed to use them in another creation for your
personal use
If you want to use them to create a tutorial, you must
ask the permission to the authors.
this tutorial is a personal creation. Any resemblance with
another would be pure coincidence

Material
1 color Palette
2 mists corinne.vicaire
2 decorations corinne vicaire
1mask corinne.vicaire
1 image

Filters Used
Factory GalleryV/ Picture Chopper
Graphics Plus / Cross Shadow

Thank you Tine
for Sharing your plugins' page
translator’s note
« Belle de Nuit » works with PSP X, I use PSP2018 to
create my tag and write my translations
but this tutorial can be realized with any other version
of PSP
according to the version of PSP you use, the results might
be slightly differents
don’t hesitate to change blend modes of layers matching
your tubes and colors
tips
**TIP 1 **from PSP X4 to recent version, the functions « Mirror » and « Flip » have
been replaced by ---->...
mirror -> mirror horizontal
flip -> mirror vertical
**TIP 2 ** if you want to use a font without having to install
it, open it with a font software (Nexus Font, or other...)
and minimize it to tray keeping the software opened
as long as you don’t close both windows (software
and font) the font will be available into PSP Text tool
Colors
color 1 --> foreground color --> FG --> left click
--> #ffffff (white)
color 2 --> background color --> BG --> right
click --> #000000 (black)
Use this brush to follow the steps
hold down left click to grab it and move it
 |
Realization
1
open a new transparent image 950 * 550 pixels
2
selections -> select all
copy / paste into selection the image 32 into selection
selections -> select none
3
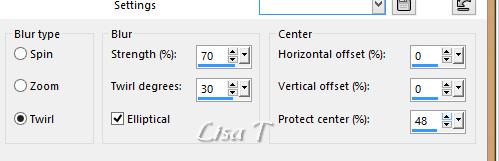
adjust -> blur -> radial blur
4
layers -> duplicate
5
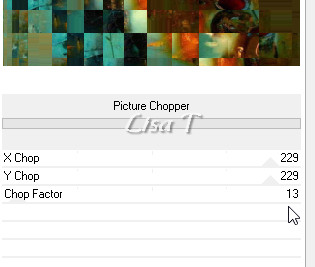
effects -> plugins -> Unlimited 2 -> Filter Factory
Gallery V / Picture Chopper
6
bend mode of the layer : Multiply
7
effects -> image effects -> seamless tiling / default
settings
layers -> new raster layer
flood fill white
8
layers -> new mask layer -> from imagechoose mask « corinne.vicaire
009-2016 »
layers -> merge -> merge group
9
blend mode : soft light
adjust -> sharpness -> sharpen
10
highlight « copy of Raster 1 »
layers -> merge -> merge down
11
copy / paste as new layer « deco bdn_abstrait1 »
activate the Pick Tool -> set position X to 533 and
position Y to -7
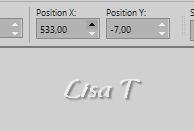
blend mode : Multiply or Luminance (Legacy)
lower the opacity if you wish, it depends on your colors
12
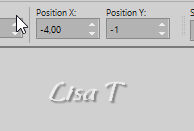
copy / paste as new layer « deco bdn_abstrait_2
png »
13
activate the Pick Tool -> set position X to -4 and position
Y to -57
14
blend mode : Multiply
15
copy / paste as new layer «mist bdn_abstrait1_png »
16
activate the Pick Tool -> set position X to 521 and
position Y to -57
layers -> duplicate
highlight layer underneath (Raster 4) -> blend mode
: Multiply
highlight layer above (copy of Raster 4) -> adjust -> sharpness
-> sharpen
17
copy / paste as new layer «mist bdn_abstrait2_png »
18
activate the Pick Tool -> set position X to 3 and position
Y to 9
layers -> duplicate
highlight layer underneath (Raster 5) -> blend mode
: Multiply
highlight layer above (copy of Raster 5) -> adjust -> sharpness
-> sharpen
19
image -> add borders -> tick « symmetric » -> 1
pixel black
20
edit -> copy
selections -> select all
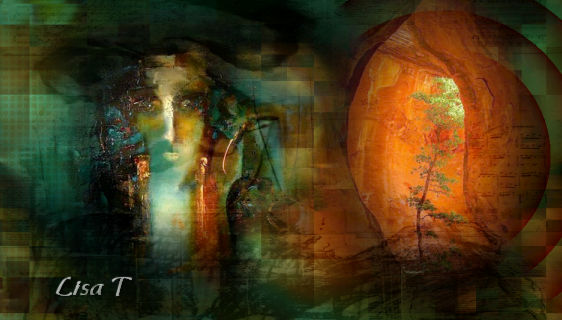
Your tag looks like this
21
image -> add borders -> tick « symmetric » -> 40
pixels white
selections -> invert
22
edit -> paste into selection
23
adjust -> blur -> gaussian blur -> 45
24
effects -> plugins -> Unlimited 2 -> Graphic Plus
/ Cross Shadow (default settings)
25
selections -> invert
effects -> 3D effects -> drop shadow -> 6 / 5
/ 60 / 30 / black
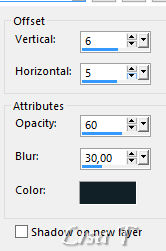
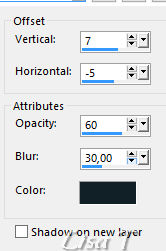
26
effects -> 3D effects -> drop shadow -> 7 / -5
/ 60 / 30 / black
27
selections -> select non
image -> add borders -> tick « symmetric » -> 2
pixels black
28
mage -> resize -> tick « all layers » -> 950
p ixels (width)
29
apply your watermark
save as... type .jpeg
Your tag is finished.
Thank you for following this tutorial
Don’t hesitate to send your creations
to Belle de Nuit

It will be a real pleasure for her to show them in the
gallery at the bottom of the tutorial page
Don’t forget to indicate her your name and the adress
of your blog or site if you have one
If you want to receive Chez Douceur’s Newsletter,
sign up ...

Back to the boards of Belle de Nuit's tutorials
Board 1 

|