Houda

You will find the original tutorial here :

I am member of TWInc
this translated tutorial is protected


All the tubes used to realize this tag were created by Azalée
She is only the tuber, the copyright© belongs to the authors of the original images
If you find the “same” tubes elsewhere, it is pure coincidence
because the images she uses are found on the net.
These tubes are for personal use, and not for profit.
Some “decoration” tubes were found on the net,
or received in the following sharing groups, whom she thanks
Beautiful-PSP - fantasiadicolori - C-Josy-Partages - UnMondodi

This tutorial is a personal creation.
Any resemblance with another one would be pure coincidence.

Plugins
Alien Skin Eye Candy 5 Impact/Gradient Glow
AP 01 [Innovations]/Lines Silverlining
Unlimited 2/Filter Factory Gallery A/Triangular Mosaic Filter
Unlimited 2/Simple/Diamonds
Unlimited 2/Tile & Mirror/XY Offset 50% (positive)
Unlimited 2/Toadies/Weaver
Unlimited 2/VM Texture/Tiles a Gogo
FM Tile Tools/Blend Emboss
L en K’s Pia
Mura’s Meister/Perspective Tili

plugins offered with the kind permission of Pinuccia

Material
selections - tubes - preset
open the tubes, duplicate them and work with the copies
copy the selections, and paste them into the folder “selections” of Py PSP Files
import the preset Gradient Glow

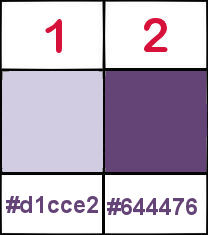
Colors
foreground color -> color 1 -> #d1cce2
background color -> color 2 -> #544293
Use the paint brush to follow the steps
left click to grab it
 |

Realization
Step 1
in the materials palette, prepare a linear gradient (45 / 2)
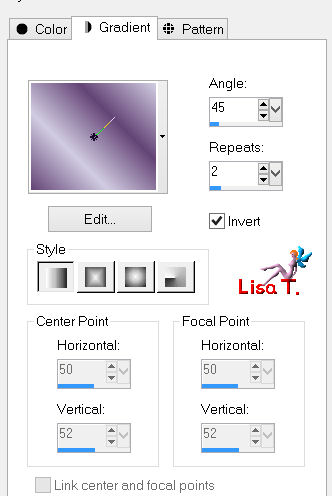
open a new transparent raster layer 900 * 600 pixels
fill with the gradient
adjust/blur/gaussian blur/25
effects/plugins/Unlimited 2/Tiles and Mirror/XY Offset 50% (positive)
Step 2
effects/plugins/Unlimited 2/Simple/Diamonds
layers/duplicate
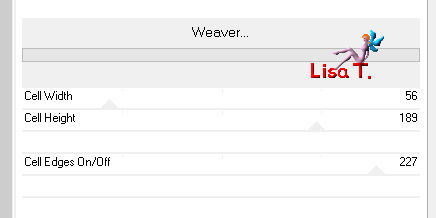
effects/plugins/Unlimited 2/Toadies/Weaver
selections/load-save selections/from disk/selection “Azalee-sel-tuto-72-1”/load
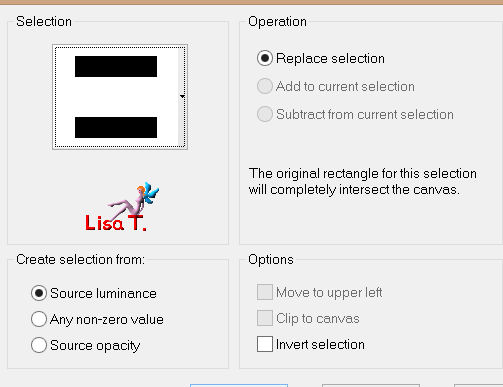
press the delete key of your keyboard
selections/select none
layers/duplicate - image/flip
layers/merge/merge down
Step 3
selections/load-save selections/from disk/selection “Azalee-sel-tuto-72-2”/load
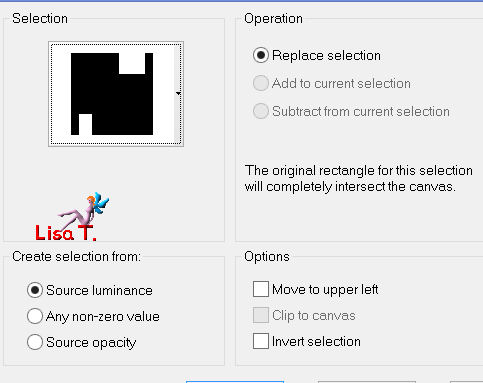
selections/promote selection to layer
effects/plugins/L en K’s Pia

selections/select none
layers/duplicate - image/mirror - image/flip
effects/image effects/offset (35 / 0)
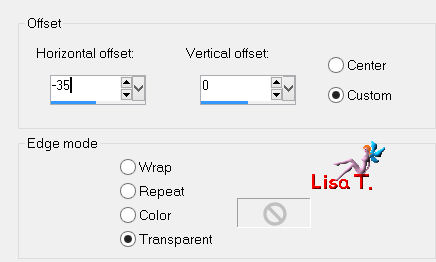
layers/merge/merge down
in the layers palette, set the blend mode on “overlay” and the opacity on 50%
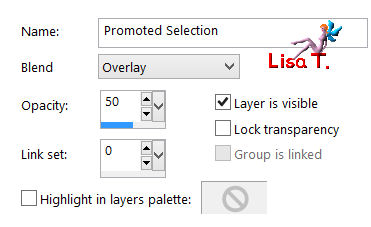
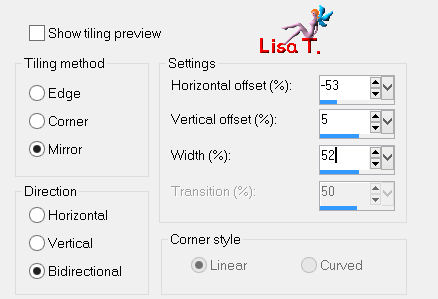
effects/image effects/seamless tiling
Step 4
in the layers palette, activate the bottom layer (raster 1)
selections/load-save selections/from disk/selection “Azalee-sel-tuto-72-3”/load
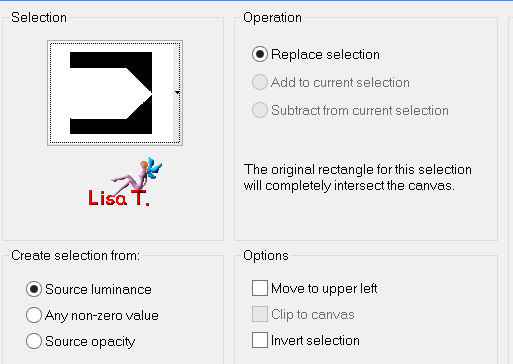
selections/promote selection to layer
effects/plugins/AP 01 (Innovations]/Lines Silverlining
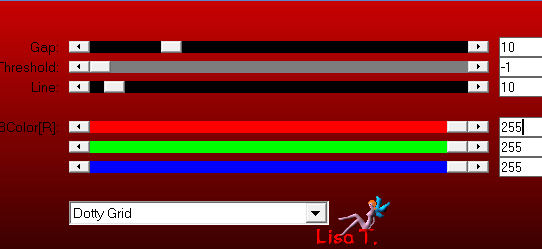
selections/select none
layers/duplicate
image/resize/uncheck “resize all layers”/70%
effects/image effects/offset ( -80 / 0)
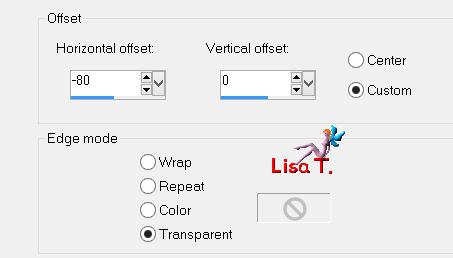
effects/edge effects/enhance
layers/duplicate
effects/distortion effects/wind

layers/arrange/move down
in the layers palette, activate the layer above (copy of promoted selection 1)
layers/merge/merge down (2 times)
layers/duplicate - image/mirror
layers/merge/merge down
Step 5
in the layers palette, activate the top layer (promoted selection)
layers/new raster layer
activate the selection tool/rectangle/custom selection

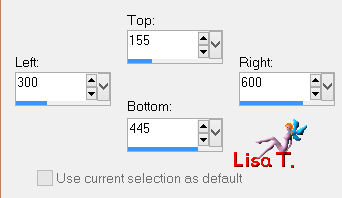
fill with color 2
selections/modify/contract/25 pixels
press the delete key of your keyboard
selections/modify/contract/25 pixels
fill with color 1
selections/modify/contract/25 pixels
press the delete key of your keyboard
selections/select none
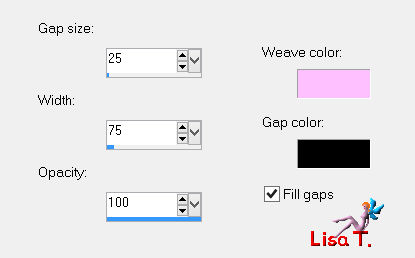
effects/texture effects/weave
weave color : choose a color lighter than color 2
Azalée chose color #ffc0ff
Step 6
layers/duplicate
close the visibility toggle of this layer, and activate the layer below (raster 2)
layers/arrange/move down (3 times)
in the layers palette, activate the top layer and open the visibility toggle
image/resize/uncheck “resize all layers “/50%
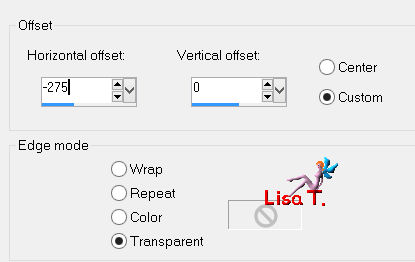
effects/image effects/offset/ ( -275 / 0)
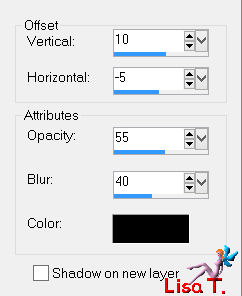
effects/3D effects/drop shadow/ 10 / - 5 / 55 / 40 / black
layers/duplicate - image/mirror
layers/merge/merge down
Step 7
layers/duplicate
image/resize/uncheck “resize all layers “/50%
adjust/sharpness/sharpen
layers/duplicate
effects/distortion effects/wind/from left

effects/distortion effects/wind/from right

layers/arrange/move down
in the layers paeltte, activate the top layer (copy (2) of raster 2)
layers/merge/merge down
Step 8
layers/new raster layer
selections/load-save selections/from disk/selection “Azalee-sel-tuto-72-4”/load
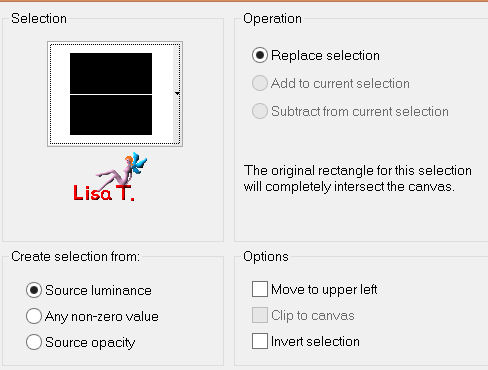
fill with color 2
selections/select none
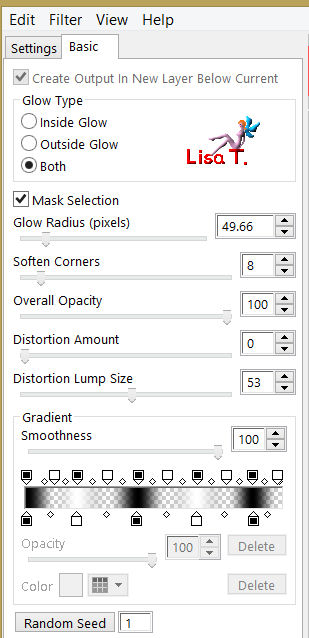
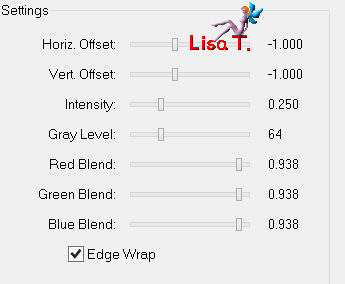
effects/plugins/Alien Skin Eye Candy 5 Impact/Gradient Glow
import the preset provided (or double click on it)
here are the settings
Step 9
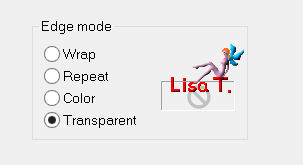
effects/geometric effects/circle
Step 10
layers/duplicate - image/flip
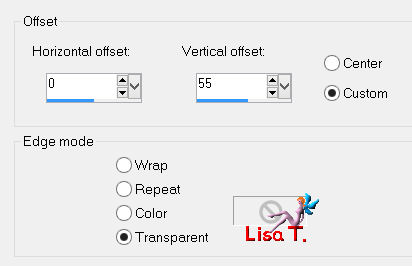
effects/image effects/offset/ ( 0 / 55 )
layers/merge/merge down
activate the magic wand tool, feather 0 and tolerance 0
select inside the ellipse
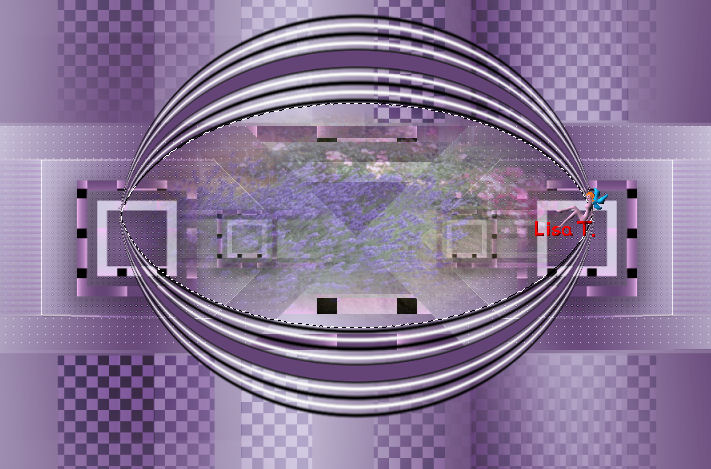
layers/new raster layer
activate the image “Pays-4-Azalee”
edit/copy - back to your work - edit/paste into selection
selections/select none
in the layers palette, set the opacity on 55%
effects/plugins/FM Tile Tools/Blend Emboss/default settings
layers/arrange/move down
in the layers palette, activate the layer above (raster 3)
layers/merge/merge down
layers/arrange/move down (3 times)
in thel ayers palette, set the opacity on 70%
Step 11
in the layers palette, activate the top layer
layers/new raster layer
in the materials palette, prepare an linear gradient ( 0 / 1 / “invert” checked )
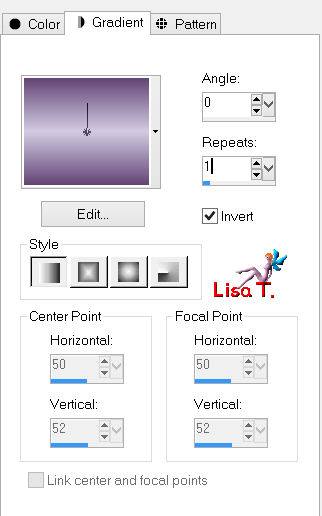
fill with this gradient
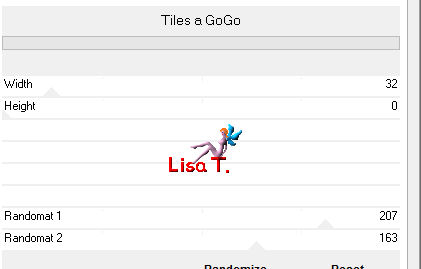
effects/plugins/Unlimited 2/VM Texture/Tiles a Gogo
effects/plugins/Mura’s Meister/Perspective Tiling
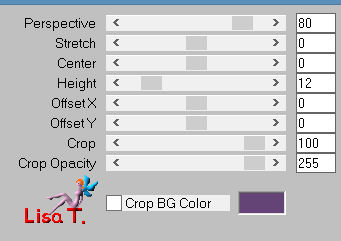
Step 12
your tag looks like this
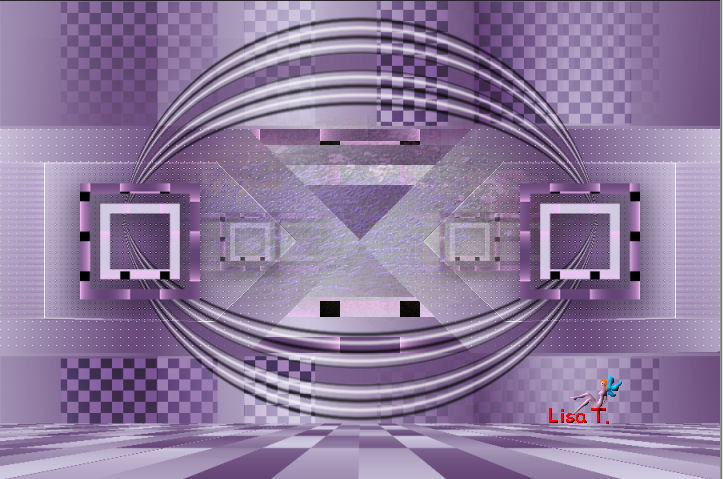
your layers palette looks like this
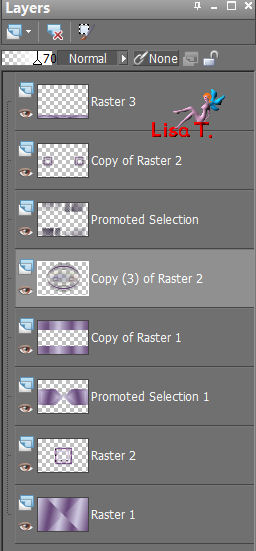
layers/merge/merge visible
Step 13
activate the tube “Vase-142-Azalee”
edit/copy - back to your work - edit/paste as new layer
image/resize/uncheck “resize all layers”/50%
move it at the bottom right (see final result)
effects/3D effects/drop shadow/ -3 / 12 / 50 / 35 / black
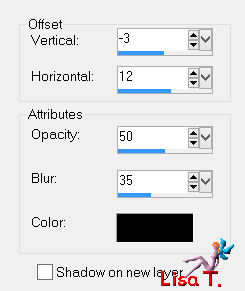
layers/merge/merge all (flatten)
Step 14
image/add borders/check “symmetric”/ ->
2 pixels color 2
4 pixels color 1
2 pixels color 2
Step 15
selections/select all
add borders 35 pixels color 1
selections/invert
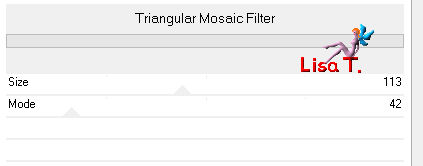
effects/plugins/Unlimited 2/Filter Factory Gallery A/Triangular Mosaic Filter
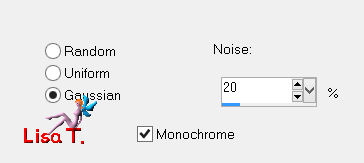
adjust/add-remove noise/add noise
selections/invert
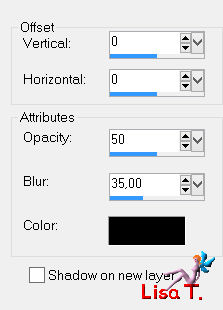
effects/3D effects/drop shadow/ 0 / 0 / 50 / 35 / black
selections/select none
Step 16
activate the tube “Femme-693-Azalee”
erase the signature
edit/copy - back to your work - edit/paste as new layer
image/resize/uncheck “resize all layers”/78%
image/mirror
move it slightly to the left (see final result)
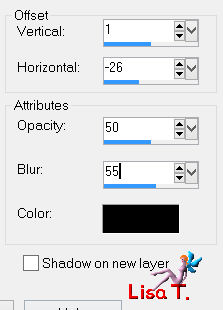
effect/3D effects/drop shadow/ 1 / -26 / 50 / 55 / black
Step 17
activate the tube “Texte-Houda-Tuto-72-Azalee”
edit/copy - back to your work - edit/paste as new layer
move it to top right (see example)
effects/edge effects/enhance (optional)
Step 18
activate the tube “Element-Tuto-72-Azalee”
edit/copy - back to your work - edit/paste as new layer
don’t move it
you can change the colors of this element of course, if you use different colors
if you do this, use -> adjust/Hue and Saturation/colorize
Step 19
apply your signature
Step 20
image/add borders/check “symmetric”/1 pixel color 2
Step 21
image/resize/width 900 pixels
adjust/sharpness/sharpen

Your tag is now finished
We hope you enjoyed doing it

You can send your creations to Azalée.
It will be her pleasure to present it on her site


If you want to be informed about Azalée’s new tutorials
Join her newsLetter, on her home page


Back to the boards of Azalée's tutorials
board 1  board 2 board 2  board 3 board 3 

|