Lisa

You will find the original tutorial here :
I am member of TWInc
this translated tutorial is protected


All the tubes used to realize this tag were created by Azalée
She is only the tuber, the copyright© belongs to the authors of the original images
If you find the “same” tubes elsewhere, it is pure coincidence
because the images she uses are found on the net.
These tubes are for personal use, and not for profit.
Some “decoration” tubes were found on the net,
or received in the following sharing groups, whom she thanks
Beautiful-PSP - fantasiadicolori - C-Josy-Partages - UnMondodi

This tutorial is a personal creation.
Any resemblance with another one would be pure coincidence.

Plugins
Alien Skin Eye Candy 5/Nature/Rust
AP 01 [Innovations]/Lines Silverlining
Filter Unlimited 2 ->
Alf’s Power Toys/Lattice Tiles - Bkg Designer sf10 III/Square Bumps
Render/Clouds (fore-/background color)
Render/Wood (tiled, fore-/background) - TramagesMo’ Jellyfish - VM Natural/Weave Distortion
Graphic <plus/Cross Shadow
Mura’s Meister/Perspective Tiling
FM Tile Tools/Blend emboss

plugins offered with the kind persmission of Pinuccia

Material
1 brush - presets - 1 mask - selections - tubes by Azalée - 1 color palette


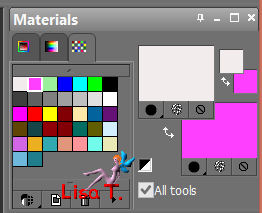
Colors
foreground color -> color 1 -> #f2ecec
background color -> color 2 -> #ff40ff
color 3 -> #9bf19b


Implementation
open the color palette, and place the colors in the materials palette, using the dropper tool
open the tubes, duplicate them and close the originals. Work with the copies
open the mask and minimize it
copy the selections, and paste them into the folder “selections” of “My psp Files”
import the paint brush, and the preset

Use the paint brush to follow the steps
left click to grab it
 |

Realization
Step 1
prepare colors 1 and 2 in the materials palette
open a new transparent raster background, 900 * 600 pixels
fill with color 2
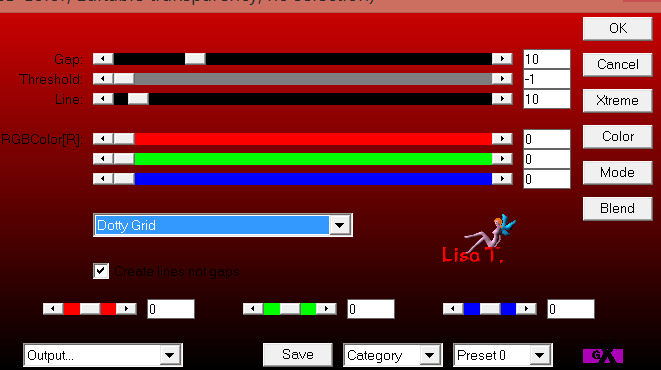
efects/plugins/AP01 Innovations/Lines Silverlining
Step 2
layers/new raster layer
fill with color 1
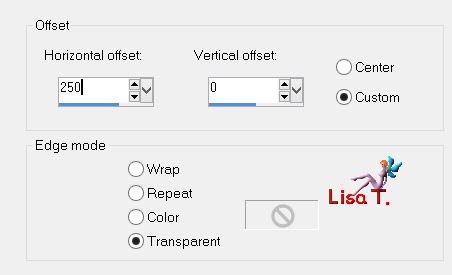
effects/image effects/offset/ 250 / 0
Step 3
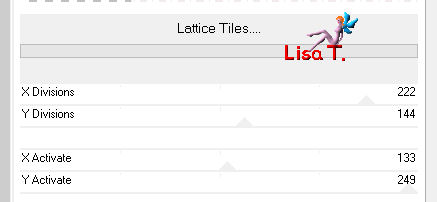
effects/plugins/Unlimited 2/Alf’s Power Toys//Lattice Tiles
Step 4
layers/nex raster layer
fill with color 2
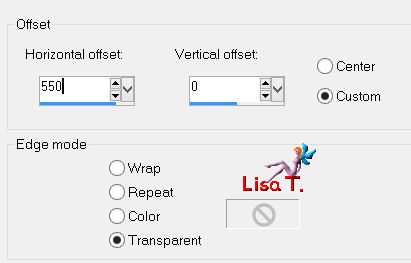
effects/image effects/offset/ 550 / 0
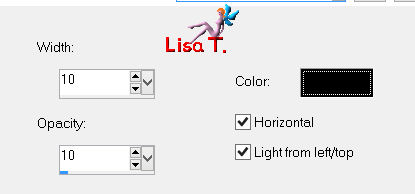
effects/texture effects/blinds
Step 5
layers/new raster layer
fill with color 1
effects/image effects/offset/ 675 / 0
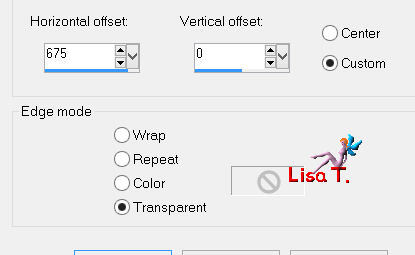
Step 6
effects/plugins/Unlimited 2/Bkg Designers sf10 III/Square Bumps
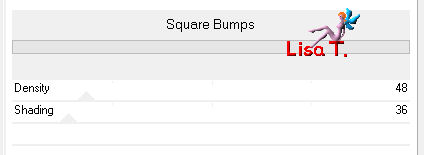
layers/merge/merge visible
step 7
your tag looks like this
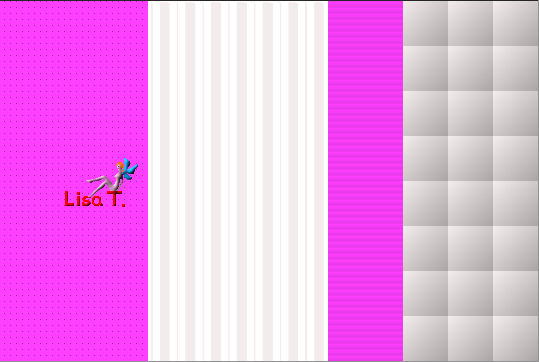
Step 8
layers/duplicate
image/free rotate/left/90°/uncheck the boxes
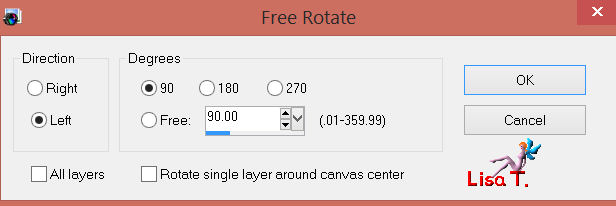
effects/3D effects/drop shadow/ 1 / 1 / 65 / 1 / black
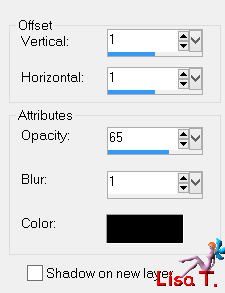
drop shadow again -1 / -1 / 65 / 1
Step 9
effects/image effects/seamless tiling
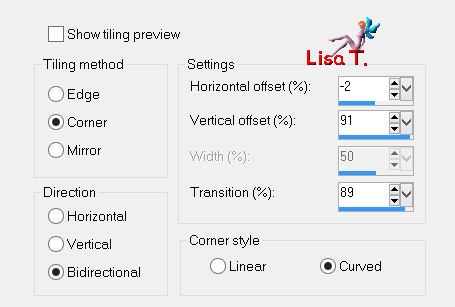
Step 10
layers/duplicate - image/flip
in the layers palette, set the opacity on 50%
layers/merge/merge visible
Step 11
selections/load-save selection/from disk/selection “azalee-sel-tuto-65-1”/load
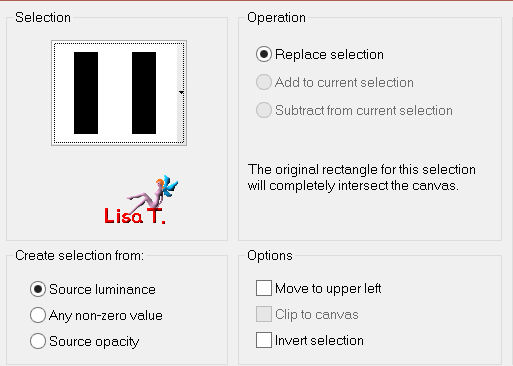
selections/promote selection to layer
selections/modify/contract/10 pixels
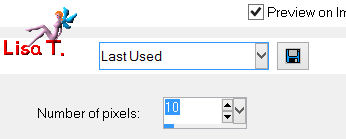
effects/3D effects/drop shadow/ 0 / 0 / 45 / 21 / black
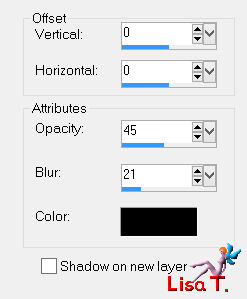
selections/modify/contract/10 pixels

activate the tube “magnolia_white”
edit/copy - back to your work - edit/paste as new layer
place it in the middle of the selection
selections/invert
press the Delete key of your keyboard
selections/invert
effects/3D effects/drop shadow/ 0 / 0 / 45 / 21 / black

selections/select none
layers/merge/merge down
effects/3D effects/drop shadow / 0 / 0 / 45 / 21 / black

Step 12
layers/duplicate
effects/image effects/offset/ 195 / 0
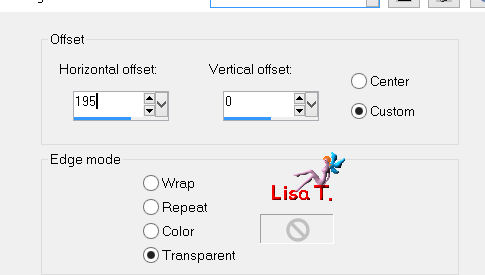
adjust/hue and saturation/colorize
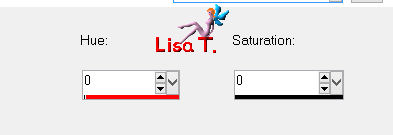
in the layers palette, set the opacituy on 35%
effects/plugins/FM Tile Tools/Blend Emboss/default settings/apply 2 times this effect
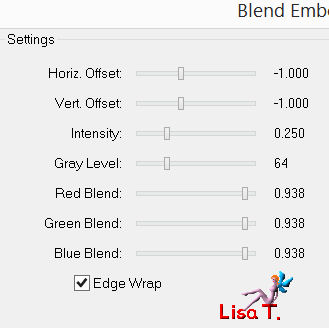
Step 13
selections/load-save selection/from disk/selection “azalee-sel-tuto-65-2”/load
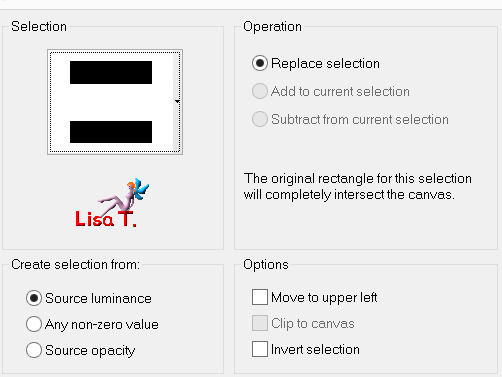
in the layers palette, activate the background layer (merged)
selections/promote selection to layer
selections/modify/contract/5 pixels
effects/3D effects/drop shadow/ 0 / 0 / 55 / 21 / black
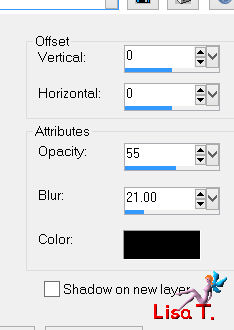
layers/new raster layer
in the material palette, set color 3 as foreground
fill the selection with this color
selections/modify/contract/5 pixels
press the Delete key of your keyboard
effects/3D effects/drop shadow/ 0 / 0 / 55 / 21 / black

selections/select none
layers/merge/merge down
Step 14
effects/plugins/Mura’s Meister/Perspective Tiling
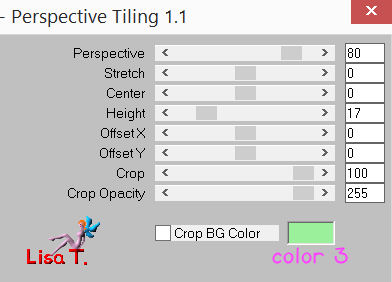
Step 15
effects/plugins/Unlimited 2/Tramages/Mo’ Jellyfish
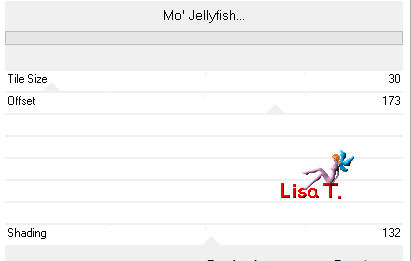
Step 16
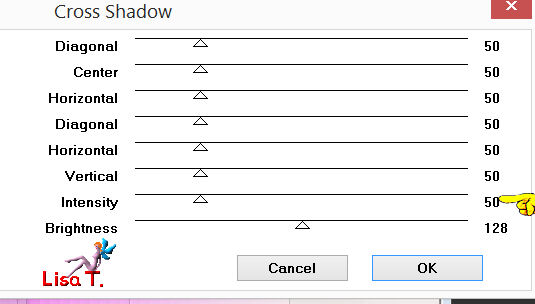
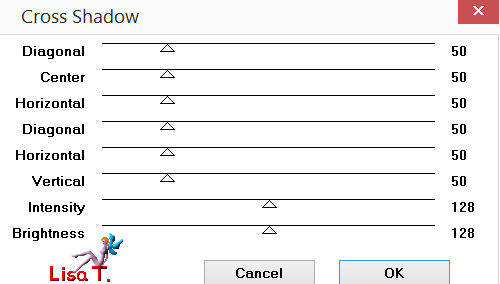
effects/plugins/Graphic Plus/Cross Shadow
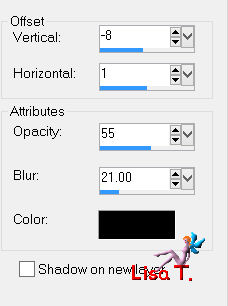
effects/3D effects/drop shadow/ -8 / 1 / 55 / 21 / black
Step 17
in the layers palette, activate the background layer
activate the tube “clouds-tuto-65-azalee”
edit/copy - back to your work - edit/paste as new layer
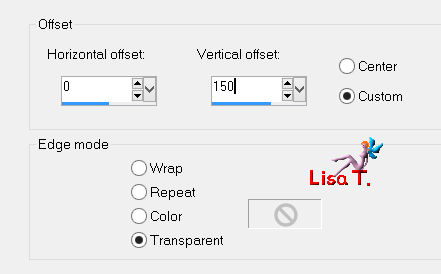
effects/image effects/offset/ 0 / 150
in the layers palette, set the blend mode on “darken” and the opacity on 40%
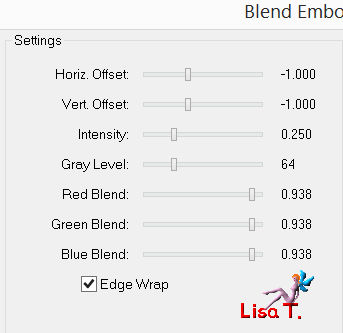
effects/plugins/FM Tile Tools/Blend Emboss/default settings
Step 18
in the layers palette, activate the top layer
activate the tube “deco-1-tuto-65-azalee”
edit/copy - back to your work - edit/paste as new layer
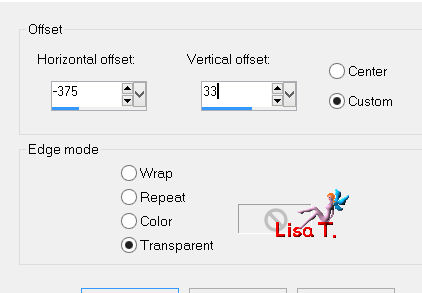
effects/image effects/offset/ -375 / 33
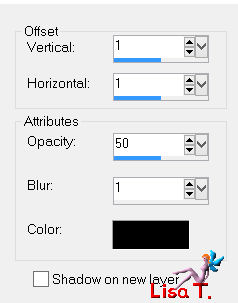
effects/3D effects/drop shadow/ 1 / 1 / 50 / 1 / black
Step 19
layers/duplicate
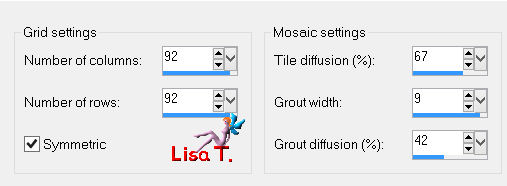
effects/texture effects/mosaic-antique
layers/arrange/move down
in the layers palette, activate the top layer
layers/merge/merge down
Step 20
in the layers palette, activate the third layer from the bottom (promoted selection 1)
close the visibility toggles of the layers above
layers/new raster layer
fill with color 3
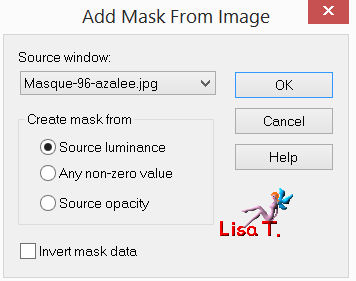
layers/new mask layer/from image/masque-96-azalee
effects/edge effects/enhance
layers/merge/merge group
in the layers palette, set the blend mode on “Multiply” and the opacity on 40%
effects/plugins/Graphic Plus/Cross Shadow
open the visiblity toggles of the layers
Step 21
in the layers palette, activate the top layer
activate the tube “text-tuto-65-azalee”
edit/copy - back to your work - edit/paste as new layer
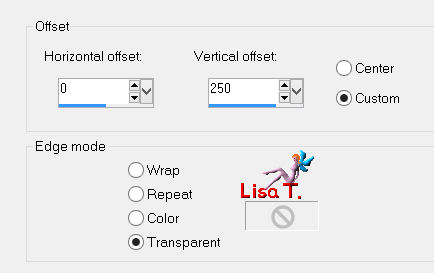
effects/image effects/offset/ 0 / 250
Step 22
activate the tube “deco-2-tuto-65-azalee”
edit/copy - back to your work - edit/paste as new layer
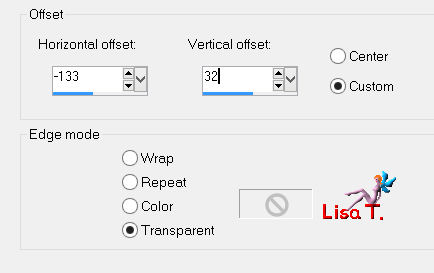
effects/image effects/offset/ -133 / 32
Step 23
layers/new raster layer
in the material palette, swap materials
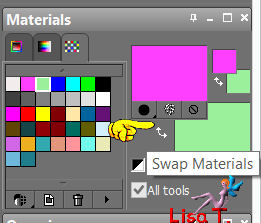
color 2 as foreground
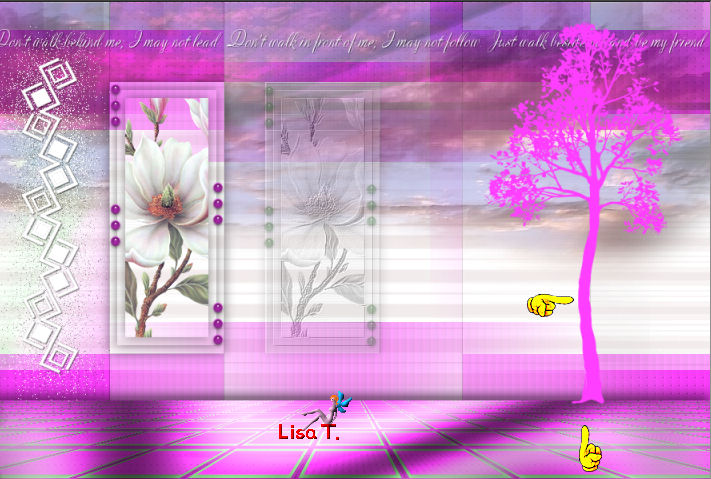
activate the paint brush tool/brush “Arbre 1” (provided)

apply to the right (see final result)
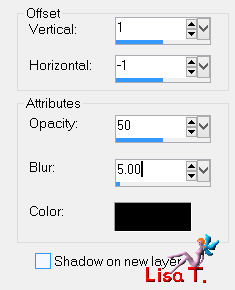
effects/3D effects/drop shadow/ 1 / -1 / 50 / 5 / black
in the layers palette, set the opacity on 32%
Step 24
activate the tube “text-lisa- 65-azalee”
edit/copy - back to your work - edit/paste as new layer
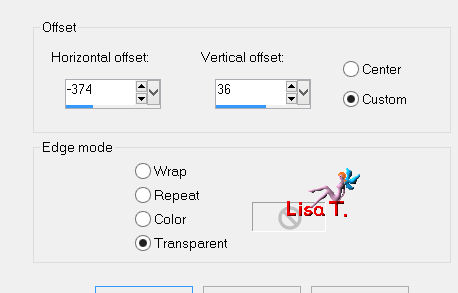
effects/image effects/offset/ -374/36
Step 25
layers/new raster layer
in the materials palette, set color 3 as foreground color
fill the layer with this color
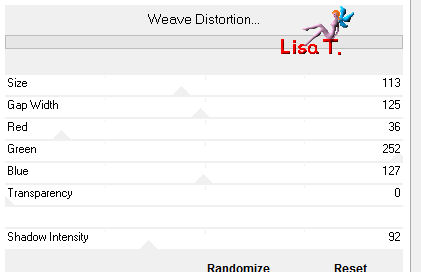
effects/plugins/Unlimited 2/VM Natural/Weave distortion
effects/image effects/seamless tiling
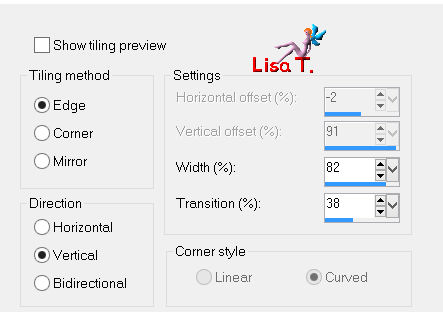
in the layers palette, set the blend mode on “multiply” and the opacity on 60%
Step 26
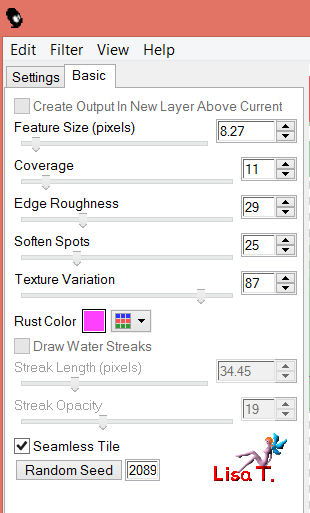
effects/plugins/Aline Skin Eye Candy 5/Nature/Rust
import the preset “azalee-Rust-T-65”
if you have difficulties to import the preset, see the settings below
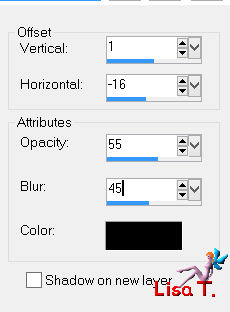
effects/3D effects/drop shadow/ 1 / -16 / 55 / 45 / black
Step 27
activate the tube “vase-110-azalee”
edit/copy - back to your work - edit/paste as new layer
image/resize/60%/uncheck “resize all layers”
effects/image effects/offset/ -250 / -195
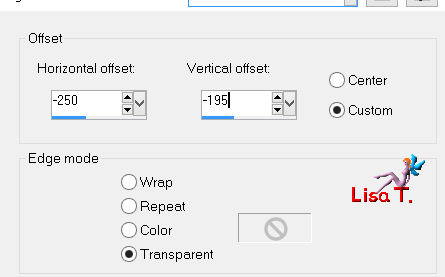
effects/3D effects/drop shadow/ -12 / -18 / 55 / 45 / black
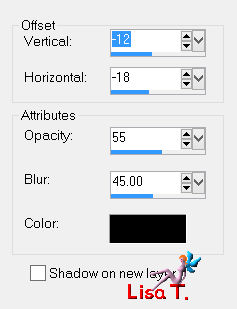
adjust/sharpness/sharpen
layers/duplicate
effects/image effects/offset/ -220 / -25
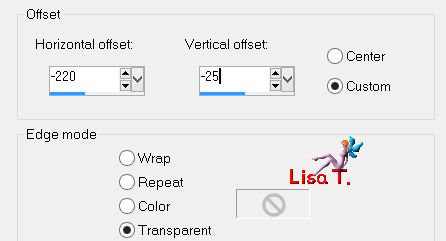
in the layers palette, set the opacity on 30%
layers/merge/merge visible
Step 28
image/add borders/check “symmetric”/1 pixel/black
selections/select all
image/add borders/check “symmetric”/10 pixels/whiteselections/invert
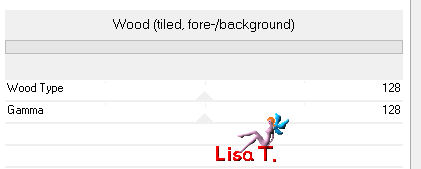
effects/plugins/Filter Unlimited 2/Render/Wood (tiled, fore-/background)
effects/3D effects/drop shadow/ 0 / 0 / 65 / 25 / balck
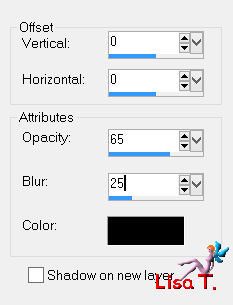
selections/select none
Step 29
image/add borders/check “symmetric”/1 pixel/black
selections/select all
image/add borders/check “symmetric”/20 pixels/white
selections/invert
effects/plugins/Unlimited 2/Render/Clouds (fore-/background color)
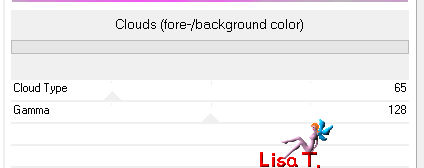
selections/invert
effects/3D effects/drop shadow/ 0 / 0 / 65 / 25 / black

selections/select none
Step 30
repeat step 28
Step 31
activate the tube “femme-650-azalee”
edit/copy - back to your work - edit/paste as new layer
image/resize/83%/uncheck “resize all layers”
effects/image effects/offset/ 170 / -2
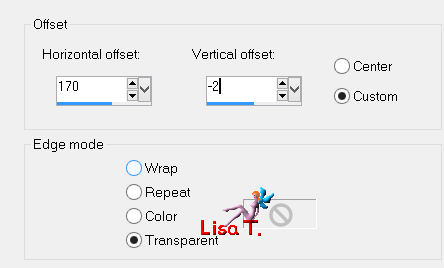
effects/3D effects/drop shadow/-7 / -14 / 65 / 55 / balck
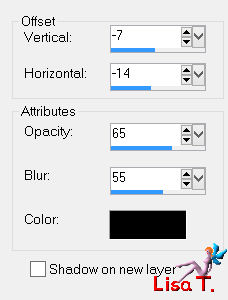
adjust/sharpness/sharpen
layers/duplicate
image/resize/83%/uncheck “resize all layers”
effects/image effects/offset/ 360 / -100
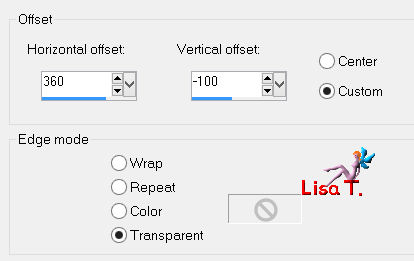
in the layers palette, set the opacity on 25%
Step 32
image/add borders/check “symmetric”/1 pixel/black
Step 33
apply your signature
Step 34
layers/merge/merge all (flatten)
Step 35
image/resize/900 pixels width
adjust/sharpness/sharpen
save as… type jpeg

Your tag is now finished
hope you enjoyed doing it

You can send your creations to Azalée.
It will be her pleasure to present it on her site

If you want to be informed about Azalée’s new tutorials
Join her newsLetter, on her home page


Back to the boards of Azalée's tutorials
board 1  board 2 board 2  board 3 board 3 

|