Mamy Annick

You will find the original tutorial here :


All the tubes used to realize this tag were created by Azalée
She is only the tuber, the copyright© belongs to the authors of the original images
If you find the « same » tubes elsewhere, it is pure coincidence
because the images she uses are found on the net.
These tubes are for personal use, and not for profit.
Some « decoration » tubes were found on the net,
or received in the following sharing groups, whom she thanks
Beautiful-PSP - fantasiadicolori
This tutorial is a personal creation.
Any resemblance with another one would be pure coincidence.
Translator’s note : Azalée works with PSPX6, and I work with PSPX8
but this tutorial can be realized with another version of PSP
Plugins
Carolaine and sensibility/ CS-HLines
Filters Unlimited/ Tile & Mirror/ Kaleidoscope2
Filters Unlimited/ Tile & Mirror/ Mirrored Scaled
Filters Unlimited/ VM Distortion/ Distortion by Hue
FM Tile Tools/ Saturation Emboss
MuRa’s Meister/ Cloud
plugins offered with the kind permission of Pinuccia

Material
1 character tube – misted face – misted scenery – decoration element
duplicate all tubes, close the originals and work with the copies
copy/paste the selections into the folder « selections » of My PS Files
copy/paste the Presets into the folder « presets » of My PSP Files
open the mask and minimize it to tray

Colors
foreground color -> color 1 -> #e8e2e6
background color -> color 2 -> #492da4

use the pencil to follow the steps
left click to grab it

Realization
Step 1
open a new transparent raster layer 900 * 600 pixels (Raster 1)
effects > plugins > Mura’s Meister > Cloud

Step 2
selections > select all
copy/paste into selection the tube « Pays-337-Azalee »
selections > select none
Step 3
adjust > blur > radial blur

adjust > sharpness > sharpen more
Step 4
effects > plugisn > Unlimited 2 > Tile & Mirror > Mirrored & Scaled

Step 5
layers > duplicate (copy of Raster 1)
effects > plugine > Unlimited 2 > Tile & Mirror > Kaleidoscope 2
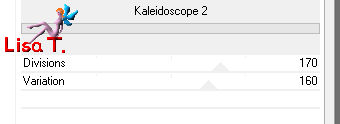
Step 6
acivate the Pick tool, click on « Carpet-Tuto-115-Azalee »
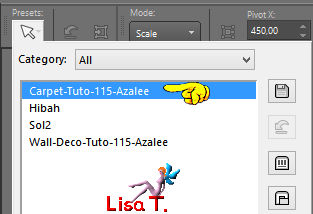
press the M key of your keyboard to disable the tool
Step 7
selections > select all
selections > float
selections > modify > select selections borders

flood fill with the BG color
selections > select none
effects > 3D effects > drop shadow > 2 / -2 / 65 / 25,75 / black

adjust > sharpness > sharpen
Step 8
layers > new raster layer (Raster 2)
selections > load-save selection > from disk > selection « Mamy-Annick-Sel1 »

flood fill the selection with the BG color
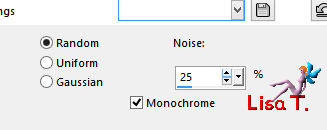
Step 9
adjust > add-remove noise > add noise
selecitons > modify > contract > 5 pixels
DELETE
selections > modify> contract > 5 pixels
flood fill the seleciton with the FG color
selections > modify > contract > 2 pixels
DELETE
selections > modify> contract > 5 pixels
flood fill with a linear gradient > 0 / 0 / uncheck « invert » > color
copy/paste into selection the landscape tube
selections > select none
effects > 3D effects > drop shadow

Step 10
effects > plugins > FM > Saturation Emboss > default settings

Step 11
layers > new raster layer (Raster 3)
flood fill with the BG color
layers > new mask layer > from image

layesr > merge > merge group (Group-Raster 3)
layers > arrange > move down (Raster 3)
selections > load-save selection > from disk > selection « Mamy-Annick-Sel2 »

flood fill the selection with the BG color
selections > select none
Step 13
effects > plugins > Carolaine and Sensibility > CS-HLines

effects > edge effects > enhance
Step 14
effects > plugins > Unlimited 2 > VM Distortion > Distortion by Hue

Step 15
actiate the Pic tool, click on « Wall-Deco-Tuto-115-Azalee »
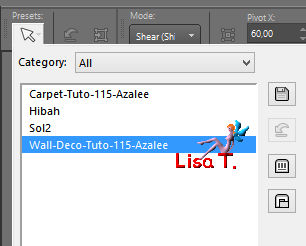
press the M key to disable the tool
Step 16
layers > duplicate (Copy of Raster 3)
image > mirror > mirror vertical
layers > merge > merge down (Raster 3)
effects > 3D effects > drop shadow

Step 17
layers > duplicate (Copy of Raster 3)
image > mirror > mirror horizontal
layers > merge > merge down (Raster 3)
opacity : 80%
layers > arrange > move down TWiCE
Step 18
copy/paste new layer the tube « Femme-Misted-1391-Azalee » (Raster 4)
image > resizze > uncheck « resize all layers « > 65%
move it top left corner

adjust > sharpness > sharpen more
Step 19
effects > plugins > FM Tile Tools > Saturation Emboss > default settings

Step 20
acitvate the top layer (Raster 2)
copy/paste as new layer the element 1 (Raster 5)
don’t move it
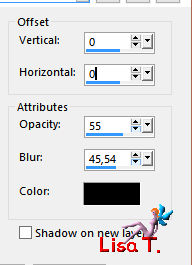
effects > 3D effects > drop shadow as before
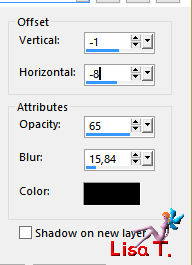
drop shadow again changing V and H by -1 and -8
Step 21
copy/paste as new layer the tube « Femme-1390-Azalee » (Raster 6)
image > resize > uncheck « resize all layers » > 88%
move it to the bottom (see final reslt)
adjsut > sharpness > sharpen
effecst > 3D effects > drop shadow

Step 22
image > add borders > check « symmetric » -->
2 pixels BG color
5 pixels FG color
1 pixel BG color
Step 23
selections > select all
image > add borders > 35 pixels FG color
effects > 3D effects > drop shadow
Step 24
selections > invert
effects > plugins > Carolaine & Sensibility > CS-HLines

effects > edge effects > enhance
selections > select nonee
Step 25
layers > new raster layer (Raster 2)
apply your watermark
Step 26
image > add borders > 1 pixel BG color
Step 27
save your work as... type jpeg
Your tag is finished
we hope you enjoyed doing it
You can send your creations to Azalée.

It will be her pleasure to present it on her site

If you want to be informed about Azalée’s new tutorials
Join her newsLetter, on her home page

My tag (animated version) characters tubes Animabelle - landscape tube by myself

Back to the boards of Azalée’s tutorials
board 2  board 2 board 2

|