Thank you, Mom !

You will find the original tutorial here :


All the tubes used to realize this tag were created by Azalée
She is only the tuber, the copyright© belongs to the authors of the original images
If you find the “same” tubes elsewhere, it is pure coincidence
because the images she uses are found on the net.
These tubes are for personal use, and not for profit.
Some “decoration” tubes were found on the net,
or received in the following sharing groups, whom she thanks
Beautiful-PSP - fantasiadicolori

This tutorial is a personal creation.
Any resemblance with another one would be pure coincidence.
Translator’s note : Azalée works with PSPX6, and I work with PSPX7
but this tutorial can be followed with another version of PSP
I used my own tubes ; you can get them for free on my site
I used the same colors as Azalee

Plugins
Filters Unlimited/ BKg Designer sf10 III/ SW Graph Paper
Filters Unlimited/ BKg Designer sf10 III/ ZigZaggerate
Filters Unlimited/ VM Toolbox/ Grid
MuRa’s Meister/ Cloud

plugins offered with the kind permission of Pinuccia


Material
1 character tube, Misted Scenery, 1 text, 1 décoration élément and 1 color palette
duplicate the tubes and fermer close the originals. Work with the copies
open the mask « Masque-175-Azalee » and minimize it to tray


Colors
foreground color -> color 1 -> #b7ad8b
background color -> color 2 -> #5f4722
color 3 -> #e2d78a


use the pencil to follow the steps
left click to grab it


Realization
Step 1
open a new transparent raster layer 900 ** 600 pixels
in the materials palette set colors 1 and 2 as foreground and background colors

effects/plugins/Mura’s Meister/Cloud/default settings

Step 2
effects/plugins/Unlimited 2/BKg Designers sf10 III/ZigZaggerate/default settings

Step 3
layers/duplicate
effects/plugins/Unlimited 2/BKg Designers sf10 III/SW Graph Paper

Step 4
selections/select all
selections/modify/contract/25 pixels
DELETE
keep the selection active
Step 5
selections/modify/contract/20 pixels
layers/new raster layer (Raster 2)
flood fill the selection with color 2
selections/modify/contract/1 pixel
DELETE
Step 6
selections/modify/contract/10 pixels
flood fill the selection with color 1
selections/modify/contract/4 pixels
DELETE
Step 7
selections/odify/contract/10 pixels
flood fill the selection with color 2
selections/modify/contract/4 pixels
DELETE
Step 8
selections/modify/contract/15 pixels
layers/new raster layer (Raster 3)
copy/paste into selection the landscape tube
Step 9
keep the selection active
layers/arrange/move down
layers/new raster layer (Raster 4)
effects/plugins/Mura’s Meister/Cloud/default settings

Step 10
selections/modify/contract/5 pixels
DELETE
Step 11
keep the selection active
layers/new raster layer (Raster 5)
effects/plugins/Unlimited 2/VM Toolbox/Grid

selections/select none
layers/duplicate – image/mirror/mirror horizontal – image/mirror/mirror vertical
layers/merge/merge down
Step 12
select the 2 left corners with the magic wand (tolerance and feather : 0)

Step 13
layers/new raster layer (Raster 6)
effects/plugins/Unlimited 2/VM Toolbox/Grid/default settings

selections/select none
layers/duplicate – image/mirror/mirror horizontal
layers/merge/merge down
Step 14
activate Raster 5
layers/merge/merge down
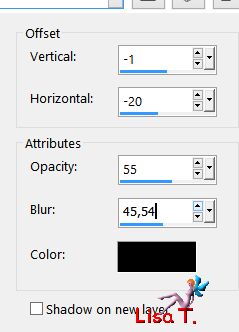
effects/3D effects/drop shadow

repeat « drop shadow » changing (2) by (-2)
Step 15
layers/new raster layer (Raster 5)
selection tool/custom selection


zoom in, flood fill the selection with color 2
selections/select none
Step 16
effects/plugins/Mura’s Meister/Copies

Step 17
effects/geometric effects/Skew

Step 18
effects/distortion effects/Wave

Step 19
effects/distortion effects/polar coordinates/polar to rectangular

Step 20
layers/duplicate
effects/image effects/offset

lalyers/merge/merge down
effects/image effects/offset

Step 21
layers/duplicate – image/mirror/mirror horizontal
layers/merge/merge down
Step 22
effects/distortion effects/polar coordinates/polar to rectangular

image/mirror/mirror vertical
Step 23
layers/duplicate
effects/image effects/offset

layers/merge/merge down
layers/arrange/move up
Step 24
layers/new raster layer (Raster 7)
in the materials palette, set color 3 as foregorund color
flood fill the layer with color 3
Step 25
layers/new mask layer/from image

layers/merge/merge group
adjust/sharpness/sharpen
Step 26
opacity of the layer : 65%
effects/edge effects/enhance more
layers/arrange/move down three times
Step 27
activate the layer « Copy of Raster 1 » (second from the bottom)
layers/arrange/bring to top
Step 28
your tag looks like this

your layers palette looks like this

Step 29
copy/paste as new layer the « mother-child-6-Azalee »
image/resize/uncheck « resize all layers »/62%
move it to the left
adjust/sharpness/sharpen
effects/3D effects/drop shadow

Step 30
copy/paste as new layer the decoration tube 110
effects/image effects/offset

colorize or change the blend mode (luminance (legacy)) if you use your own colors
effects/3D effects/drop shadow

Step 31
copy/paste as new layer the text tube
move it bottom right
colorize it or change the blend mode
Step 32
layers/new raster layer -> apply your signature
Step 33
layers/new raster layer
selections/select all
flood fill the selection with color 2
selections/modify/contract/1 pixel
DELETE
flood fill the selection with color 3
selections/modify/contract/1 pixel
DELETE
flood fill the selection with color 2
selections/modify/contract/1 pixel
DELETE
selections/select none
Step 34
layers/merge/merge all (flatten)
Step 35
file/save as... type jpeg

Your tag is finished
we hope you enjoyed doing it

You can send your creations to Azalée.


It will be her pleasure to present it on her site


If you want to be informed about Azalée’s new tutorials
Join her newsLetter, on her home page


Back to the boards of Azalée’s tutorials
Board 2  board 3 board 3 

|