

You will find the original tutorial here :

This tutorial is a personal creation.
Any resemblance with another one would be only pure coincidence.
It is stricly forbidden to modify tubes, to change their
name or take off the matermarks,
To present them on your sites or blog,
To share them in groups,
to make a bank of images, or to use them on lucrative purposes.

Thank you to respect Animabelle’s work and the tubers
work.
Don’t hesitate to warn me if you have any trouble with
this translation,
and I’ll try to fix the problem as quickly as I can


Material
tubes - text file - text tube - alpha layer (selections included)

open all your tubes into PSP and duplicate them. Work with
the copies to preserve orignals

Filters (plugins) used
Filters Unlimited 2.0 / &<Background Designers IV>
&<Bkg Kaleidoscope>
Filters Unlimited 2.0 / It@lian Editors Effect
Adjust
Toadies
Unlimited 2.0 / Frames, Stone & Granite
Alien Skin Eye Candy 5: Impact
Filters Unlimited 2.0 / Mura's Seamless
Mura's Meister
Filters Unlimited 2.0 / Tramages
AP 01 [Innovation]
thank you Renée Salon for sharing your plugins ‘ page

use the pencil to you follow the steps
hold down left click of your mouse to grab it and move it


Important
Open all images with PSP, duplicate them and close the
originals.
Never work on original images.
Animabelle worked with PSPX8, I worked with PSPX9
but you can follow the steps with another version of PSP

Colors
use the Dropper tool to pick up ..... colors into your
tube
Animabelle chose these colors
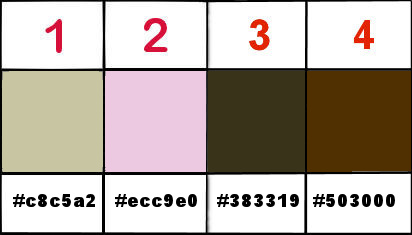
color 1 -> ForeGround color -> #c8c5a2
color 2 -> BackGround color -> #ecc9e0
color 3 -> #383319
color 4 -> #503000
Don't hesitate to change the colors and the blend modes
of the layers,
according to your tubes and images

1
don’t forget to save your work often
in newest versions of PSP (from PSPX4) the functions « Mirror » and « Flip » have
been replaced by -->
« Mirror » --> mirror -> mirror horizontal
« Flip » --> mirror -> mirror vertical
2
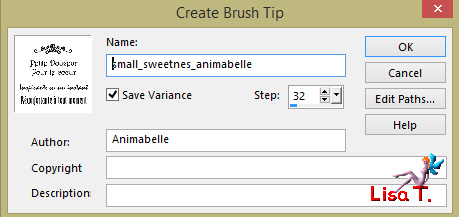
open « Pinceau_Petite_Douceur_Animabelle »
file -> export -> custom brush
give a name to your new brush tip
Realization
1
if you want to use different colors then those indicated
by Animabelle
pick up four colors into your tubes, images, misted....
don’t hesitate to change the blend modes, the opacities
of the layers, matching to your tubes and colors
2
open « 144_tubes_enfantin_animabellewindow -> duplicate
use the copy and close the original image to preserve it
erase the watermark
image -> mirror -> mirror horizontal
edit -> copy
open the Alpha layer « Alpha_Petite_Douceur_Animabelle » and
duplicate it (never work with orignals)
flood fill with color 1
selections -> select all
edit -> paste into selection
selections -> select none
keep this tube opened for a later use
effects -> image effects -> seamless tiling / default
settins
3
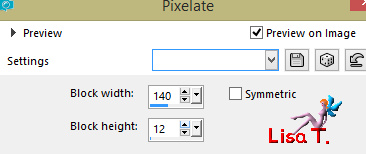
effects -> distortion effects -> pixelate
effects -> Art Media effects -> brush strokes
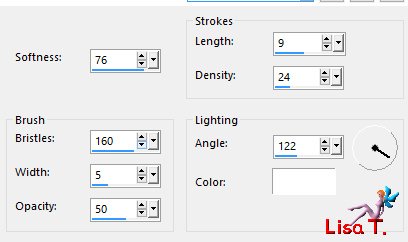
effects -> plugins -> Unlimited 2 -> &<Background
Designers IV> / Refr@ctor / default settings
4
layers -> duplicate
image -> mirror -> mirror horizontal
effects -> plugins -> Unlimited 2 -> &<Background
Designers IV> / sf10Shades Of Shadow
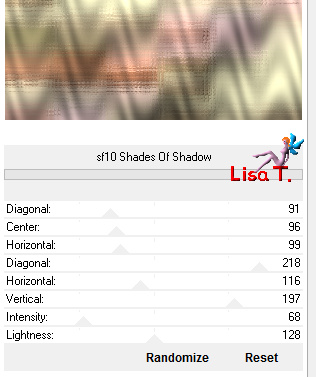
blend mode of the layer : Overlay - Opacity :
40%
layers -> merge -> merge visible
layers -> duplicate
effects -> plugins -> Unlimited 2 -> &<BkgKaleidoscope> /
Kaleidoscope Persian
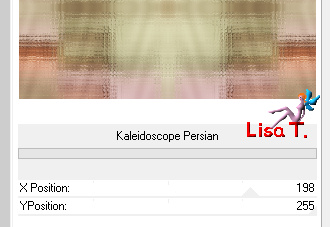
5
activate Selection Tool / Rectangle / custom selection

settings
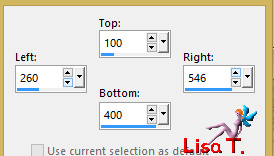
selections -> promote selection to layer
selections -> select none
6
effects -> plugins -> Unlimited 2 -> It@lian
Editors Effect / Tv Editors
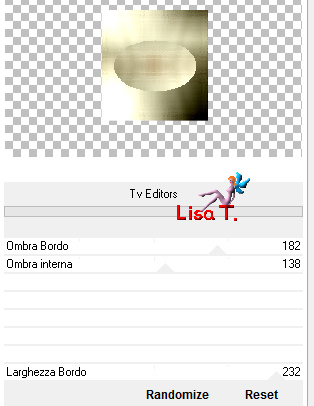
effects -> plugins -> Unlimited 2 -> It@lian
Editors Effect / Effeto Fantasama
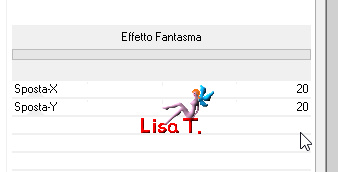
blend mode of the layer : Multiply
effects -> image effects -> seamless tiling / Side
by Side
effects -> reflection effects -> Rotating Mirror
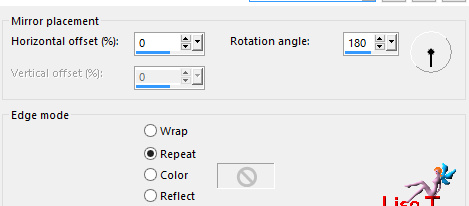
7
highlight layer « copy of Merged » below
selections -> load-save selection -> from alpha channel
-> selection #1
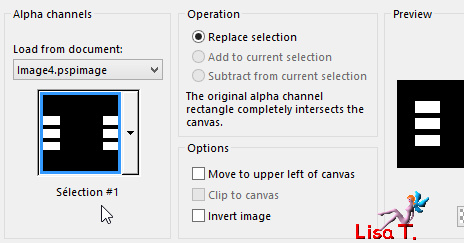
selections -> promote selection to layer
layers -> arrange -> move up
effects -> plugins -> Adjust -> Variations
click once on « original »
then click 3 times on « darken » then
click OK
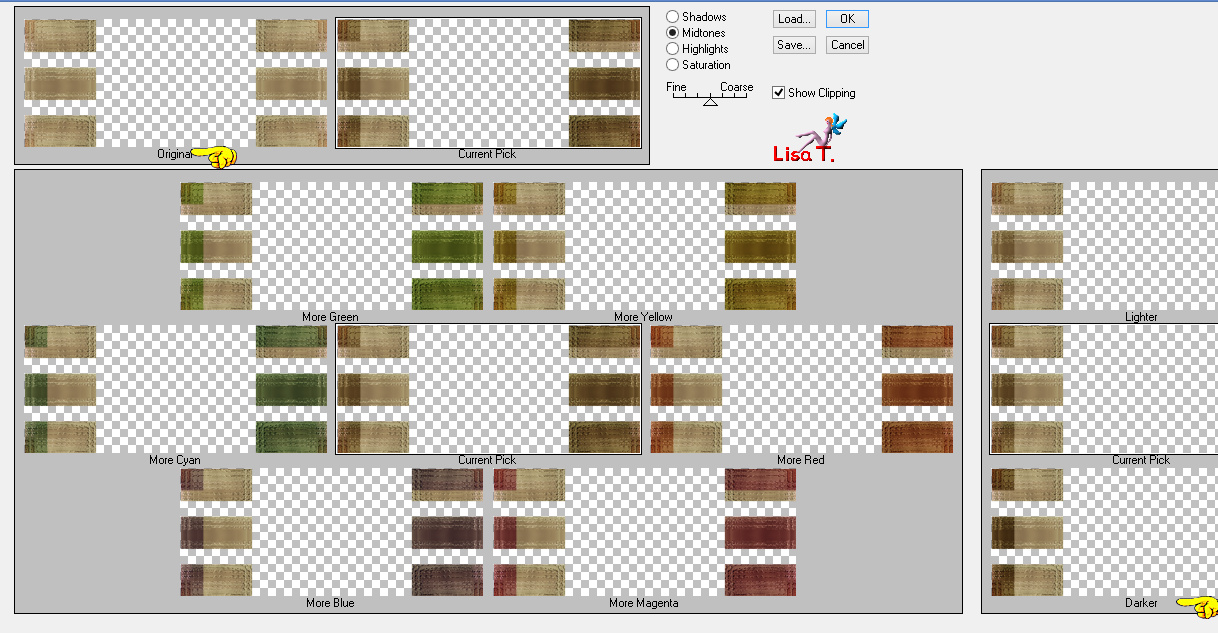
selections -> select none
effects -> 3D effects -> drop shadow -> 5 / 5
/ 100 / 15 / color 3 * -5 / -5
/ 100 / 15 / color 4
8
layers -> duplicate
effects -> distortion effects -> twirl / 720°
layers -> arrange -> move down
layers -> duplicate
effects -> plugins -> Toadies / Weaver

blend mode of the layer : « Burn » - opacity :
60%
highlight layer « copy of Promoted Selection
1 »
effects -> texture effects -> Mosaic Antique
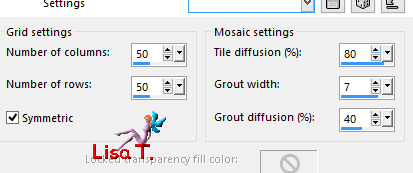
blend mode of the layer : « Multiply » - opacity
: 40%
9
highlight « copy of Merged » (second
from the bottom)
selection tool -> rectangle -> custom selection
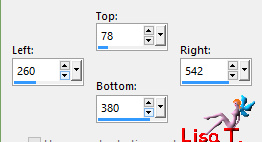
selections -> promote selection to layer
layers -> arrange -> bring to top
effects -> plugins -> Unlimited 2 -> Frames,
Stone & Granite / Stone 02
change the last 3 numbers according to your won colors
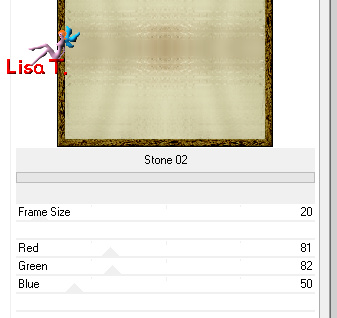
example :
using color #244d47, note the numbers for Red, Green and
Blue
and copy these numbers into your plugin
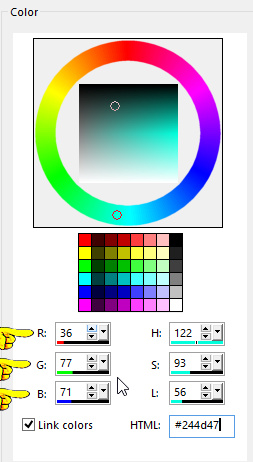
selections -> modify -> contract -> 20 pixels
eidt -> cut
selections -> invert
effects -> 3D effects -> drop shadow -> 0 / 0
/ 100 / 30 / color 3
selections -> select none
10
into mateirals palette, set color 4 as FG color (or another
of your choice of course)
layers -> new raster layer
activate the Brush Tool and choose the brush tip « Pinceau_Petite_Douceur_Animabelle » created
previously
left click once into the frame (see final result)
effects -> 3D effects -> drop shadow -> -2 /
-2 / 80 / 0 / color 1
place it properly with the Move Tool if necessary
layers -> merge -> merge down TWICE
your work and layers palette look like this
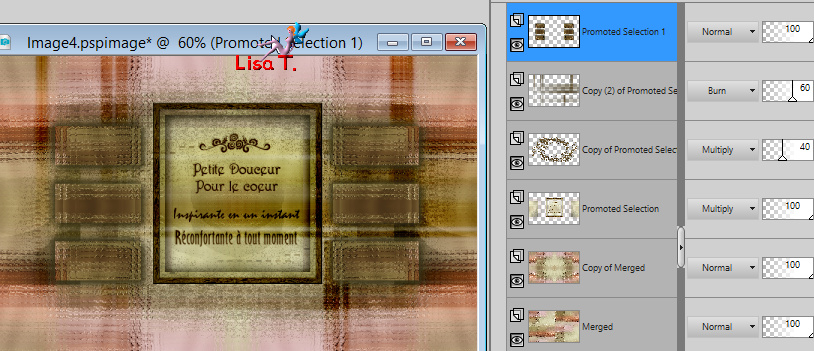
11
layers -> new raster layer
selections -> load-save selection -> from alpha channel
-> selection #2
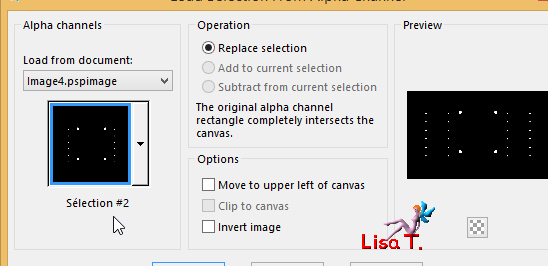
flood fill with color 4
effects -> plugins -> Alien Skin Eye Candy 5 :
Impact -> Glass
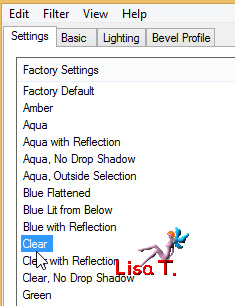
selections -> select none
layers -> merge -> merge down
12
layers -> new raster layer
edit -> copy special -> copy merged
selections -> load-save selection -> from alpha channel
-> selection #3
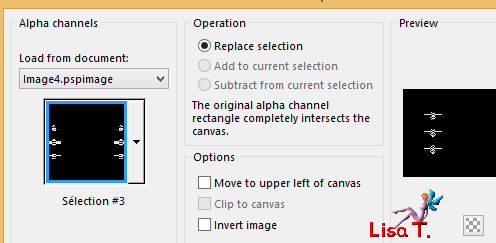
edit -> paste into selection
effects -> plugins -> Unlimited 2 -> Mura’s
Seamless / Emboss at Alpha
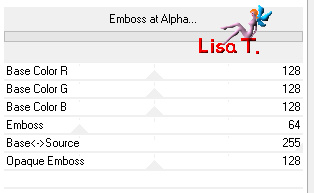
selections -> select none
opacity of the layer : 70%
layers -> merge -> merge down
effects -> image effects -> offset / 0 / 30 / Transparent
and Custom ticked
13
highlight bottom layer (Merged)
layers -> arrange -> bring to top
effects -> plugins -> Mura’s Meister / Perspective
Tiling

14
highlight bottom layer (Copy of Merged)
selection tool -> custom selection
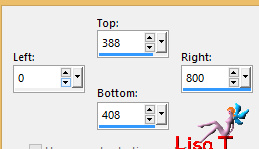
selections -> promote selection to layer
layers -> arrange -> bring to top
effects -> texture effects -> Tiles

adjust -> sharpness -> sharpen
selections -> select none
layers -> duplicate
blend mode of the layer : « Burn » - opacity :
50%
layers -> merge -> merge down
effects -> 3D effects -> drop shadow -> -2 /
0 / 100 / 1 / color 3
layers -> arrange -> move down
effects -> image effects -> offset -> 0 / -8
15
image -> add borders -> tick « symmetric » -> 1
pixel color 3
selections -> select all
image -> add borders -> tick « symmetric » -> 10
pixels color 1
selections -> invert
effects -> reflection effects ->Kaleidoscope
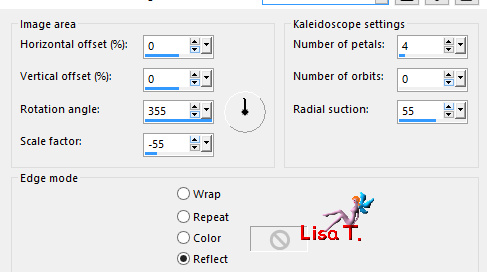
adjust -> blur -> gaussian blur / 10
selections -> promote selection to layer
effects -> 3D effects -> inner bevel / color 1
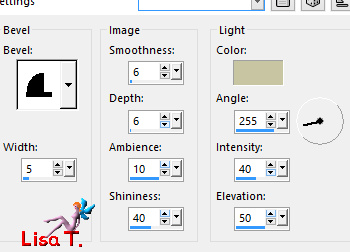
opacity of the layer : 50%
layers -> merge -> merge down
selections -> invert
layers -> new raster layer
effects -> 3D effects -> cutout / color 3
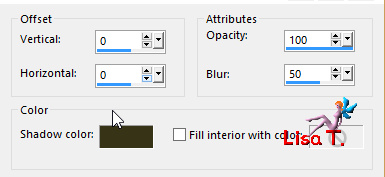
selections -> select none
image -> add borders -> tick « symmetric » -> 1
pixel color 3
16
selections -> select all
image -> add borders -> tick « symmetric » -> 45
pixels color 1
selections -> invert
effects -> plugins -> Unlimited 2 -> Tramages
-> Pool Shadow
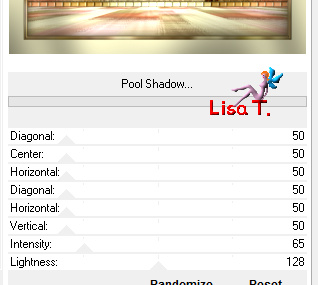
selections -> select all
selections -> modify -> contract / 10 pixels
selections -> promote selection to layer
selections -> modify -> contract / 20 pixels
edit -> cut
selections -> select none
effects -> plugins -> AP 01 [Innovations] / Line
- SilverLining
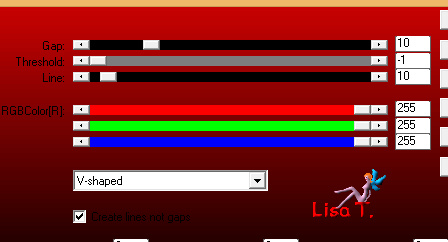
effects -> plugins -> Unlimited 2 -> Mura’s
SEamless / Emboss at Alpha / default settings
blend mode of the layer : « Multiply » - opacity :
80%
17
copy / paste « 144_tubes_enfantins_animabelle » as
new layer
image -> resize -> untick « resize all
layers » -> 65%
adjust -> sharpness -> sharpen
move it bottom right
layers -> duplicate
highlight bottom layer
adjust -> blur -> gaussian blur -> 15
blend mode of the layer « Multiply »
18
highlight top layer
copy / paste « 145_tubes_enfantins_animabelle » as
new layer (don’t forget to erase the watermark)
image -> resize -> 45%
adjust -> sharpness -> sharpen
move it to the left
layers -> duplicate
highlight bottom layer
adjust -> blur -> gaussian blur -> 15
blend mode of the layer « Multiply’
19
highlight top layer
layers -> new raster layer
apply your watermark
iamge -> add borders -> « symmetric » -> 1
pixel color 3
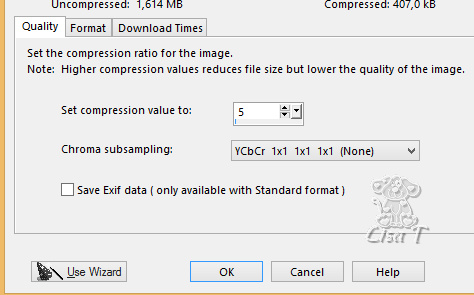
file -> export -> type .jpeg optimizer...

Don't hesitate to write to me if you have any trouble
with this tutorial
If you create a tag (using other tubes than those provided)
with this tutorial
and wish it to be shown, send it to me !
It will be a real pleasure for me to add it to the gallery
at the end of the tutorial


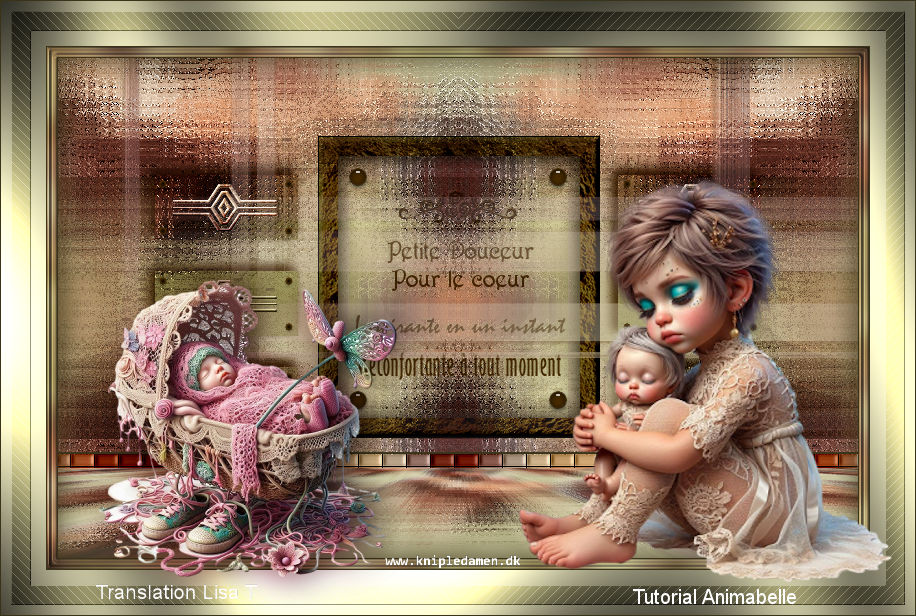
My tag with my characters tubes



created by  Birte Birte

back to the boards of Animabelle’s tutorials
board 1  board
2 board
2  board
3 board
3 

|