

You will find the original tutorial here :

This tutorial is a personal creation.
Any resemblance with another one would be only pure coincidence.
It is stricly forbidden to modify tubes, to change their name or take off the matermarks,
To present them on your sites or blog,
To share them in groups,
to make a bank of images, or to use them on lucrative purposes.

Thank you to respect Animabelle’s work and the tubers work.
Don’t hesitate to warn me if you have any trouble with this translation,
and I’ll try to fix the problem as quickly as I can
Animabelle worked with PSP2019 and I worked with PSP2020 Ultimate
you can follow this tutorial with another version of PSP, but the result might be slightly different

Supplies
Masks – decoration tube - Word Art

main tubes are no longer provided
I used one of my tubes
TIP 1 -> if you don’t want to install a font -->
open it in a software as « Nexus Font » (or other font viewer software of you choice)
as long as both windows are opened (software and font), your font will be available in your PSP
TIP 2 -> from PSPX4, in the later versions of PSP the functions « Mirror » and « Flip » have been replaced by -->
« Mirror »has become --> image => mirror => mirror horizontal
« Flip » has become --> image => mirror => mirror vertical

Plugins needed
I.C.Net Software - Filters Unlimited 2.0
MuRa's Seamless
MuRa's Meister
AAA Filters
Graphics Plus
Tramages
L en K
Thank you Renée Salon for sharing your plugins page

 
Use the pencil to mark your place
along the way
hold down left click to grab and move it
 |
 
1
duplicate all the tubes and work with the copies to preserve originals
save your work often in case of problems with your psp
2
use the Dropper tool to pick up your colors into your tubes and misted images
Animabelle chose these :
color 1 => #fbc4d8
color 2 => #f46a88
color 3 => #b3d4e5
color 4 => #7496a6
color 5 => #25333b
color 6 => #af314b
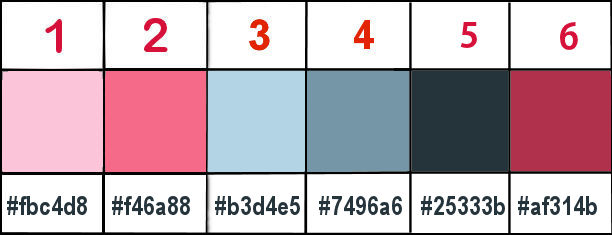
don’t hesitate to change blend modes and opacities of the layers to match your personal colors and tubes
open the masks and minimize to tray
3
open a new image => transparent => 850 * 450 px
flood fill layer with the following sunburst gradient
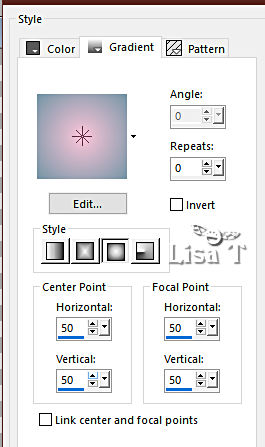
layers => duplicate
effects => plugins => Unlimited 2 => &<Bkg Designer sf10 III> => Solid Solar Fabric
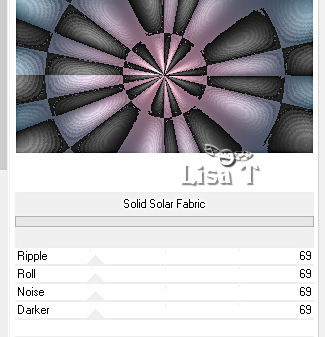
blend mode of the layer : Overlay
layers => merge => merge down
4
effects => plugins => Unlimited 2 => &<Bkg Designer sf10 III> => VMT Trimosaic CG... / default settings
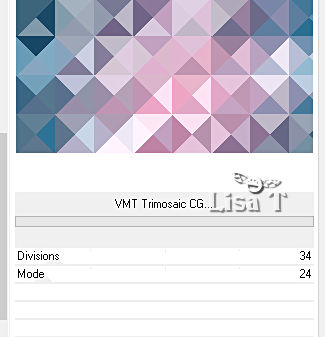
effects => plugins => Toadies => Blast’em ! => 23 / 211
5
layers => duplicate
effects => plugins => Unlimited 2 => Unplugged Tools / CopyStar... / default settings
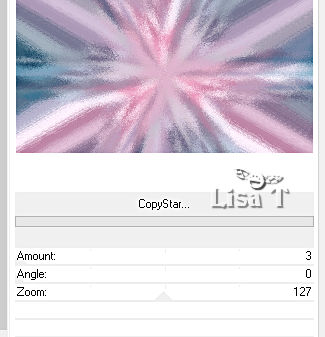
opacity of the layer : 85%
layers => merge => merge down
6
layers => new raster layer
flood fill white
layers => new mask layer => from image
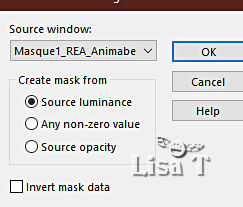
layers => merge => merge group
effects => plugins => Mura’s Seamless => Emboss at Alpha => default settings
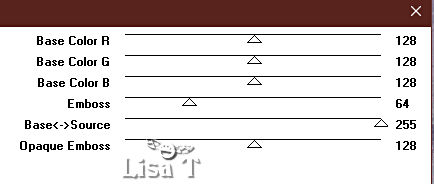
effects => 3D effects => drop shadow => 10 / 10 / 50 / 10 / color 5
7
highlight bottom layer
layers => duplicate
layers => arrange => bring to top
adjust => blur => gaussian blur => 5
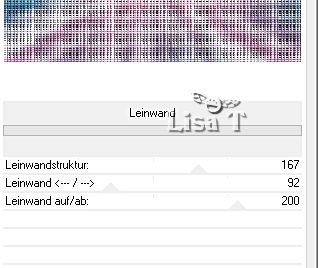
effects => plugins => °v° Kiwi’s Oelfilter / Leinwand
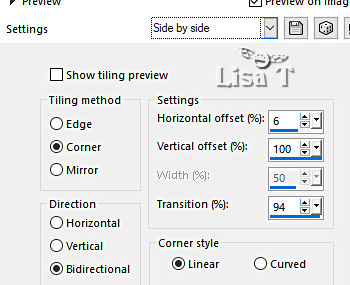
effects => image effects => seamless tiling => Side by Side
9
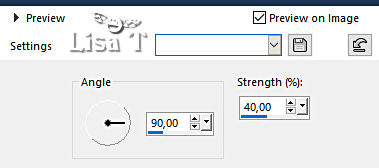
adjust = > blur => motion blur /
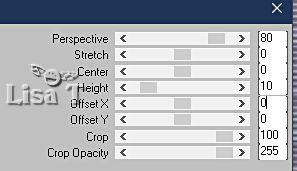
effects => plugins => Mura’s Meister => Perspective Tiling
layers => duplicate
blend mode of the layer : Multiply / opacity : 60%
layers => merge => merge down
effects => 3D effects => drop shadow => -10 / 0 / 35 / 30 / color 5
10
layers => new raster layer
flood fill white
layers => new mask layer => from image
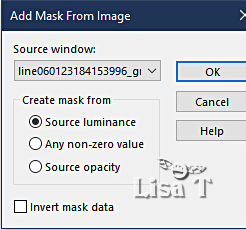
layers => merge => merge group
effects => plugins => Mura’s Seamless => Emboss at Alpha => default settings

layers => arrange => move down
layers => merge => merge all (flatten)
11
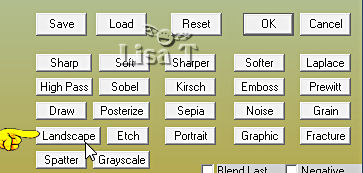
effects => plugins => AAA Filters / Custom => click on « Landscape » (optional)
selections => select all
effects => 3D effects => cutout / color 5
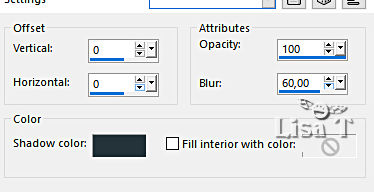
keep selection active
12
image => add borders => tick « symmetric » => 10 px color 2
selections => invert
selections => promote selection to layer
effects => plugins => Graphic Plus => Cross Shadow => default settings
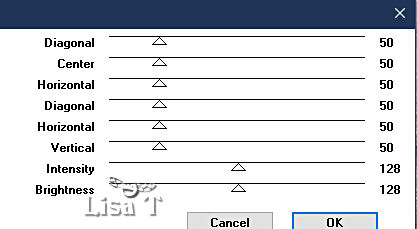
blend mode of the layer : Luminance (Legacy)
layers => merge => merge down
effects => 3D effects => inner bevel
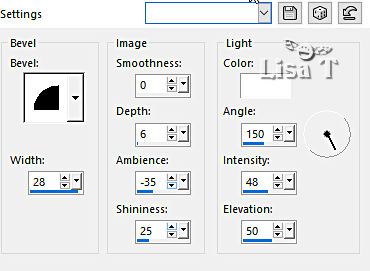
selections => select none
13
image => add borders => tick « symmetric » => 5 px color 3
selections => select all
image => add borders => tick « symmetric » => 45 px color 3
v
selections => promote selection to layer
effects => plugins => Tramages / Pool Shadow => default settings
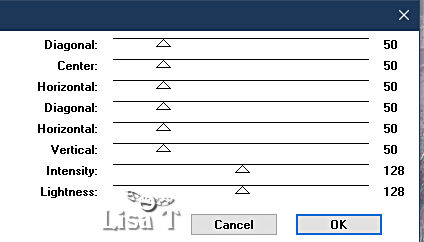
blend mode of the layer : Luminance (Legacy)
layers => merge => merge down
14
effects => plugins => L en K’s => L en K’s - Paris => Apply TWICE
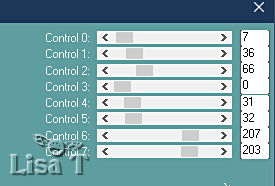
adjust => sharpness => sharpen
adjust => sharpness => sharpen
effects => 3D effects => drop shadow => 0 / 0 / 100 / 60 / color 5 => Apply TWICE
selections => select none
15
image => add borders => tick « symmetric » => 1 px color 6
copy / paste « Deco1_REA_Animabelle » as new layer
effects => 3D effects => drop shadow => 5 / 5 / 45 / 10 / color 5
colorize if necessary
16
copy / paste « 162_Femmes_Page7_Animabelle » as new layer (or choose another tube)
place as shown on final result
layers => duplicate
highlight layer below (original)
adjust => blur => gaussian blur => 20
blend mode of the layer : Multiply
copy / paste the Word Art tube as new layer
place as shown on final result
effects => 3D effects => drop shadow => 5 / 5 / 45 / 10 / color 5
18
layers => new raster layer
apply your watermark or signature
write your licence number if you used a licensed tube
layers => merge => merge all (flatten)
save your work as... type .jpeg optimized
 
Another version with another of my tubes


Don't hesitate to write to me if you have any trouble with this tutorial
If you create a tag (using other tubes than those provided) with this tutorial
and wish it to be shown, send it to Animabelle !
It will be a real pleasure for her to add it to the gallery at the end of the tutorial

mailto:animabelle.chantou@gmail.com

back to the boards of Animabelle’s tutorials
board 1 board 2 board 2 board 3 board 3 board 4 board 4 board 5 board 5
board 6 board 7 board 7


|