

You will find the original tutorial here :

This tutorial is a personal creation.
Any resemblance with another one would be only pure
coincidence.
It is stricly forbidden to modify tubes, to change
their name or take off the matermarks,
To present them on your sites or blog,
To share them in groups,
to make a bank of images, or to use them on lucrative purposes.

Thank you to respect Animabelle’s work and the tubers
work.
Don’t hesitate to warn me if you have any trouble
with this translation,
and I’ll try to fix the problem as quickly as I can

Animabelle worked with PSPX6 and I worked with PSP2020
you can follow this tutorial with another version
of PSP, but the result might be slightly different

Supplies
tubes – mask – image

TIP 1 -> if
you don’t
want to install a font -->
open it in a software as « Nexus Font » (or
other font viewer software of you choice)
as long as both windows are opened (software and font),
your font will be available in your PSP
TIP 2 -> from PSPX4,
in the later versions of PSP the functions « Mirror » and « Flip » have
been replaced by -->
« Mirror »has become --> image => mirror => mirror
horizontal
« Flip » has become --> image => mirror => mirror
vertical

Plugins needed
Unlimited 2
L en K’s
FilterFactory Gallery E
Kang 2
Graphics Plus
Simple
Mehdi
AP 01 [Innovations]
AAA Frames
Thank you Renée Salon for sharing you plugins page


Use the pencil to mark your place
along the way
hold down left click to grab and move it
 |

Prepare your work
duplicate all the tubes and work with the copies
to preserve originals
open the mask and mimimize to tray
save your work often in case of problems with your psp
use the Dropper tool to pick up your colors into your tubes
and misted images
don’t forget to erase tuber’s watermark before
using
Animabelle chose these :
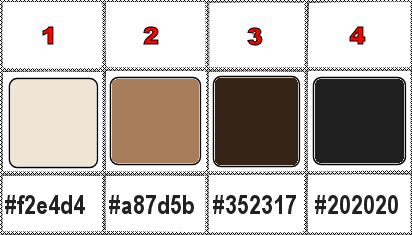
don’t hesitate to change blend modes and opacities
of the layers to match your personal colors and tubes
1
file => open a new image => transparent => 800
* 500 px
flood fill layer with the following rectangular gradient
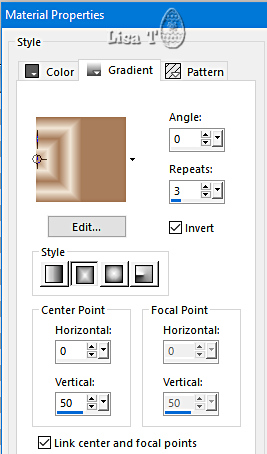
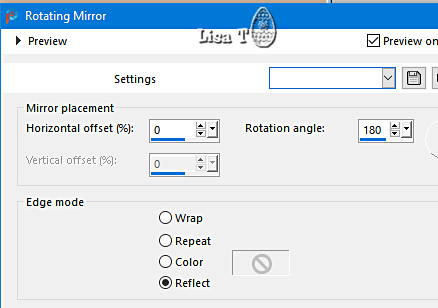
effects => reflection effects => rotating Mirror
2
adjust => blur => radial blur
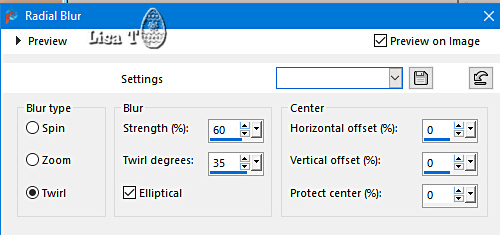
effects => plugins => Unlimited 2 => Filter
Factory Gallery E / Web
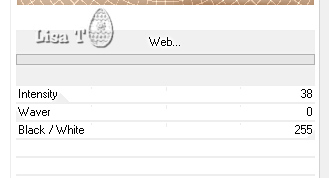
effects => image effects => seamless tiling => default
settings
adjust => sharpness => sharpen
3
layers => duplicate
effects => plugins => Unlimited 2 => Kang 2 => Solar
Fabric
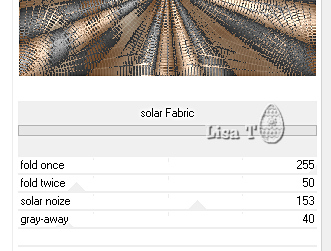
blend mode of the layer : Multiply (or other) / opacity
: 40%
layers => merge => merge visible
4
layers => new raster layer
flood fill with color 1
effects => plugins => Graphics Plus => Cross
Shadow
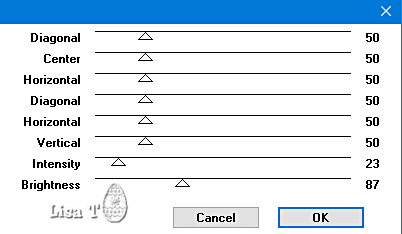
layers => new mask layer => from image
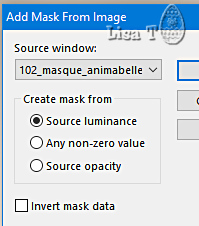
layers => merge => merge group
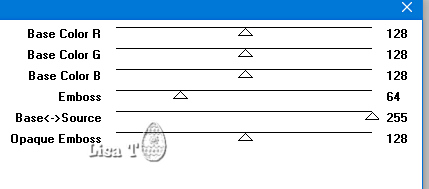
effects => plugins => Mura’s Seamless => Emboss
at Alpha
5
copy / paste « jpeg_pascaline_animabelle » as
new layer
if you choose another image, the size must be 640 px x
340 px
select the transparent part with the Magic Wand tool
selections => invert
selections => modify = > select selection borders
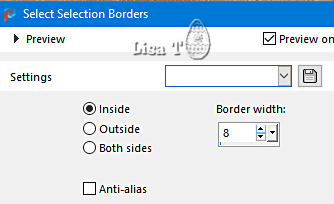
effects => plugins => Graphics Plus => Cross
Shadow / Default Settings
effects = > plugins => Simple => Top Left Mirror
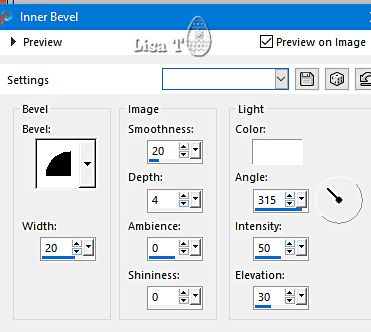
effects => 3D effects => Inner Bevel
selections => select none
6
copy / paste « ecrou_pascaline_animabelle » as
new layer
effects => image effects => offset => H : -290
/ V : 140 / tick « custom » and « transparent »
effects = > plugins => Simple => Top Left Mirror
layers => merge => merge down
effects => 3D effects => drop shadow => 0 / 0
/ 100 / 30 / color 3 or black
effects => image effects => offset => H : -40
/ V : 40 / tick « custom » and « transparent »
7
selections => select all
image => add borders => tick « symmetric » => 2 px color
3
layers => new raster layer
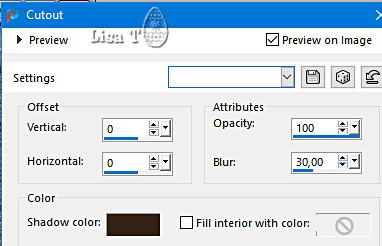
effects => 3D effects => Cutout
8
image => add borders => tick « symmetric » => 20
px color 1
selections => Invert
effects = > plugins => Simple => Diamonds
layers => new raster layer
flood fill selection with the following linear gradient
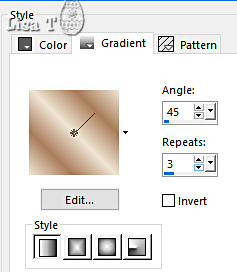
opacity of the layer : 85%
layers => merge => merge down
adjust => sharpness => sharpen
9
image => add borders => tick « symmetric » => 2
px color 3
selections => select all
image => add borders => tick « symmetric » => 50
px color 1
selections => Invert
10
set color 1 as FG color and color 2 as BG color in the
materials palette
effects => plugins => Mehdi => Wavy Lab 1.1 => Radial
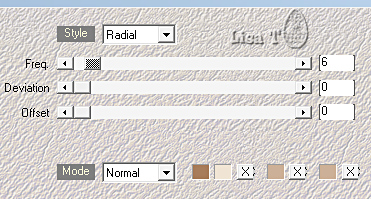
11
effects => plugins => AP 01 [Innovations] / Lines
=> Lines Silverlining / Dotty Grid
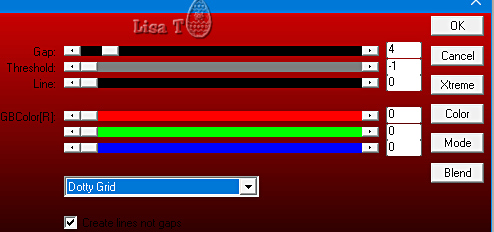
12
effects => plugins => AP 01 [Innovations] / Lines
=> Lines Silverlining / V-Shaped
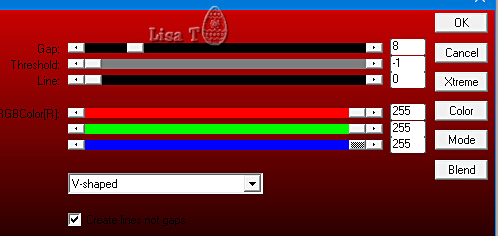
13
effects => plugins => AAA Frames => Foto Frame
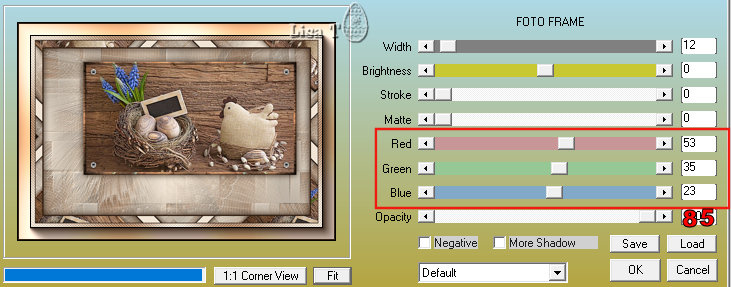
depending on your colors, here's how to change the numbers
for the Red Green and Blue lines
open color 3
Animabelle shows you her color 3 => note the R G B values
on the left (53 - 35 - 23)
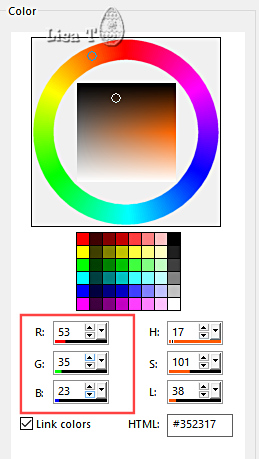
change these values in the corresponding lines of the
plugin (see screenshot for Foto Frmae)
selections => select none
14
copy / paste the character tube as new layer
resize if necessary
move properly (see final result)
effects => 3D effects => drop shadow => -10 /
10 / 80 / 40 / color 3
15
copy / paste « cocotte_pascaline_animabelle » as
new layer
move to bottom left side (see final result)
image => add borders => tick « symmetric » => 1
px color 4
apply your watermark or signature on a new layer
write your licence number if you used a licenced tube
layers => merge => merge all (flatten)
resize to 800px width (or other)
file => save your work as... type .jpeg optimized

Another version with one of my tubes


Don't hesitate to write to me if you have any trouble
with this tutorial
If you create a tag (using other tubes and colors than
those provided) with this tutorial
and wish it to be shown, send it to me !
It will be a real pleasure for me to add it to the gallery
at the end of the tutorial


coming  soon soon

back to the boards of Animabelle’s tutorials
20 tutorials on each board
board 13 => 
at the bottom of each board you will find the arrows
allowing you to navigate from one board to another


|