
You will find the original tutorial here :

this is a fast and "easy to make" tutorial

This tutorial is a personal creation.
Any resemblance with another one would be only pure coincidence.
Thank you to respect Animabelle’s work and the tubers work.
Don’t hesitate to warn her if you have any trouble with this tutorial.


Material
Animabelle’s important note
Tubers have been warned that disrespectful and dishonest bloggers come steeling our tubes
they grab them into the folders of material we provide with our tutorials.
These people rename and convert the tubes to png type,
and then they offer them for download in their blogs, pretending they have done the work.

To protect my work, I am therefore forced to no longer provide my tubes with the material.
Honest people will understand my way of doing, I hope.
I thank them for their understanding.
Very important Tip:
never take your tubes on these blogs, because most of the time all of these tubes are stolen tubes.
Always make sure that the tubes you take have been signed by their authors !
Thank you.
|
1 tube – Maryse (not provided) 
1 tube – KTs (not provided)
1 texture
2 selections

Filters
It@lian Ediros Effects
Filter Factory Gallery A
Mura’s Seamless
User defined Filter
Visual Manipulation
VM Natural

Download material

This tutorial was created with PSP12, but it can be followed with another version.

Use the pencil to follow the steps
hold down left click to grab and move it
 |

Important
Open all images in PSP, duplicate them and close the originals.
Never work on original images.
copy / paste selections in the special file “selections” of “My PSP files”
copy / paste texture in the special file “textures” file in “My PSP Files”

Colors used
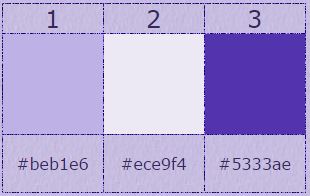
color 1 as foreground/color 3 as background
Don't hesitate to change the colors and the blend mode of the layers,
according to your tubes and images.

Step 1
open a new transparent raster background : 900 *** 600 pixels
paint with color 1
in the materials palette, click on the background to open it
enable the box “texture”
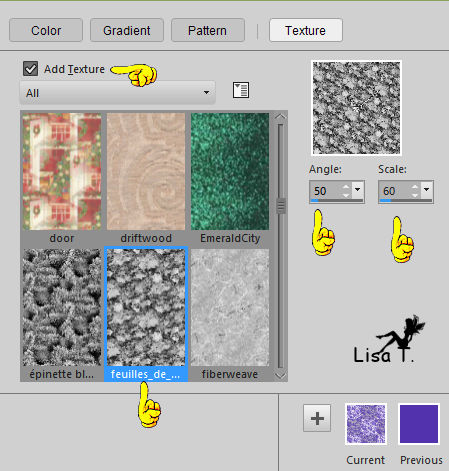
find the texture “feuilles_de_lierre” provided in the material
you can use another texture if you wish, of course !
activate the Flood Fill tool, opacity set to 30%
back on your tag, and right click in the window
(don’t forget to set back the opacity of the tool to 100 %)
disable the texture in the materials palette
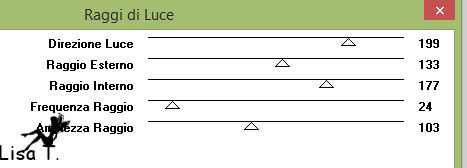
effects -> plugins -> It@lian Editors Effects / Raggi di Luce
effects -> geometric effects / spherize/100/ellipse
effects -> distortion effects -> polar coordinates / polar to rectangular
effects -> image effects -> offset -> 0 / 330 / custom / transparent
Step 2
select the transparent part of the tag with the magic wand
selections -> modify -> feather / 10
press 5 times on the delete key of your keybord
selections -> select none
Step 3
selections -> load-save selection -> load selection from disk
find the selection “maman_je_taime1animabelle”
selections -> invert
effects -> user defined filter/emboss 3
selections -> invert
effects -> 3D effects -> drop shaodw -> 10 / 0 / 40 / 10 / color #393052
if necessary, change the colors according to your tubes
selections- > select none
effects -> 3D effects -> drop shadow - > 23 / 0 / 50 / 40 / same color as before
Step 4
layers -> new raster layer
layers -> arrange -> move down
paint with color 1
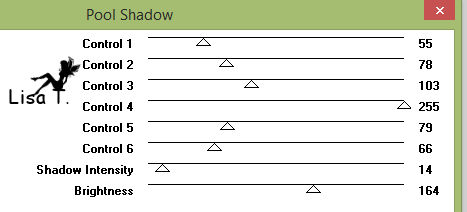
effects -> plugins -> Filter Factory Gallery A/Pool Shadow
effects -> art media effects -> brush strokes
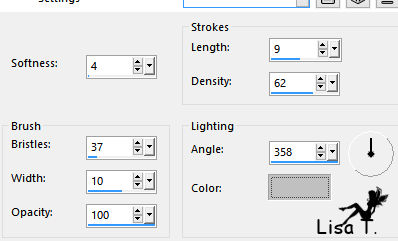
effects -> reflection effects -> rotating mirror / 0 / 180 / repeat
effects -> geometric effects -> pentagon/repeat
effects -> image effects -> seamless tiling
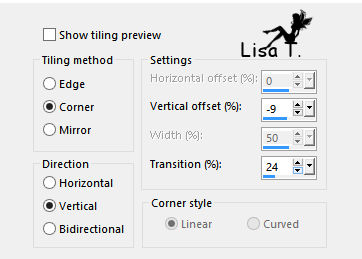
effects -> user defined filter/emboss 3
Step 5
copy / paste the flowers tube (KTs_5657)
image -> mirror
place below on the right (see example)
adjust -> sharpness -> sharpen
Step 6
activate upper layer
select the pen tool (key V of you keyboard) with the following settings

in the materials palette, close the background and set color 3 as foreground (or another dark color)
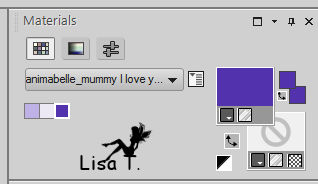
draw a curved line, as precise as possible, as shown below
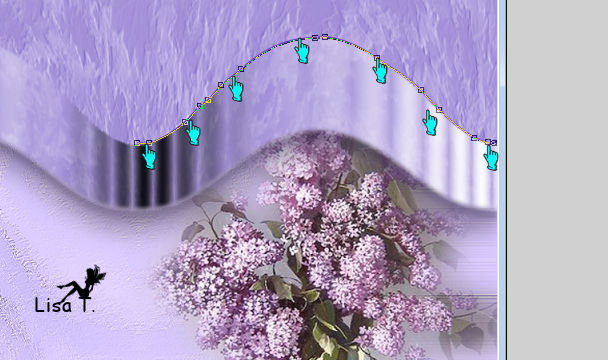
Step 7
activate the Text tool. (Animabele chose font "Fiolex Girl") (of course you can choose the font you like)

open the background
set color 3 as background and foreground
layer -> new raster layer
place the cursor in the middle of the curved line
and left click when the T with the cross appears

write your text
the result must look like this
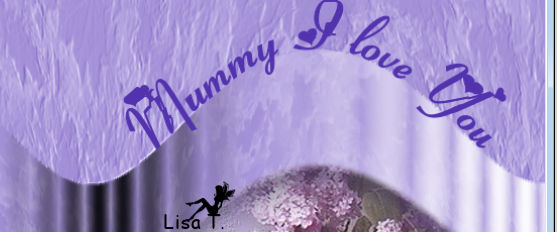
layers -> convert to raster layer
activate the layer underneath
layers -> delete / OK
once more : layers -> delete /OK
activate the upper layer (the one with the text)
with the “Move tool”, place the text inside the curved shape
effects -> plugins -> Mura’s Seamless - >Emboss at Alpha / default settings
effects -> 3D effects -> drop shadow - > 6 / 6 / 40 / 6 / color #393052
layers -> merge -> merge all (flatten)
Step 8
selections -> select all
effects - >3D effets -> cutout
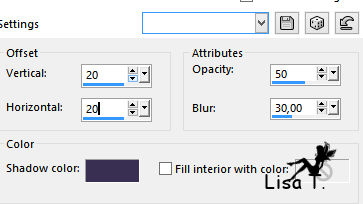
apply the same effect once more with negative numbers -20 / -20
selections -> select none
image -> add borders :
3 pixels / color3
80 pixels / color 1
select the large border with the magic wand (enable “inside”)
layers/new raster layer
paint with a linear gradient 45 / 5 / color 1 as foreground / color 2 as background
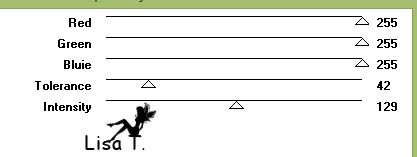
effects -> plugins -> Visual Manipulation / Hue Transparency
effects -> reflection effects -> rotating mirror / 0 / 180 / repeat
effects -> plugins -> VM Natural / Acid Rain
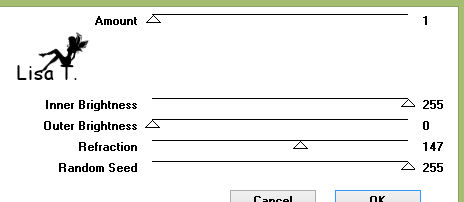
effects -> user defined filter / emboss 3
selections -> Select none
Step 9
copy / paste as a new layer the tube (MR_Mother and Daughter)
erase the watermark with the eraser tool
place below on the left
effects -> 3D effects -> drop shadow : 0 / 0 / 100 / 70 / color #393052
Step 10
layers -> new raster layer
selections -> load-save selection -> load selection from disk
find the selection (maman_je_taime2_animabelle)
paint with color 3
effets -> 3D effects / buttonize
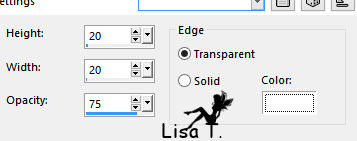
selections -> select none
effects -> plugins -> Mura’s Seamless -> Emboss at Alpha / default settings
effects -> 3D effects -> drop shadow : 6 / 6 / 40 / 6 / color #393052
image -> add borders :3 pixels color 3
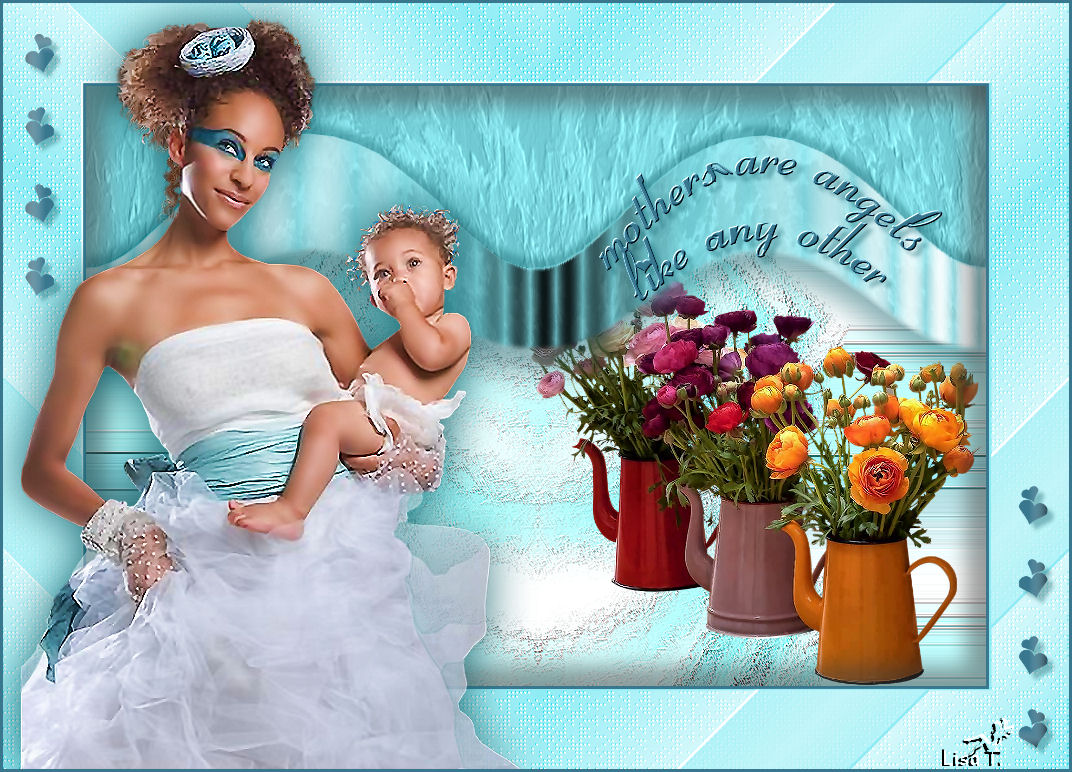
Your tag is finished
don’t forget to sign it and save as... type JPEG
resize if you wish

Don't hesitate to write to Animabelle if you have any trouble with her tutorial
To be informed about her new tutorials, join her NewsLetter

If you create a tag with her tutorial and wish it to be shown,
send it to Animabelle !
It will be her pleasure to add it to the gallery at the end of the tutorial


My tag with my tubes
Back to the boards of Animabelle's tutorials
board 1  board 2 board 2 

|