
You will find the original tutorial here :


This tutorial is a personal creation.
Any resemblance with another one would be only pure coincidence.
It is stricly forbidden to modify tubes, to change their name or take off the
matermarks,
To present them on your sites or blog,
To share them in groups,
to make a bank of images, or to use them on lucrative purposes.

Thank you to respect Animabelle’s work and the tubers
work.
Don’t hesitate to warn me if you have any trouble
with this translation,
and I’ll try to fix the problem as quickly as I can


Material

open all your tubes into PSP and duplicate them. Work with
the copies to preserve orignals
open the masks and minimize them to tray
copy / paste selections into the folder « selections » of
Corel PSP General folder
double click on the presets to install them
TIP -> if you don’t want to install the font,
open it in a software as « Nexus Font » (or
other font viewer software)
as long as the window is opened, the font will be available
in your PSP

Filters (plugins) used
thank you Renée Salon for sharing your plugins ‘ page


use the pencil to you follow the steps
hold down left click of your mouse to grab it and move
it


Important
Open all images with PSP, duplicate them and close the
originals.
Never work on original images.
Animabelle works with PSPX9, I work with PSPX9 too
but you can follow the steps with another version of PSP

Colors
use the Dropper tool to pick up ..... colors into your
tube
Animabelle chose these colors
color 1 -> ForeGround color -> #ffffff (white)
color 2 -> BackGround color -> #a6a493
color 3 -> #531c1d
color 4 -> 000000 (black)
Don't hesitate to change the colors and the blend modes
of the layers,
according to your tubes and images

realization
1
don’t forget to save your work often
from PSPX4 the functions « Mirror » and « Flip » have
been replaced by -->
« Mirror » --> mirror -> mirror horizontal
« Flip » --> mirror -> mirror vertical
2
with the dropper tool, pick up 4 colors into your main
tube
or use Animabelle’s colors
3
open the alpha layer. It contains invisible selections
window -> duplicate
close the original layer to preserve it, work with the
copy
flood fill with color 2
layers -> new raster layer
selections -> select all
open « 155_Femme_Page6_Animabelle »
close the original and work with the copy
erase the watermark (eraser tool or selection tool as you
wish)
edit -> copy
back to your work -> edit -> paste into selection
selections -> select none
4
layers -> duplicate
highlight « Raster 2 »
adjust -> blur -> radial blur

effects -> image effects -> seamless tile

effects -> plugins -> Ulimited 2 -> FunHouse
/ Vibes

blend mode of the layer : Hard light - opacity
of the layer : 80%
5
highlight « Copy of Raster 2 »
adjust -> blur -> gaussian blur -> 30
effects -> plugins -> Filter Factory Gallery F /
Scrambler

effects -> image effects -> seamless tile

blend mode of the layer : Multiply - opacity of the
layer : 60%
6
layers -> duplicate
effects -> plugins -> L & K Landsiteofwonders
/ L en K’s Katharina

blend mode of the layer : Screen - opacity of the
layer : 44%
effects -> edge effects -> enhance more
layers -> merge -> merge visible
7
layers -> new raster layer
flood fill with color 1
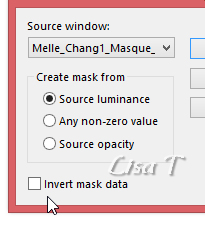
layers -> new mask layer -> from image

layers -> merge -> merge group
blend mode of the layer : dodge - opacity of the
layer : 35%
adjust -> sharpness -> sharpen more
8
selections -> load-save selection -> from alpha channel
-> selection #1

selections -> promote selection to layer
selections -> select none
blend mode of the layer : dodge - opacity of the
layer : 75%
9
highlight bottom layer (merged)
layers -> new raster layer
selections -> select all
copy / paste image « ying_yang » into
selection
selections -> select none
blend mode of the layer : soft light
10
highlight top layer (promoted selection)
layers -> new raster layer
selections -> load-save selection -> from alpha channel
-> selection #2

flood fill selection with color 1
effects -> texture effects -> blinds
pick up a color into your tag
Animabelle chose color #76664c

selections -> select none
blend mode of the layer : hard light - opacity of
the layer : 60%
11
layers -> duplicate
image -> mirror -> mirror vertical
effects -> image effects -> offset -> -110 / 0
/ tick « custom » and « transparent »
effects -> 3D effects -> drop shadow -> 7 / 7
/ 40 / 10 / black
highlight « Raster 2 »
effects -> 3D effects -> drop shadow -> 7 / 7
/ 40 / 10 / black
12
highlight top layer
layers -> new raster layer
selections -> load-save selection -> from alpha channel
-> selection #3

flood fill selection with color 3
click 5 or 6 times to fill properly
selections -> select none
effects -> 3D effects -> drop shadow -> 3 / 3
/ 55 / 10 / black
if necessary, activate the « Move » tool
(optional)
and press arrows « up » and « down » of
your keyboard to place the small squares properly

13
image -> add borders -> tick « symmetric » -> 2
pixels color 2
*** edit -> COPY
selections -> select all
image -> add borders -> tick « symmetric » -> 30
pixels color 4
selections -> invert
selections -> promote selection to layer
*** Edit -> paste into selection
effects -> plugins -> Andrew’s Filter 8 -> Tow
The Line / default settings

blend mode of the layer : hard light - opacity of
the layer : 50%
selections -> select none
image -> add borders -> tick « symmetric » -> 2
pixels color 2
image -> add borders -> tick « symmetric » -> 45
pixels color 4
14
copy / paste as new layer the tube « 155_Femme_Page6_Anbimabelle »
image -> resize -> untick « resize all
layers » -> 70%
place the tube bottom right
effects -> 3D effects -> drop shadow -> 10 /
20 / 60 / 40 / black
image -> add borders -> tick « symmetric » -> 2
pixels color 2
15
copy / paste « "Deco_Ying_Yang_Animabelle » as
new layer
image -> resize -> untick « resize all
layers » -> 45%
effects -> image effects -> offset -> -507 / 304
16
effects -> plugins -> Mura’s Meister / Copies

effects -> plugins -> Mura’s Seamless / Emboss
at Alpha / default settings

17
copy / paste as new layer « Texte_Melle_Chang_ABelle »
place it where you like
use another Font and another text if you wish
layers -> new raster layer
apply your watermark
layers -> merge -> merge all (flatten)
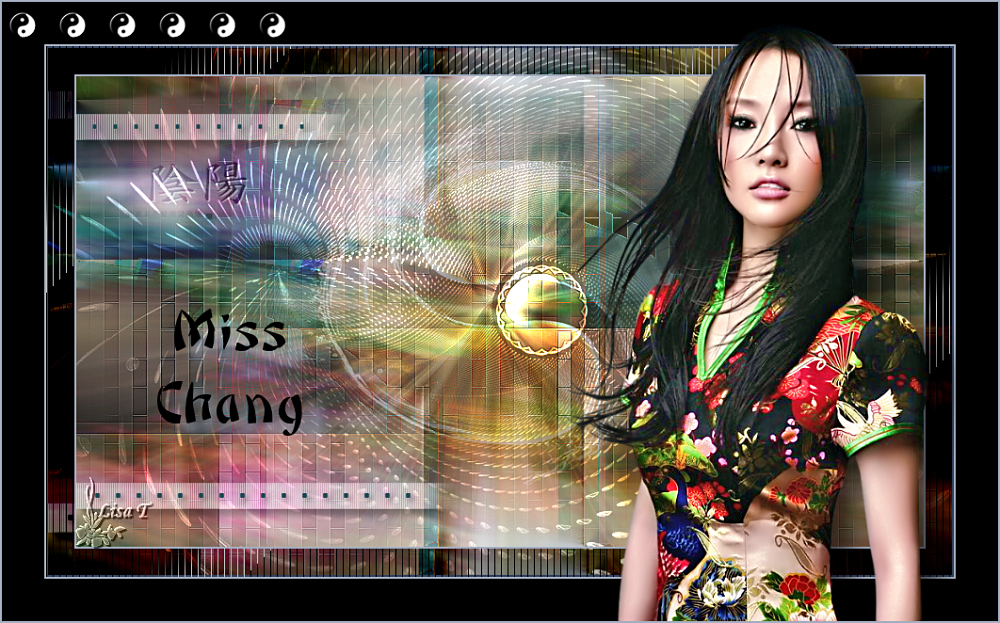
your tag is finished
file -> save as... -> type .jpeg

My tag with my tube


Don't hesitate to write to Animabelle if you have any trouble
with her tutorial
To be informed about her new tutorials, join her NewsLetter
If you create a tag (using other tubes than those provided)
with this tutorial
and wish it to be shown, send it to Animabelle !
It will be a real pleasure for her to add it to the gallery
at the end of the tutorial


back to the boards of Animabelle’s tutorials
board 1  board
2 board
2  board
3 board
3 

|