

You will find the original tutorial here
:

This tutorial is a personal creation.
Any resemblance with another one would be only pure coincidence.
It is stricly forbidden to modify tubes, to change their
name or take off the matermarks,
To present them on your sites or blog,
To share them in groups,
to make a bank of images, or to use them on lucrative purposes.

Thank you to respect Animabelle’s work and the tubers
work.
Don’t hesitate to warn me if you have any trouble
with this translation,
and I’ll try to fix the problem as quickly as I can

Animabelle works with PSPX9 and I work with PSP 2020 Ultimate
you can follow this tutorial with another version of PSP,
but the result might be slightly different

Supplies
masks - tubes - selections - brush tip

TIP 1 -> if
you don’t
want to install a font -->
open it in a software as « Nexus Font » (or
other font viewer software of you choice)
as long as both windows are opened (software and font),
your font will be available in your PSP
TIP 2 -> from PSPX4,
in the later versions of PSP the functions « Mirror » and « Flip » have
been replaced by -->
« Mirror »has become --> image => mirror => mirror
horizontal
« Flip » has become --> image => mirror => mirror
vertical

Plugins needed
i.C.NET Software - Filters Unlimited 2.0
MuRa's Meister
Nik Software
Mehdi
thank you Renée Salon for sharing your plugins page


Use the pencil to mark your place
along the way
hold down left click to grab and move it
 |

1
open the tubes, decorations, masks... etc.... / duplicate
/ close originals
work with the copies
minimize the mask to tray
don’t forget to save your work often in case of problems
with psp
2
with the dropper tool, pick up nice colors into your main
tubes
Animabelle chose these
color 1 => FG color => #e5d0d0
color 2 => BG =>#a79fa4
color 3 => #473c3f
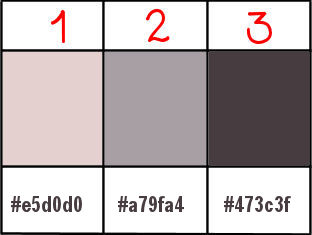
don’t hesitate to change blend modes and opacities
of the layers to match your personal colors and tubes
3
place the selections into the folder « selections » of
Corel PSP general folder
place the two elements .PspBrush and .PspScript inot the
folder « brushes » of PSP general
folder
4
open a new transparent image 850 * 550 px
set colors 2 and 3 as FG and BG colors into the materials
palette
effects => plugins => Mura’s Meister => Cloud
/ default settings
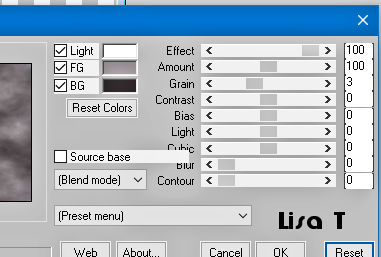
5
layers => duplicate
effects => geometric effects => Perspective / Horizontal
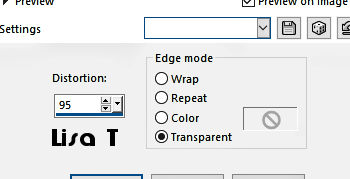
apply once
more changing distortion => - 95
effects => distortion effects => wave

6
layers => duplicate
image => mirror => mirror horizontal
layers => merge => merge down
layers => duplicate
image => mirror => mirror vertical
layers => merge => merge down
adjust => sharpness => sharpen more
effects => 3D effects => drop shadow => 6 / 6
/ 45 / 8 / black or dark color
7
layers => new raster layer
selections => load-save selection => from disk => selection
# 1
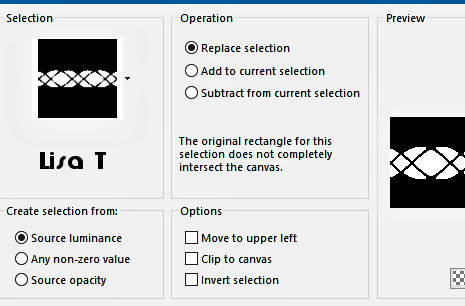
flood fill selection with color 3
8
layers => new mask layer => from image
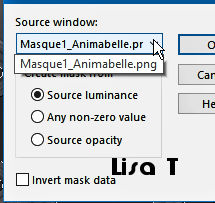
layers => merge => merge group
selections => select none
effects => 3D effects => drop shadow => 6 / 6
/ 75 / 8 / black or dark color
layers => arrange => move down
9
highlight top layer
layers => merge => merge down
effects => image effects => offset => H : 0/
V : - 60 / tick « custom » and « transparent »
10
highlight bottom layer
copy / paste the misted tube as new layer
image => resize => untick « resize all layers » => 90%
adjust => sharpness => sharpen
layers => merge => merge down
11
highlight top layer
layers => new raster layer
set colors 1 as FG color into the materials palette
enable the Brush tool, and find the brush tip provided
qith the following settings

apply top center of the tag (see final
result) (left click)
effects => 3D effects => drop shadow => 6 / 6
/ 75 / 15 / black or dark color
12
highlight bottom layer
layers => duplicate
effects => image effects => seamless tiling => default
settings
adjust => blur => radial blur
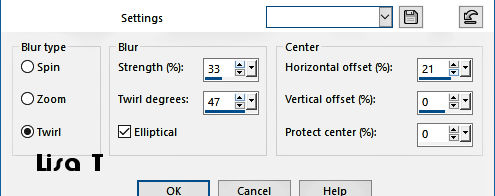
13
effects => plugins => Unlimited 2 => VM Toolbox
/ Grid
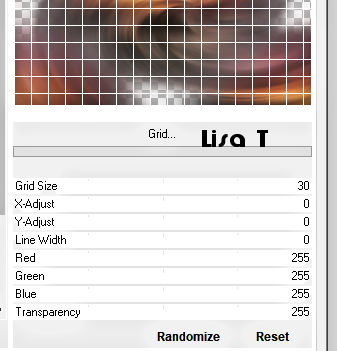
effects => plugins => Mura’s Meister => Perspective
Tiling
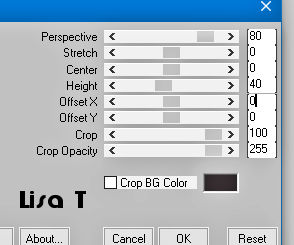
14
selections => load-save selection => from disk => selection
# 2
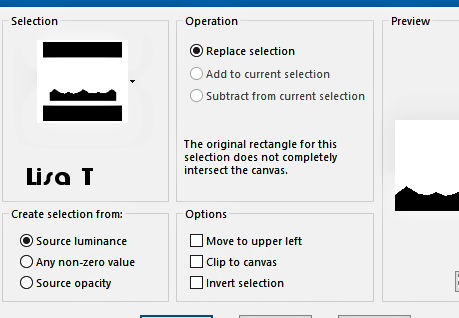
hit the « M » key of your keyboard to disable
the tool
selections => select none
15
layers => duplicate
effects => plugins => Nik Software => Color Efex
Pro 3.0 / Tonal Contrast
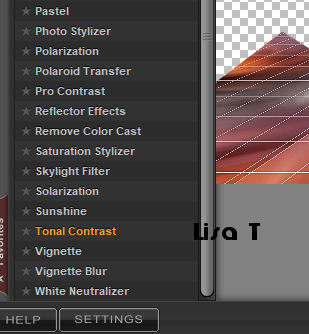
opacity of the layer : 50 %
layers => merge => merge visible
effects => plugins => Unlimited 2 => AFH / AFH
Beveler 2.0a
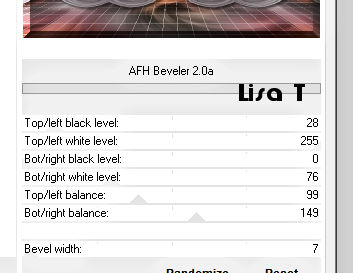
16
image => add borders => tick « symmetric » => ...
2 px color 3
selections => select all
image => add borders => tick « symmetric » => ...
50 px color 1
selections => invert
effects => plugins => Mehdi => Wavy Lab 1.1 => colors
2 / 1 / 4
choose colors matching your main tubes
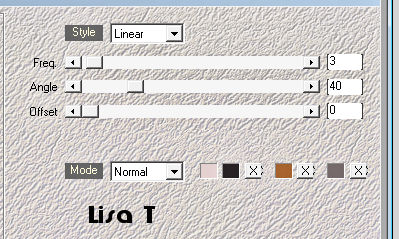
selections => invert
effects => 3D effects => drop shadow => 0 / 0
/ 100 / 85 / black
17
selections => select all
selections => modify => contract => 25 px
effects => 3D effects => drop shadow => 0 / 0
/ 100 / 85 / black
selections => select none
image => add borders => tick « symmetric » => ...
1 px color 1
18
copy / paste the woman tube as new layer
don’t forget to erase the watermark
image => resize if necessary
drop a shadow of your choice
place where you like
19
layers => new raster layer
apply your watermark or signature
write your licence number if you used a licenced tube
save your work as... type .jpeg optimized

My tag with my tubes

Don't hesitate to write to me
if you have any trouble with her tutorial
If you create a tag (using other tubes than those provided)
with this tutorial
and wish it to be shown, send it to Animabelle !
It will be a real pleasure for her to add it to the gallery
at the end of the tutorial


back to the boards of Animabelle’s tutorials
board 1 board 2 board 2 board
3 board
3 board 4 board 4 board
5 board
5 board 6 board 6


|