

You will find the original tutorial here
:

This tutorial is a personal creation.
Any resemblance with another one would be only pure coincidence.
It is stricly forbidden to modify tubes, to change their
name or take off the matermarks,
To present them on your sites or blog,
To share them in groups,
to make a bank of images, or to use them on lucrative purposes.

Thank you to respect Animabelle’s work and the tubers
work.
Don’t hesitate to warn me if you have any trouble
with this translation,
and I’ll try to fix the problem as quickly as I can

Animabelle works with PSPX9 and I work with PSP 2019
you can follow this tutorial with another version of PSP,
but the result might be slightly different

Supplies
selections -> tubes

place the selections into the dedicated
folder of « My
Corel PSP »
TIP 1 -> if you don’t
want to install a font -->
open it in a software as « Nexus Font » (or
other font viewer software of you choice)
as long as both windows are opened (software and font),
your font will be available in your PSP
TIP 2 -> from PSPX4,
in the later versions of PSP the functions « Mirror » and « Flip » have
been replaced by -->
« Mirror »has become --> image => mirror => mirror
horizontal
« Flip » has become --> image => mirror => mirror
vertical

Plugins needed
Mehdi
Simple
Kang
Transparency
AP 01 [Innovations]
VM Toolbox
Filters Unlimited 2.0
L en K
Alien Skin Eye Candy 5: Impact
Thank you Renée for sharing your plugins page


Use the pencil to mark your place
along the way
hold down left click to grab and move it
 |

1
duplicate all the tubes and work with the copies to preserve
originals
save your work often in case of problems with your psp
2
use the Dropper tool to pick up your colors into your tubes
and misted images
Animabelle chose these :
color 1 => #f4dfd3
color 2 => #c1da94
color 3 => #a68075
color 4 => #97baa5
don’t hesitate to change blend modes and opacities
of the layers to match your personal colors and tubes
place colros 1 & 2 as FG and BG colors
3
open a new transparent image 800 * 500 px
effects => plugins => Mehdi => Wavy Lab 1.1
colors to choose into the 4 boxes => 1 2 3 4
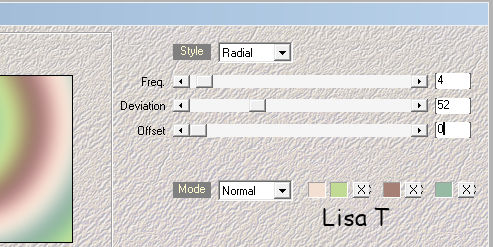
4
effects => plugins => Mehdi => Sorting Tiles
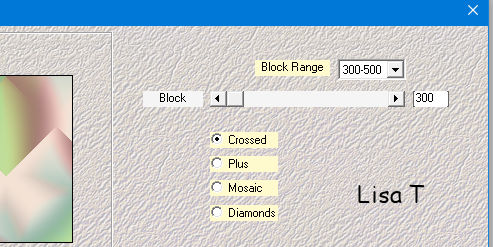
effects => edge effects => enhance more
effects => plugins => Simple => Top Left Mirror
5
layers => duplicate
effects => plugins => Kang => Houdini is Only
Sleeping / default settings
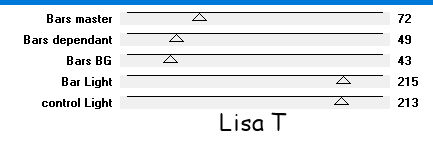
effects => plugins => Transparency => Eliminate
Black
blend mode of the layer : Soft Light
adjust => sharpness => sharpen
layers => merge => merge down
6
selections => load-save selection => from disk => load
selection « Selection1_Madame_Animabelle »
selections => promote selection to layer
flood fill selection with color 2
effects => plugins => AP 01 [Innovations] / Lines-Silverlining
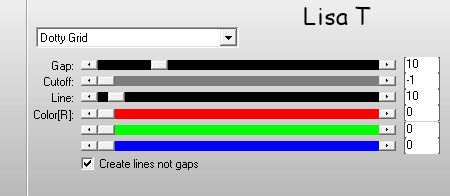
selections => select none
effects => 3D effects => drop shadow => 0 / 0
/ 55 / 25 / black
7
layers => duplicate
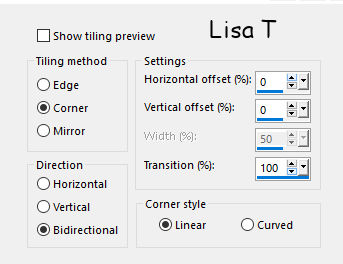
effects => image effects => seamless tiling
8
highlight bottom layer
selections => load-save selection => from disk => load
selection « Selection2_Madame_Animabelle »
selections => promote selection to layer
adjust => blur => gaussian blur / 40
9
layers => duplicate
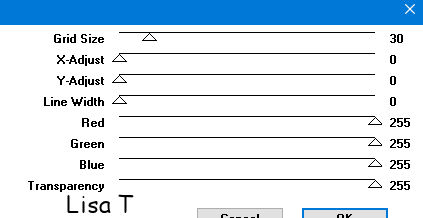
effects => plugins => VM Toolbox / Grid / default
settings
effects => 3D effects => drop shadow => 0 / 0
/ 35 / 35 / black
selections => select none
10
layers => duplicate
image => resize => untick « resize all
layers » => 80%
enable the Pick tool and stretch the layer this way :
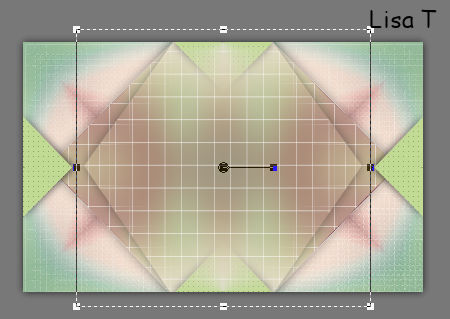
layers => merge => merge down TWICE
11
selections => load-save selection => from disk => load
selection « Selection4_Madame_Animabelle »
edit => cut
selections => select none
12
highlight bottom layer
selections => load-save selection => from disk => load
selection « Selection3_Madame_Animabelle »
selections => promote selection to layer
effects => plugins => Unlimited 2 => Pattern
Generators / Sine Pattern (seamless)
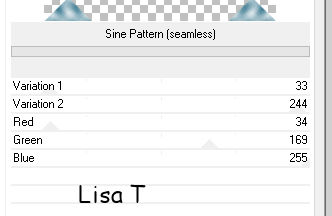
blend mode of the layer : Luminance - opacity :
60%
13
effects => plugins => AP 01 [Innovations] / Lines-Silverlining
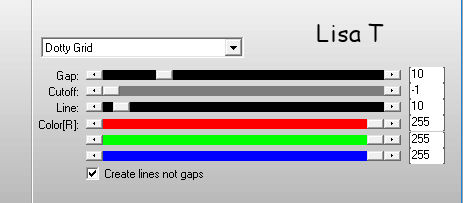
layers => new raster layer
effects => 3D effects => drop shadow => 0 / 0
/ 65 / 20 / black
selections => select none
14
highlight top layer
copy / paste as new layer « 217_fleurs_animabelle_page_3 »
(don’t forget to erase the watermark)
image => resize => untick « resize all layers » => 70%
adjust => sharpness => sharpen
layers => merge => merge all (flatten)
15
selections => select all
effects => 3D effects => cutout / black
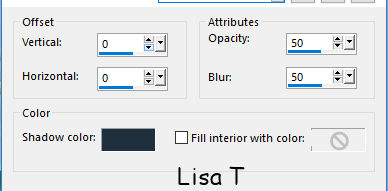
selections => select none
16
image => add borders => tick « symmetric » => ...
1 px white
30 px color 1
select the large border with the magic wand tool
effects => texture effects => weave / color 3
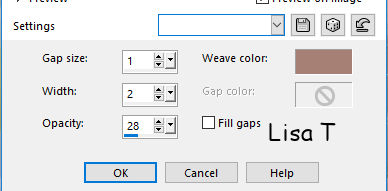
selections => invert
effects => 3D effects => drop shadow => 15 / 15
/ 30 / 25 / black
selections => select none
17
image => add borders => tick « symmetric » => ...
1 px color 3
50 px color 2
select the large border with the magic wand tool
effects => plugins => L en K / L en K’s Paris
/ default settings
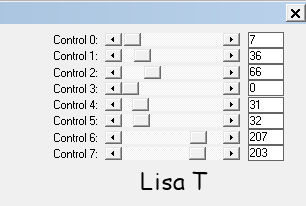
adjust => sharpness => sharpen
selections => invert
effects => 3D effects => drop shadow => 15 / 15
/ 30 / 25 / black
selections => select none
18
copy / paste as new layer « Deco1_Madame_Animabelle »
if you changed the colors, set the blend mode to « Luminance
(Legacy) »
effects => 3D effects => drop shadow => 5 / 5
/ 15 / 5 / black
19
copy / paste as new layer « Deco2_Madame_Animabelle »
if you changed the colors, set the blend mode to « Luminance
(Legacy) »
effects => 3D effects => drop shadow => 5 / 5
/ 15 / 5 / black
20
copy / paste as new layer « femme519-coly »
(don’t forget to erase the watermark)
image => resize => untick « resize all layers » => 85%
move left
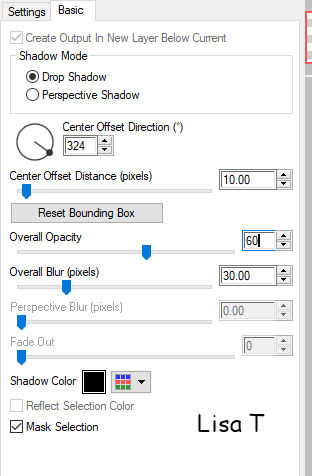
Alien Skin Eye Candy 5: Impact / Perspective Shadow
21
image => add borders => tick « symmetric » => 1
px black
layers => new raster layer
apply your watermark (or signature)
file => export => type .jpeg optimized

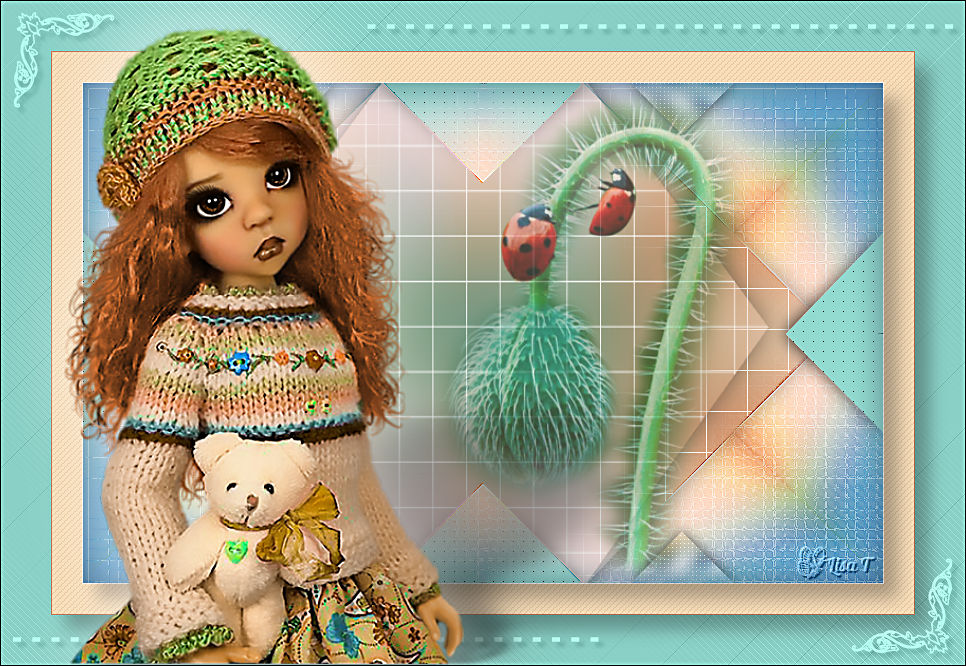
My tag with my tubes
Don't hesitate to write to Animabelle
if you have any trouble with her tutorial
If you create a tag (using other tubes than those provided)
with this tutorial
and wish it to be shown, send it to Animabelle !
It will be a real pleasure for her to add it to the gallery
at the end of the tutorial


back to the boards of Animabelle’s tutorials
board 1  board 2 board 2 board
3 board
3 board 4 board 4

|