
You will find the original tutorial here :

This tutorial is a personal creation.
Any resemblance with another one would be only pure coincidence.
It is stricly forbidden to modify tubes, to change their name or take off the matermarks,
To present them on your sites or blog,
To share them in groups,
to make a bank of images, or to use them on lucrative purposes.

Thank you to respect Animabelle’s work and the tubers work.
Don’t hesitate to warn me if you have any trouble with this translation,
and I’ll try to fix the problem as quickly as I can

Animabelle worked with PSP2020 and I worked with PSP2020 Ultimate
you can follow this tutorial with another version of PSP, but the result might be slightly different

Supplies
tubes - font - masks

TIP 1 -> if you don’t want to install a font -->
open it in a software as « Nexus Font » (or other font viewer software of you choice)
as long as both windows are opened (software and font), your font will be available in your PSP
TIP 2 -> from PSPX4, in the later versions of PSP the functions « Mirror » and « Flip » have been replaced by -->
« Mirror »has become --> image => mirror => mirror horizontal
« Flip » has become --> image => mirror => mirror vertical

Plugins needed
Filters Unlimited 2.0
Toadies
Mu'Ras Meister
Tramages
Thank you Renée Salon for sharing your plugins page


Use the pencil to mark your place
along the way
hold down left click to grab and move it
 |

1
duplicate all the tubes and work with the copies to preserve originals
save your work often in case of problems with your psp
open the masks and minimize to tray
2
use the Dropper tool to pick up your colors into your tubes and misted images
Animabelle chose these :
color 1 => #fec444
color 2 => #364655
color 3 => #131313
color 4 => #aa1b0b
color 5 => #ffffff (white)

don’t hesitate to change blend modes and opacities of the layers to match your personal colors and tubes
3
open « Image_Base_Roussette »
window => duplicate
rename « Raster 1 » in the layer stack
if you wnat to use another image => resize => untick « resize all layers » and « lock aspect ratio » => 800 * 500 px

effects => image effects => seamless tiling => default settings

4
effects => plugins => Toadies => Weaver

adjust = > blur => motion blur

effects => distortion effects => wave

5
layers => duplicate
effects => plugins => Unlimited 2 => Crescent Moon / Jammin’...

blend mode of the layer : Luminance (Legacy) / opacity : 55%
effects => image effects => seamless tiling => default settings

effects => plugins => Unlimited 2 => Toadies => What Are You ?...

layers => merge => merge visible
6
copy / paste « Image2_Roussette_Animabelle » as new layer
blend mode of the layer : Overlay / opacity : 15%
effects => edge effects => enhance more
layers => merge => merge visible
layers => duplicate
layers => new mask layer => from image

layers => merge => merge group
blend mode of the layer : Dodge
7
layers => duplicate
layers => merge => merge visible
layers => duplicate
layers => new mask layer => from image

layers => merge => merge group
blend mode of the layer : Screen
layers => duplicate
effects => 3D effects => drop shadow => 1 / 1 / 100 / 1 / black
layers => merge => merge visible
8
layers => duplicate
effects => texture effects => mosaic / antique

effects => image effects => seamless tiling => default settings

effects => plugins => Mura’s Meister => Perspective Tiling

adjust => sharpness => sharpen
effects => 3D effects => drop shadow => -15 / 0 / 40 / 15 / black
9
copy / paste « Image3_ Roussette » as new layer
image => resize => untick « resize all layers » => 40%
effects => image effects => offset => H : 0/ V : -6 / tick « custom » and « transparent »
adjust => sharpness => sharpen
effects => 3D effects => drop shadow => 0 / 0 / 100 / 50 / black
note => Animabelle added a window with no background in case you like to personalize your work
10
layers => duplicate
highlight layer below (original)
effects => texture effects => mosaic / Glass

layers => duplicate
layers => merge => merge down
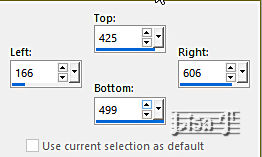
enable the Selection tool / custom selection


hit the DELETE key of your keyboard
selections => select none
11
image => add borders => tick « symmetric » => 1 px color 3 or black
selections => select all
image => add borders => tick « symmetric » =>
5 px color 1
5 px color 2
20 px color 4
selections => invert
12
effects => plugins => Tramages / Pool Shadow / default settings

selections => invert
layers => new raster layer
effects => 3D effects => cutout (black)

selections => select none
layers => duplicate
effects => texture effects => Weave / white

13
image => add borders => tick « symmetric » => 1 px color 3 or black
selections => select all
image => add borders => tick « symmetric » => 40 px color 2
selections => invert
effects => plugins => Unlimited 2 => Texturize => Raw Canvas

effects => plugins => Tramages / Pool Shadow / default settings

selections => invert
effects => 3D effects => drop shadow => 0 / 0 / 100 / 50 / black
selections => select none
14
copy / paste « 168_enfant_p2_animabelle » as new layer
don’t forget to erase the watermark
image => resize => untick « resize all layers » => 55%
adjust => sharpness => sharpen
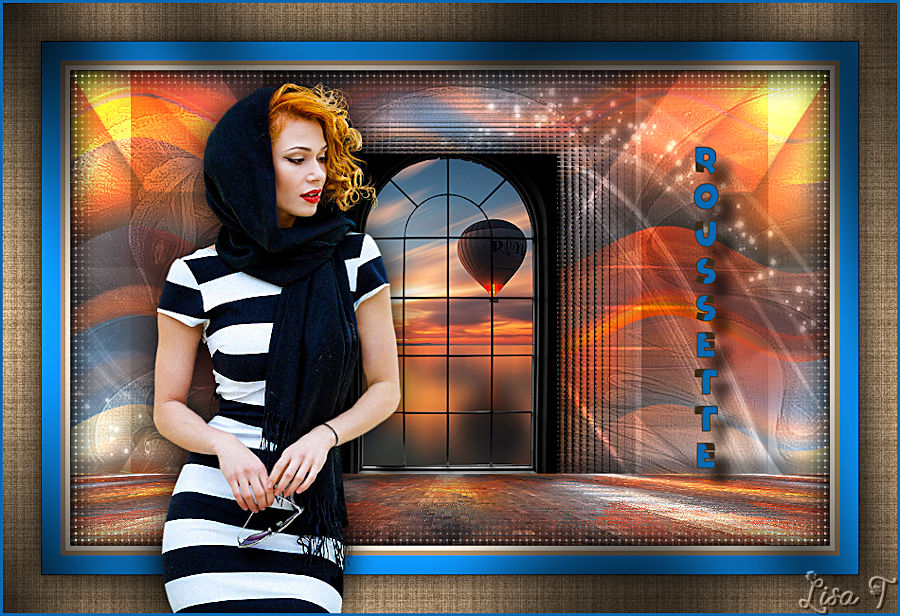
place as shown on final result
effects => 3D effects => drop shadow => 0 / 0 / 100 / 50 / black
15
image => add borders => tick « symmetric » => 3 px color 4
set FG to color 3 and BG to color 4 in materials palette
open the font provided

TN => I set « kerning » to -75

write your text
right click on the layer in the layers stack => convert to raster layer

place as shown on final result
effects => 3D effects => drop shadow => 15 / 15 / 70 / 15 / black
layers => merge => merge all (flatten)
image => resize => tick « resize all layers » => 900 px width

16
layers => new raster layer
apply your watermark or signature
write your licence number if you used a licenced tube
layers => merge => merge all (flatten)
save your work as... type .jpeg optimized

Another version with one of my tubes and a google image


Don't hesitate to write to me if you have any trouble with this tutorial
If you create a tag (using other tubes than those provided) with this tutorial
and wish it to be shown, send it to Animabelle !
It will be a real pleasure for her to add it to the gallery at the end of the tutorial


back to the boards of Animabelle’s tutorials
20 tutorials / board
board 1 board 2 board 2 board 3 board 3 board 4 board 4 board 5 board 5
board 6 board 7 board 7 board 8 board 8


|