

You will find the original tutorial here
:

This tutorial is a personal creation.
Any resemblance with another one would be only pure coincidence.
It is stricly forbidden to modify tubes, to change their
name or take off the matermarks,
To present them on your sites or blog,
To share them in groups,
to make a bank of images, or to use them on lucrative purposes.

Thank you to respect Animabelle’s work and the tubers
work.
Don’t hesitate to warn me if you have any trouble
with this translation,
and I’ll try to fix the problem as quickly as I can

Animabelle works with PSPX9 and I work with PSP 2019
you can follow this tutorial with another version of PSP,
but the result might be slightly different

Supplies
brush tip - mask - tubes - selections

TIP 1 -> if
you don’t
want to install a font -->
open it in a software as « Nexus Font » (or
other font viewer software of you choice)
as long as both windows are opened (software and font),
your font will be available in your PSP
TIP 2 -> from PSPX4,
in the later versions of PSP the functions « Mirror » and « Flip » have
been replaced by -->
« Mirror »has become --> image => mirror => mirror
horizontal
« Flip » has become --> image => mirror => mirror
vertical

Plugins needed
I.C.Net Software - Filters Unlimited 2.0
Simple
Alien Skin Eye Candy 5: Impact
AP [Utility]
VanDerLee
Flaming Pear
Graphics Plus

Use the pencil to mark your place
along the way
hold down left click to grab and move it
 |

1
duplicate all the tubes and work with the copies to preserve
originals
save your work often in case of problems with your psp
2
use the Dropper tool to pick up your colors into your tubes
and misted images
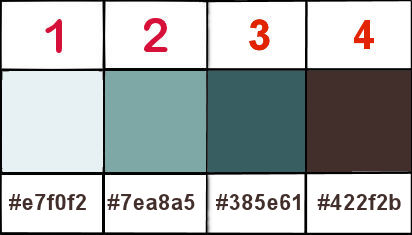
Animabelle chose these :
color 1 => #e7f0f2
color 2 => #7ea8a5
color 3 => #385e61
color 4 => #422f2b
don’t hesitate to change blend modes
and opacities of the layers to match your personal colors
and tubes
3
place the selections into the folder « selections » or
Corel PSP general folder
place the two elements « pinceau » and « Brush
tip » into the folder « brushes » of
Corel PSP general folder
4
open a new transparent iamge 800 * 500 px
flood fill with color 2
selections => select all
copy / paste the misted image into selection
selections => select none
adjust => blur => gaussian blur => 10
5
effects => plugins => Unlimited 1 => FunHouse
/ Loom
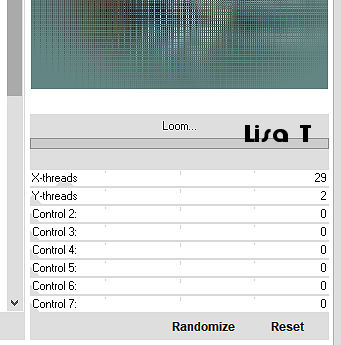
effects => plugins => Simple / Blintz
image => mirror => mirror horizontal
effects => reflection effects => rotating mirror
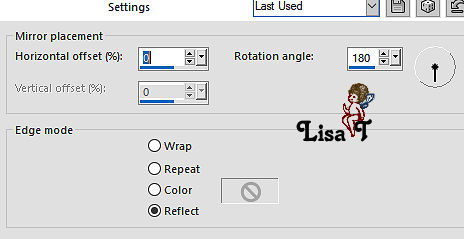
effects => plugins => Simple / Top Left Mirror
6
selections => load-save selection => from disk => selection
#1
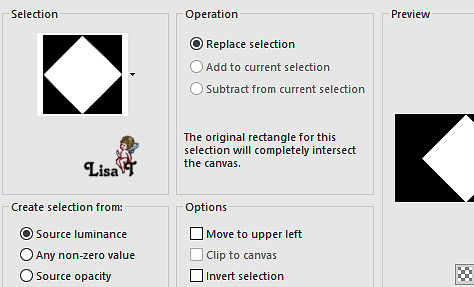
selections => promote selection to layer
effects => plugins => Alien Skin Eye Candy 5 Impact
/ Perspective Shadow
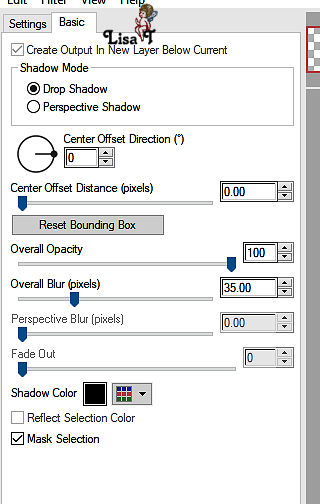
7
selections => modify => contract => 30 px
effects => Art Media effects => brush strokes
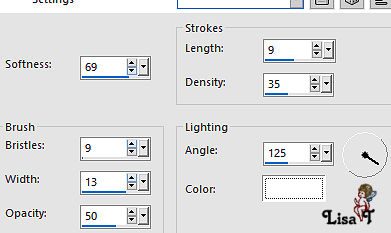
adjust => sharpness => sharpen
effects => plugins => Alien Skin Eye Candy 5 Impact
/ Perspective Shadow
same settings as in step 6
8
selections => modify => contract => 30 px
effects => plugins => Alien Skin Eye Candy 5 Impact
/ Perspective Shadow
same settings as in step 6
selections => promote selection to layer
effects => plugins => AP [Utility] - Utility - Both
Sides
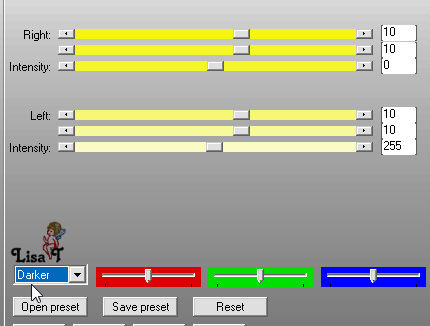
selections => select none
(Animabelle set the blend mode to « Luminance » on
her second version)
layers => merge => merge down
9
layers => duplicate
effects => plugins => VanDerLee / Unplugged X /
Copystar
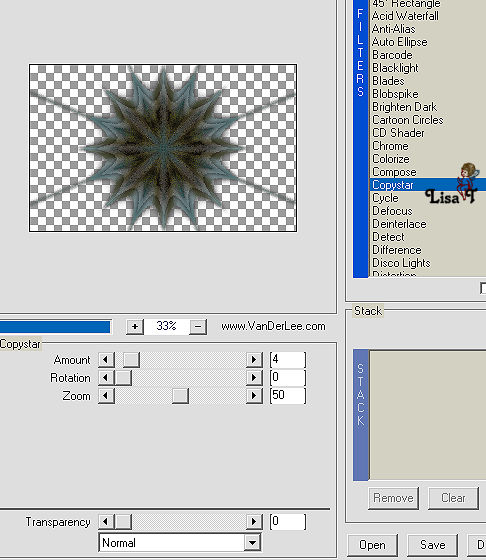
layers => merge => merge down
edit => Copy - edit => paste as new image
and set aside for a later use
10
highlight bottom layer
layers => new raster layer
selections => load-save selection => from disk => selection
#4
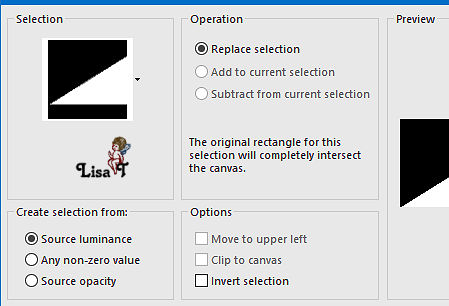
flood fill selection with color 1
layers => new mask layer => from image => mask « Masque1_Imagination_Animabelle »
layers => merge => merge group
adjust => sharpness => sharpen
11
selections => invert
layers => new raster layer
effects => plugins => Alien Skin Eye Candy 5 Impact
/ Perspective Shadow
same settings as in step 6
selections => select none
highlight the Mask layer (underneath)
effects => 3D effects => drop shadow => 4 / 4
/ 80 / 5 / color 4
blend mode of the layer : « Overlay »
12
highlight bottom layer
selections => load-save selection => from disk => selection
#4
selections => invert
selections => promote selection to layer
selections => select none
effects => image effects => offset => -20 / 20
(Tick « transparent » and « custom »)
effects => plugins => Alien Skin Eye Candy 5 Impact
/ Perspective Shadow
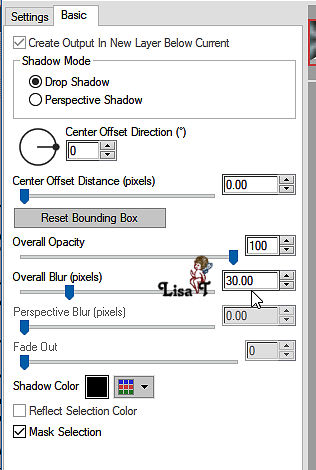
apply twice if necessary
layers => duplicate
effects => image effects => offset => -20 / 20
(Tick « transparent » and « custom »)
layers => merge => merge down
13
selections => load-save selection => from disk => selection
#2
selections => promote selection to layer
effects => plugins => Unlimited 2 => &<Bkg
Designer sf10 I> / BlindsVertical
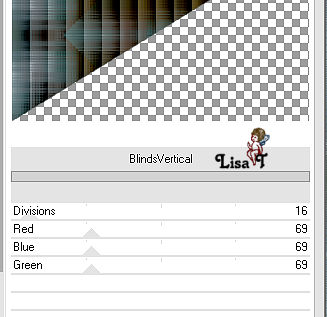
blend mode of the layer : Soft Light
layers => new raster layer
effects => plugins => Alien Skin Eye Candy 5 Impact
/ Perspective Shadow / same settings as before
apply twice if necessary
selections => select none
14
highlight bottom layer
layers => duplicate
layers => arrange => bring to top
image => resize => untick « resize all
layers » => 60%
effects => plugins => Flaming Pear / Flexify 2
import the preset provided by clicking on the red arrow
OR
apply the following settings
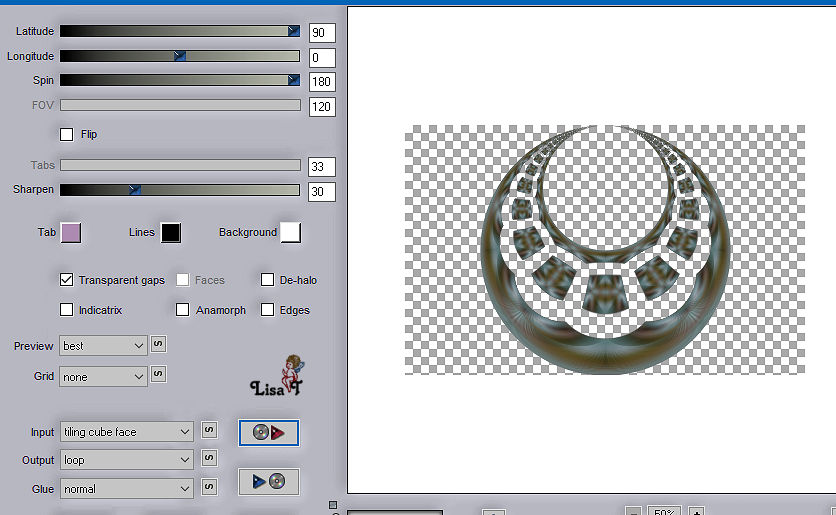
15
image => resize => untick « resize all layers » => 85%
adjust => sharpness => sharpen
effects => image effects => offset => 131 / 0 (Tick « transparent » and « custom »)
16
highlight bottom layer
selections => load-save selection => from disk => selection
#5
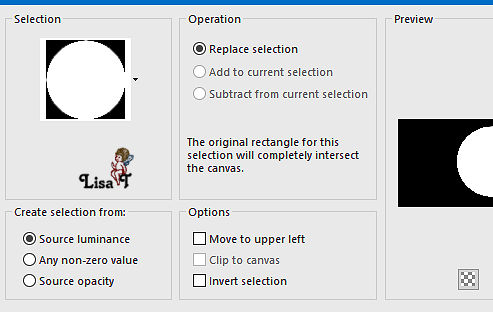
selections => promote selection to layer
layers => arrange => bring to top
adjust => blur => gaussian blur / 20
layers => new raster layer
copy / paste into selection the misted image
adjust => sharpness => sharpen
17
layers => duplicate
layers => merge => merge down TWICE
effects => plugins => Alien Skin Eye Candy 5 Impact
/ Glass
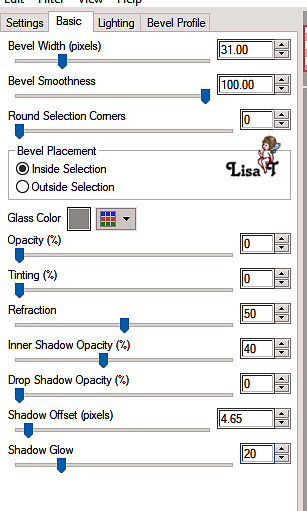
selections => select none
layers => arrange => move down
highlight top layer
effects => plugins => Alien Skin Eye Candy 5 Impact
/ Perspective Shadow (don’t change settings)
18
layers => new raster layer
in the materials palette, set color 1 as FG color
enable the Brush tool

find the brush « Pinceau_Imagination_Animabelle »
apply top left of the tag
effects => 3D effects => drop shadow => 4 / 4
/ 80 / 5 / color 4 or black
image => free rotate
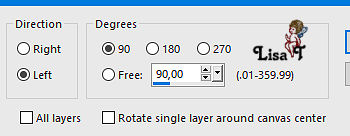
place as shown on final result
19
layers => merge => merge visible
effects => plugins => Unlimited 2 / Buttons & Frames
/ 3D Glass Frame 1
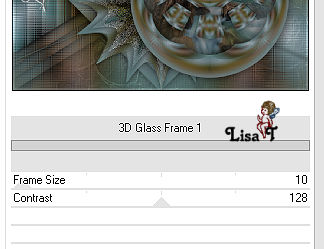
iamge => add borders => 1 px color 4
20
selections => select all
image => add borders => 5 px color 2
image => add borders => 1 px color 4
image => add borders => 5 px color 3
selections => invert
effects => plugins => Graphic Plus / Cross Shadow
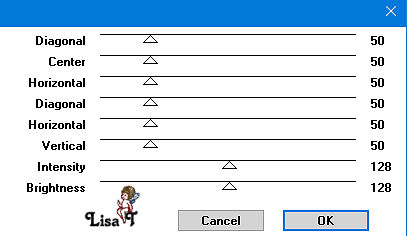
selections = > select none
21
image => add borders => 1 px color 4
selections => select all
image => add borders => 60 px color 2
selections => invert
effects => plugins => Graphic Plus / Cross Shadow
(don’t change the settings)
selections => promote selection to layer
effects => plugins => Unlimited 2 => ECWS Halftone
/ Diagonal : 46
effects => plugins => Unlimited 2 => Mirror Rave
/ Quadrant Flip
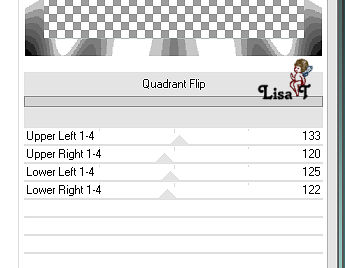
22
layers => merge => merge visible
selections => invert
effects => 3D effects => drop shadow => 0 / 0
/ 100 / 100 / black
selections => select all
selections => modify => contract / 30 px
effects => 3D effects => drop shadow => 0 / 0
/ 100 / 100 / black
selections => select none
23
open the image set aside in step 9
edit => copy
back to your work
edit => paste as new layer
image => resize => untick « resize all layers » => 15%
adjust => sharpness => sharpen
effects => image effects => offset -400 / 250
effects => plugins => Unlimited 2 => Mirror Rave
/ Quadrant Flip (don’t change the settings)
effects => 3D effects => drop shadow => 5 / 5
/ 70 / 15 / black
24
copy / paste as new layer the woman tube
drop a nice shadow
move slightly to the right
image => add borders => 1 px color 4
25
layers => new raster layer
apply your watermark
file => export => type .jpeg optimized

My tag with a tube created by Colybrix

Don't hesitate to write to Animabelle
if you have any trouble with her tutorial
If you create a tag (using other tubes than those provided)
with this tutorial
and wish it to be shown, send it to Animabelle !
It will be a real pleasure for her to add it to the gallery
at the end of the tutorial


back to the boards of Animabelle’s tutorials
board 1 board
2 board
2 board
3 board
3 board 4 board 4 board
5 board
5

|