Hi Cat !!!

You will find the original tutorial here

This tutorial is a personal creation.
Any resemblance with another one would be only pure coincidence.
It is stricly forbidden to modify tubes, to change their name or take off the matermarks,
To present them on your sites or blog,
To share them in groups,
to make a bank of images, or to use them on lucrative purposes.

Thank you to respect Animabelle’s work and the tubers work.
Don’t hesitate to warn me if you have any trouble with this translation


Material
tubes - selections


Filters (plugins) used
Tramages
< I.C.NET Software - Filters Unlimited 2.0
Distorsion Filters
MuRa's Meister
AAA Frames
Thank you Renée Salon for sharing your plugins’ page


use the pencil to you follow the steps
hold down left click of your mouse to grab it and move it


Important
Open all images with PSP, duplicate them and close the originals.
Never work on original images.
copy / paste selections into « Selections » folder ( into Corel PSP general folder)
Animabelle and I work with PSPX9
but you can follow this tutorial with another version of PSP.
The results might be slightly different according to the version of PSP you use

Colors
Don't hesitate to change the colors and the blend mode of the layers,
according to your tubes and images.
Animabelle chose these colors
Couleur 1 -> ForeGround color -> #793e08
Couleur 2 -> BackGround color -> #ffe5d1
Couleur 3 -> #5a2a04
Couleur 4 -> #442203

realization
1
don’t forget to save your work often
using PSP X4 and following versions of PSP : function « Mirror » and « Flip » have been replaced
Mirror has become : Mirror -> Mirror horizontal
Flip has become : Mirror -> Mirror vertical
2
with dropper tool, pick up 4 colors into your main tube (or mist)
open a new transparent image 900 * 600 pixels
into materials palette, prepare the following radial gradient into FG box
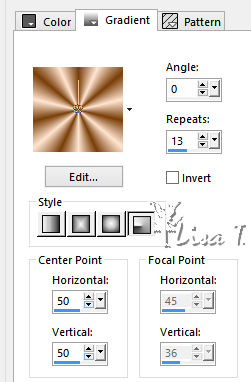
flood fill layer with this gradient
adjust -> blur -> gaussain blur -> 30
effects -> plugins -> Tramages / Wire Mesh
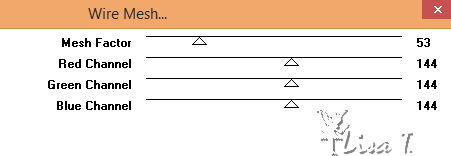
3
layers -> new raster layer
flood fill with the same radial gradient as in step 2 (but check « invert »)
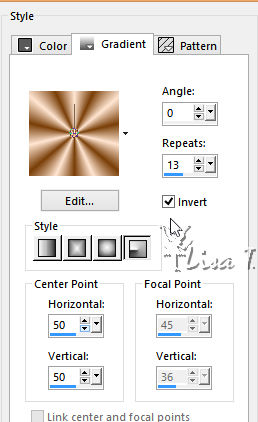
effects -> plugins -> < I.C.NET Software - Filters Unlimited 2.0 -> Distorsion Filters / Cracked
Intensity -> 77
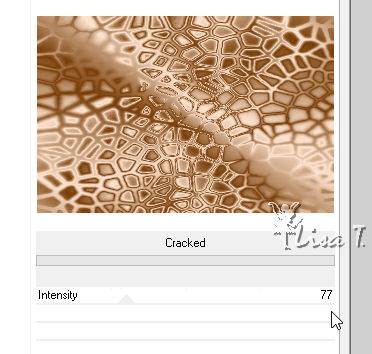
effects -> texture effects -> Mosaic Antique
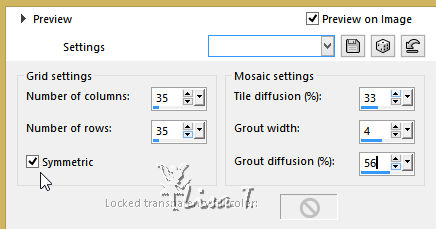
4
effects -> plugins -> < I.C.NET Software - Filters Unlimited 2.0 -> Distorsion Filters / Black Hole / Size : 114
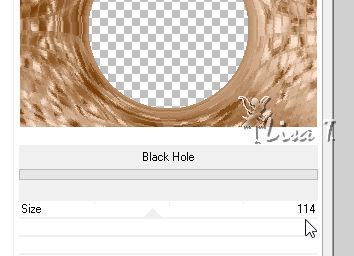
highlight « Raster 1 »
selections -> save-load selection -> from alpha channel -> selection « Sel1_Chalut_Animabelle »
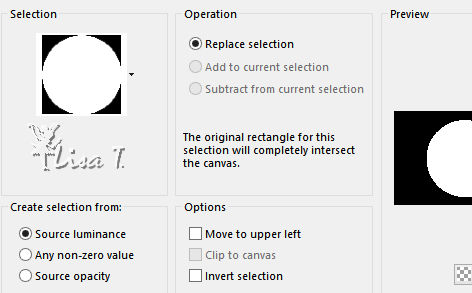
layers -> new raster layer
effects -> 3D effects -> cutout / color 3
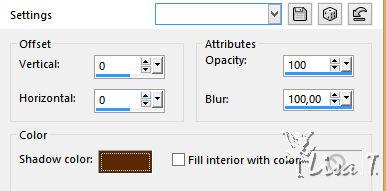
selections -> select none
5
highlight « Raster 1 »
copy / paste as new layer « 274_animabelle_tubes_animaux » (erase the watermark)
image -> resize -> uncheck « resize all layers » -> 130%
move the tube to see cat’s head in the middle of the circle
adjust -> sharpness -> sharpen
layers -> duplicate
layers -> merge -> merge down
6
highlight top layer
layers -> merge -> merge down twice
image -> resize -> 80%
adjust -> sharpness -> sharpen
highlight top layer
effects -> image effects -> page curl / color 1
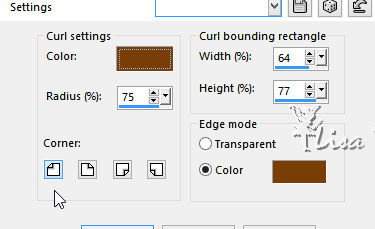
apply this effects 3 more times on the other angles
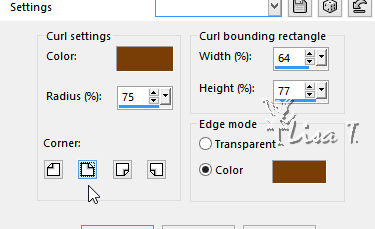
7
acitate « Selection » tool / rectangle / custom selection

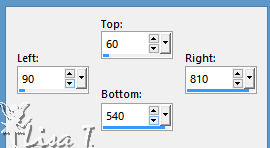
effects -> 3D effects -> chisel / color 1
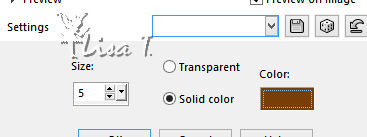
selections -> select none
effects -> 3D effects -> drop shadow -> 0 / 0 / 100 / 90 / black
8
image -> add borders -> 2 pixels color 3
layers -> new raster layer
selections -> save-load selection -> from alpha channel -> selection «Sel2_Chalut_Animabelle »
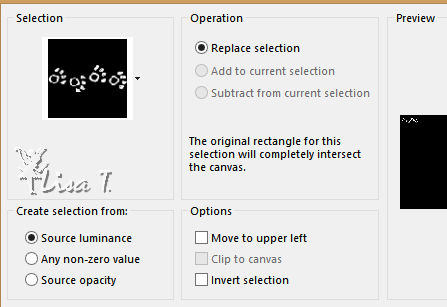
zoom in to see your work better
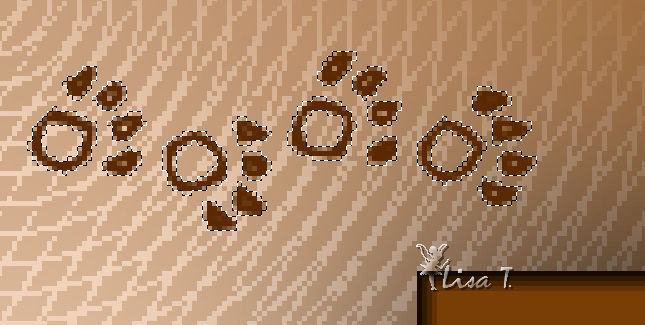
flood fill selection with color 3
selections -> select none
9
effecgs -> plugins -> Mura’s Meister / Copies
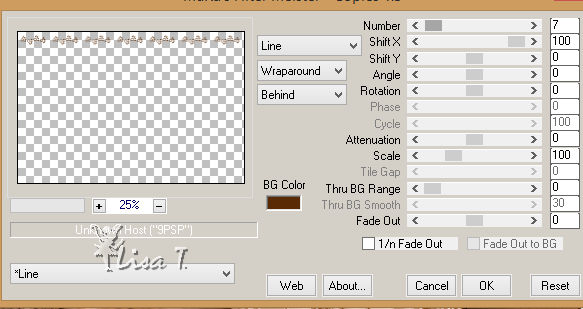
layers -> duplicate
image -> mirror -> mirror horizontal
image -> mirror -> mirror vertical
effects -> image effects -> offset -> 0 / -5 / check « custom » and « transparent »
layer s-> merge -> merge down
effects -> 3D effects -> drop shadow -> 3 / 3 / 40 / 5 / color 4
layers -> merge -> merge visible
10
layers -> duplicate
image -> resize
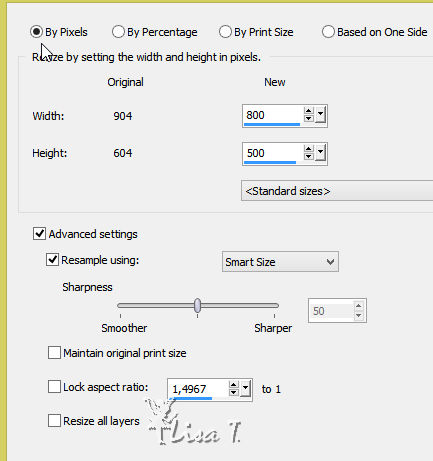
highlight bottom layer
effecrts -> image effects -> seamless tiling
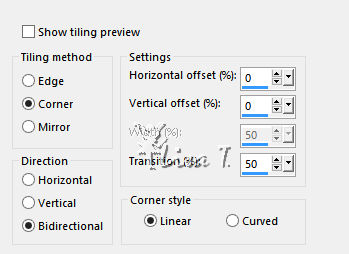
adjust -> blur -> gaussian blur / 30
effects -> plugins -> Tramages / Wire Mesh
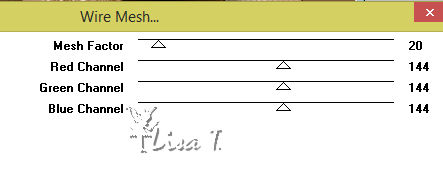
highlight bottom layer
effects -> 3D effects -> drop shadow -> 0 / 0 / 100 / 85 / black
layers -> merge -> merge all (flatten)
11
effects -> plugins -> AAA Frame / Foto Frame
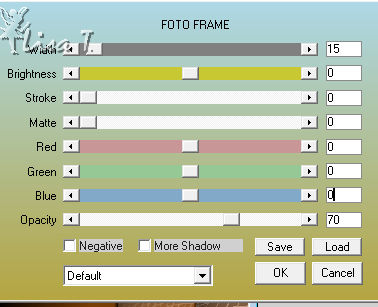
copy / paste as new layer « 60_fleurs_animabelle » (erase the watermark)
image -> resize -> 70%
move this layerto the left (see final result)
effects -> 3D effects -> drop shadow -> ( - 12 ) / 12 / 65 / 25 / color 4
12
layer s-> new raster layer
apply your watermark (signature)
layers -> merge -> merge all (flatten)
file -> exort -> type .jpeg optimized
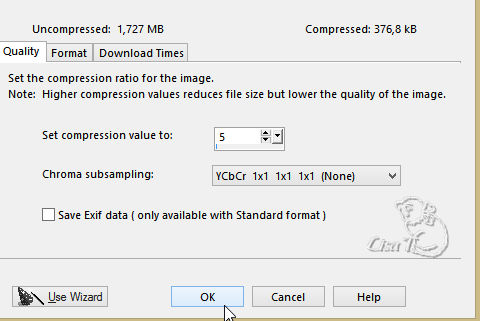
your tag is finished

Don't hesitate to write to Animabelle if you have any trouble with her tutorial
To be informed about her new tutorials, join her NewsLetter
If you create a tag (using other tubes than those provided) with this tutorial
and wish it to be shown, send it to Animabelle !
It will be a real pleasure for her to add it to the gallery at the end of the tutorial


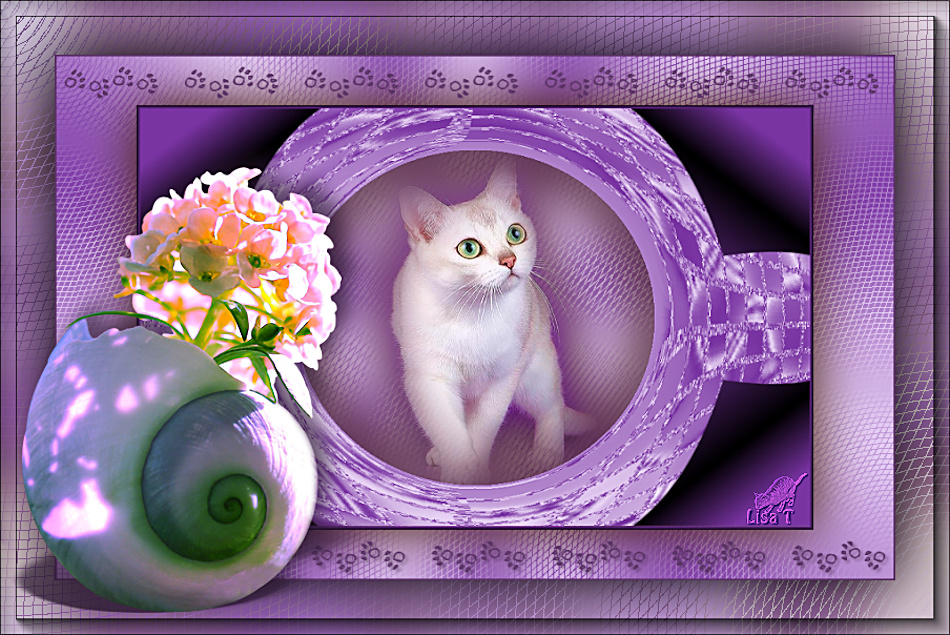
My tag with my tubes

back to the boards of Animabelle’stutorials
board 1  board 2 board 2  board 3 board 3 

|