

You will find the original tutorial here
:

This tutorial is a personal creation.
Any resemblance with another one would be only pure coincidence.
It is stricly forbidden to modify tubes, to change their
name or take off the matermarks,
To present them on your sites or blog,
To share them in groups,
to make a bank of images, or to use them on lucrative purposes.

Thank you to respect Animabelle’s work and the tubers
work.
Don’t hesitate to warn me if you have any trouble
with this translation,
and I’ll try to fix the problem as quickly as I can

Animabelle works with PSPX9 and I work with PSP 2019
you can follow this tutorial with another version of PSP,
but the result might be slightly different

Material
selections - brush tip - tubes - masks
xxxxxxxxx Download material xxxxxxxxxxx
TIP 1 -> if you don’t
want to install a font -->
open it in a software as « Nexus Font » (or
other font viewer software of you choice)
as long as both windows are opened (software and font),
your font will be available in your PSP
TIP 2 -> from PSPX4,
in the later versions of PSP the functions « Mirror » and « Flip » have
been replaced by -->
« Mirror »has become --> image => mirror => mirror
horizontal
« Flip » has become --> image => mirror => mirror
vertical

Filters (plugins) used
Mehdi
Filters Unlimited 2.0
MuRa's Seamless Mehdi
Filters Unlimited 2.0
MuRa's Seamless

 
Use the pencil to mark your place
along the way
hold down left click to grab and move it
 |
 
1
duplicate all the tubes and work with the copies to preserve
originals
save your work often in case of problems with your psp
open the masks and minimize to tray
2
use the Dropper tool to pick up your colors into your tubes
and misted images
Animabelle chose these :
color 1 => #b8c3e8
color 2 => #434b69
color 3 => #00052e
color 4 => #48454c
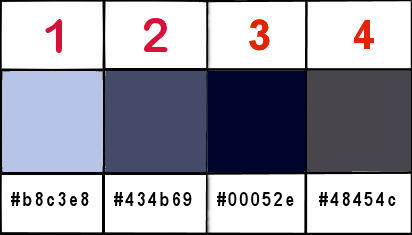
don’t hesitate to change blend modes and opacities
of the layers to match your personal colors and tubes
place the brush tip into the dedicated folder into Corel
PSP genera folder
3
open a new transparent image 800 * 500 px
effects => plugins => mehdi => Wavy Lab
1.1
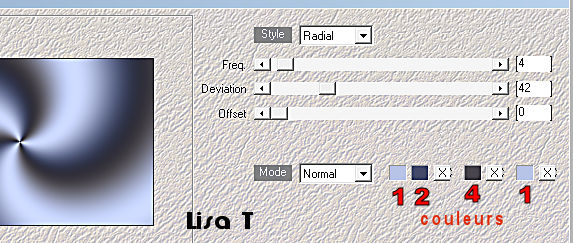
effects => plugins => Unlimited 2 => &<Background
Designers IV> => sf10 Slice N Dice
effects => plugins => Unlimited 2 => &<Background
Designers sf10 I> => ALF’s Border Mirror Bevel
=>128 / 64
4
adjust => blur => gaussian blur => 20
effects => plugins => Unlimited 2 => &<Background
Designers sf10 I> => FH PatchWork / 23
5
layers => duplicate
effects => plugins => Unlimited 2 => Déformation
=> Dimensia.../ 16
opacity of the layer : 77%
effects => edge effects => enhance more
6
layers => new raster layer
flood fill white
layers => new mask layer => from image => « Masque1_Curtis_Animabelle »
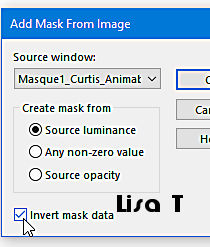
layers => merge => merge group
7
effects => image effects => seamless tiling
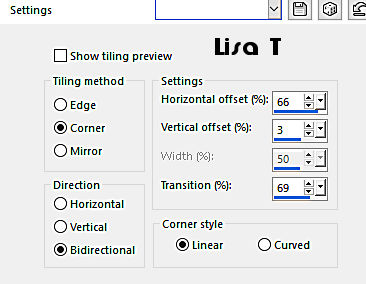
blend mode of the layer : Overlay - opacity of the
layer : 65%
effects => 3D effects => drop shadow => 10 / 10
/ 50 / 5 / black
effects => 3D effects => drop shadow => -10 /
-10 / 50 / 5 / black
layers => merge => merge visible
8
layers => new raster layer
flood fill with color 3
layers => new mask layer => from image => « Masque2_Curtis_Animabelle»
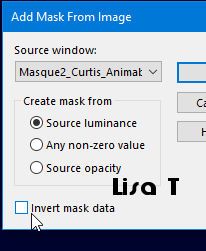
layers => merge => merge group
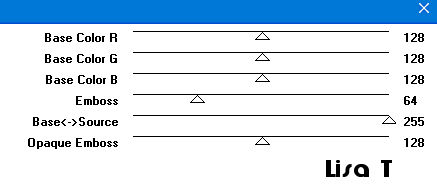
effects => plugins => Mura’s Seamless => Emboss
At Alpha / default settings
9
selections => load-save selection => from disk => « sel1_Curtis_Animabelle »
DELETE on your keyboard
10
highlight bottom layer
copy / paste as new layer the misted landscape (don’t
forget to erase the signature)
selections => invert
edit => cut
11
selections => invert
layers => new raster layer
effects => 3D effects => cutout / color 3
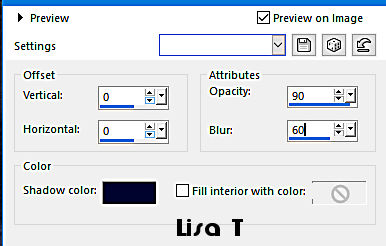
selections => select none
layers => merge => merge all (flatten)
12
selections => select all
effects => 3D effects => cutout / color 3 / same
settings as in step 11
selections => select none
13
image => add borders => tick « symmetric » => ...
1 px color 1
30 px white
select the large border with the magic wand tool
effects => plugins => Unlimited 2 => Distortion
Filters / Smelter 1 / 135
adjust => blur => gaussian blur => 20
14
selections => promote selection to layer
effects => plugins => Unlimited 2 => Filter Factory
Gallery G / Double Image... / 21
opacity of the layer : 50%
selections => invert
effects => 3D effects => drop shadow => 15 / 15
/ 100 / 401 / color 3
selections => select none
15
image => add borders => tick « symmetric » => ...
1 px color 3
50 px white
select the large border with the magic wand tool
effects => plugins => Unlimited 2 => Kang 3 /
Liquid you Too / default settings
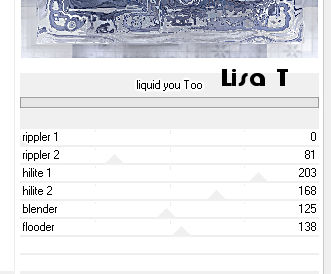
adjust => sharpness => sharpen more
selections => select none
16
layers => new raster layer
enable the Brush tool
set color 2 as FG color into the materials palette
find the brush tip provided « Fleur_Curtis_Animabelle » /
size : 100

apply this brush tip in the lower right
corner (see final result)
you can use another color if you wish
17
effects => plugins => Mura’s Seamless / Emboss
at Alpha / default settings
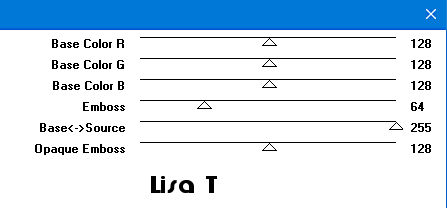
effects => 3D effects => drop shadow => 10 / 10
/ 40 / 10 / color 3
18
copy / pastee as new layer the character tube (the boy)
don’t forget to erase the watermark
image => mirror => mirror horizontal
image => resize => untick « resize all
layers » => 62%
place bottom left
drop a shadow of your choice
19
image => add borders => tick « symmetric » => 1
px color 3
layers => new raster layer => apply your
signature or watermark
file => export => type .jpeg optimized
 
my tag with my tube and mist
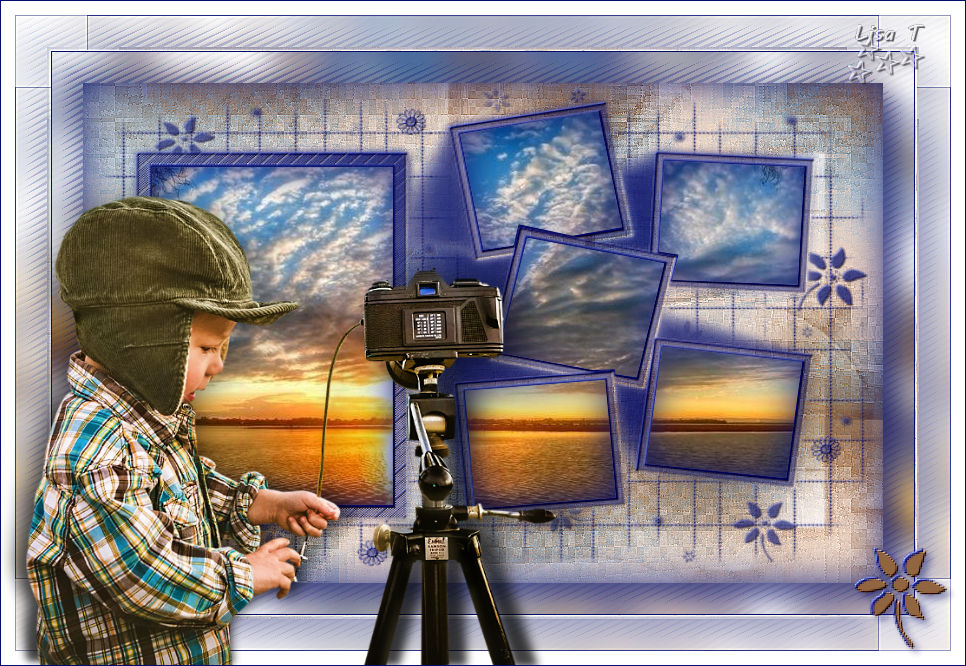
Don't hesitate to write to Animabelle
if you have any trouble with her tutorial
If you create a tag (using other tubes than those provided)
with this tutorial
and wish it to be shown, send it to Animabelle !
It will be a real pleasure for her to add it to the gallery
at the end of the tutorial


back to the boards of Animabelle’s tutorials
board 1 board 2 board 2 board
3 board
3 board 4 board 4


|