

You will find the original tutorial here
:

This tutorial is a personal creation.
Any resemblance with another one would be only pure coincidence.
It is stricly forbidden to modify tubes, to change their
name or take off the matermarks,
To present them on your sites or blog,
To share them in groups,
to make a bank of images, or to use them on lucrative purposes.
 
Thank you to respect Animabelle’s work and the tubers
work.
Don’t hesitate to warn me if you have any trouble
with this translation,
and I’ll try to fix the problem as quickly as I can

Animabelle works
with PSPX9 and I work with PSP 2020 Ultimate
you can follow this tutorial with another version of PSP,
but the result might be slightly different
 
Supplies
masks - tubes - selection - brush tip - images
TIP 1 -> if
you don’t
want to install a font -->
open it in a software as « Nexus Font » (or
other font viewer software of you choice)
as long as both windows are opened (software and font),
your font will be available in your PSP
TIP 2 -> from PSPX4,
in the later versions of PSP the functions « Mirror » and « Flip » have
been replaced by -->
« Mirror »has become --> image => mirror => mirror
horizontal
« Flip » has become --> image => mirror => mirror
vertical
 
Plugins needed
Filters Unlimited 2.0
FM Tile Tools
MuRa's Meister
Thank you Renée Salon for sharing your plugins page

   
Use the pencil to mark your place
along the way
hold down left click to grab and move it
 |
   
1
duplicate all the tubes and work with the copies to preserve
originals
save your work often in case of problems with your psp
2
use the Dropper tool to pick up your colors into your tubes
and misted images
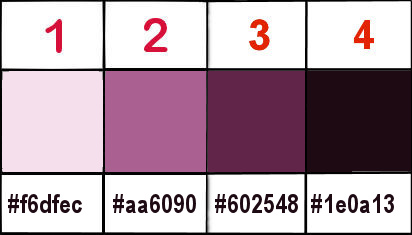
Animabelle chose these :
color 1 => #f6dfec
color 2 => #aa6090
color 3 => #602548
color 4 => #1e0a13
don’t hesitate to change blend modes and opacities
of the layers to match your personal colors and tubes
3
place the selection into the folder « selections » of
Corel PSP general folder
import the brush tip
open the masks and minimize to tray
4
open a new transparent image 800 * 500 px
selections => select all
copy / paste « image_Base » into
selection
selections => select none
adjust => sharpness => sharpen
colorize if necessary
****** OR ******
paint the layer with one of your main colors
layers => new raster layer
selections => select all
copy / paste « image_Base » into selection
selections => select none
adjust => sharpness => sharpen
blend mode of the layer : Luminance (Legacy)
layers => merge => merge visible
****** ******
effects => plugins => Unlimited 2 => &<Bkg
Designer sf10 III> => Texture Rax Canvas / default
settings
apply the plugin once more
5
layers => new raster layer
flood fill with color 1
layers => new mask layer => from image => mask « Masque2_Animabelle » (untick
the box at the bottom)
adjust => sharpness => sharpen more
layers => merge => merge group
6
layers => new raster layer
selections => select all
copy / paste « image2 » into
selection
selections => select none
blend mode of the layer : overlay / opacity : 50%
7
layers => new raster layer
flood fill with color 1
layers => new mask layer => from image => mask « Masque3_Animabelle »
layers => merge => merge group
effects => plugins => FM Tile Tools / Saturation
Emboss / default settings
blend mode of the layer : soft light
8
layers => duplicate
layers => merge => merge visible
layers => duplicate
image => mirror => mirror horizontal
image => mirror => mirror vertical
effects => reflection effects => rotating Mirror
=> 0 / 180 / tick « Reflect »
effects => plugins => ScreenWorks / Canvas Mesh
effects => plugins => Mura’s Meister => Perspective
Tiling
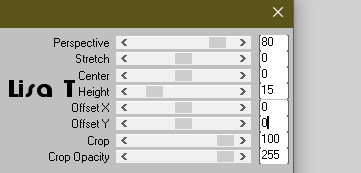
apply the plugin once more
9
image => add borders => tick « symmetric » => ...
1 px color 1
5 px color 2
1 px color 1
10 px color 3
1 px color 1
10
selections => select all
image => add borders => tick « symmetric » => 60
px color 3
selections => invert
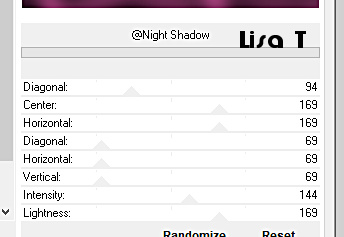
effects => plugins => Unlimited 2 => &<Background
Designers IV> => @Night Shadow
11
adjust => add-remove noise => add noise
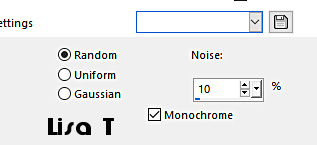
effects => plugins => Unlimited 2 => &<Bkg
Designer sf10 III> => VMT Instant Tile / default
settings / 77 / 31
12
selections => load-save selection => from disk => selection « Selection
1_Animabelle »
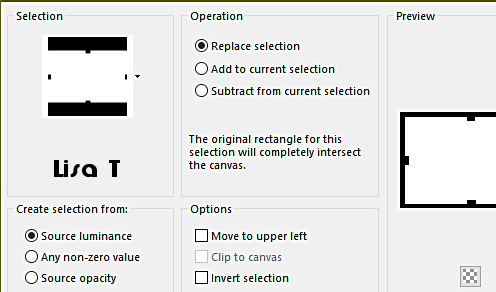
effects => 3D effects => drop shadow => 0 / 0
/ 100 / 50 / black => TWICE
selections => select none
13
layers => new raster layer
set White as FG color (or other, matching your personal
colors)
eanble the Brush tool => find the brush tip provided

apply where you like
effects => 3D effects => drop shadow => 1 / 1
/ 100 / 0 / black
blend mode of the layer : Luminance (Legacy) or « Normal »
14
copy / paste the woman tube as new layer
place bottom right
drop a shadow of your choice
image => add borders => tick « symmetric » => 2
px color 4
15
layers => new raster layer
apply your watermark or signature
write your licence number if you used a licenced tube
save your work as... type .jpeg optimized
   
My tag with my tube (avalailable on my site)

Don't hesitate to write to me if you have
any trouble with this translation
If you create a tag (using other tubes than those provided)
with this tutorial
and wish it to be shown, send it to Animabelle !
It will be a real pleasure for her to add it to the gallery
at the end of the tutorial

 
back to the boards of Animabelle’s tutorials
board 1 board 2 board 2 board
3 board
3 board 4 board 4 board
5 board
5 board 6 board 6


|