Attractive Redheads

You will find the original tutorial here :


This tutorial is a personal creation.
Any resemblance with another one would be only pure coincidence.
It is stricly forbidden to modify images, to change their name or take off the matermarks,
To present them on your sites or blog,
To share them in groups,
to make a bank of images, or to use them on lucrative purposes.

Thank you to respect Animabelle’s work and the tubers work.
Don’t hesitate to warn her if you have any trouble with this tutorial.


Material
1 Tube - Nikita/Rêveries
1 Tube - Monique
2 masks
Animabelle’s important note
Tubers have been warned that disrespectful and dishonest bloggers come steeling our tubes
they grab them into the folders of material we use to provide for our tutorials.
These people rename and convert the tubes to png type,
and then they offer them for download in their blogs, pretending they have done the work.

To protect my work, I am therefore forced to no longer provide my tubes with the material.
Honest people will understand my way of doing, I hope.
I thank them for their understanding.
Very important Tip:
never take your tubes on these blogs, because most of the time all of these tubes are stolen tubes.
Always make sure that the tubes you take have been signed by their authors !
Thank you.
|
Filters used
I.C.NET Software / Unlimited 2 / Buttons et frames
I.C.NET Software / Unlimited 2 / FunHouse
I.C.NET Software / Unlimited 2 / Noise Filters
I.C.NET Software / Unlimited 2 / Photo Aging Kit
Filtre personnalisé

“Renée Graphisme” filters, with her kind permission


translator’s note : I use PSP18, but this tutorial can be realized with another version.
I translate exactly the indications of Animabelle

Colors used

Don't hesitate to change the colors and the blend mode of the layers, and the shadows,
according to your tubes and images.

Important
Open all images in PSP, duplicate them and close the originals.
work with the copies
open the masks and minize them to tray

use the pencil to follow the steps
left click to grab it

Execution
Step 1
open a new transparent raster layer 900 * 600 pixels
flood fill with color 2
layers > new raster layer
flood fill with color 3
layers > new mask layer > from image

layers > merge > merge group
adjust > sharpness > sharpen more
layers > merge > merge down
copy/paste as new image > set aside for a later use
Step 2
back to your work
layers > new raster layer
flood fill white
layers > arrange > move down
activate the top layer
layers > new mask layer > from image

layers > merge > merge group
effects > 3D effects > drop shadow > 3 / 3 / 100 / 10 / white
Step 3
activate the selection tool > rectangle > custom selection

with the following settings

activate the layer underneath
flood fill the selection with the following gradient
colors : 4 and white


adjust > blur > gaussian blur > 20
Step 4
copy / paste as new layer the tube « tube423_monique »
image > resize > uncheck « resize all layers » > 150%

adjust > sharpness > unsharp mask

selections > invert
edit > cut
selections > invert
layers > new raster layer
effects > 3D effects > cutout

layers > new raster layer
effects > 3D effects > cutout, changing the previous settings V and H by (-12)
selections > select none
Step 5
image > add borders > check « symmetric » -->
2 pixels color 1
2 pixels color 2
2 pixels color 3
40 pixels color 1
select the large border with the magic wand tool
copy/paste into selection the image you set aside in step 1
image > mirror > mirror horizontal
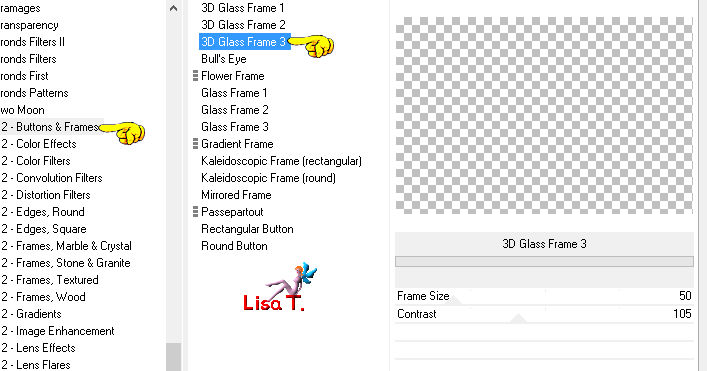
effects > plugins > Unlimited 2 > Buttons & Frames > 3D Glass Frame 3

selections > invert
Step 6
selections > modify > contract > 6 pixels
selections > invert
effects 3D effects > drop shadow > -15 / 15 / 70 / 30 / color 1
drop shadow again > 15 / -15 / 70 / 30 / color 1
selections > select none
Step 7
image > add borders > check « symmetric » -->
2 pixels color 1
2 pixels color 2
2 pixels color 3
40 pixels color 1
select the large border with the magic wand tool
effects > plugins > Unlimited 2 > FunHouse > Tunnel Tile

adjust > blur > gaussian blur > 20
effects > plugins > Unlimited 2 > Noise Filters > Noisy Rotation

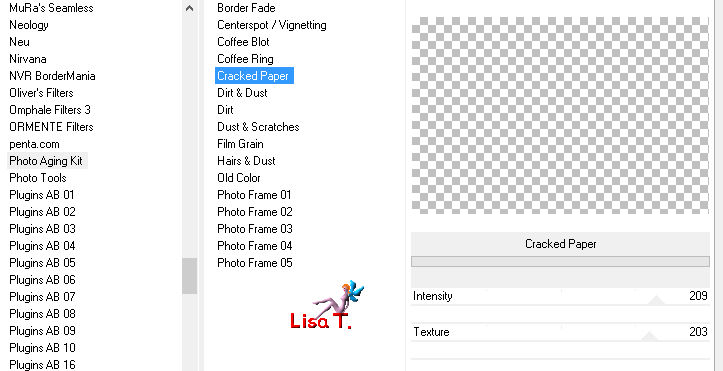
effects > plugins > Unlimited 2 > Photo Aging Kit > Cracked Paper

effects > plugins > Unlimited 2 > Buttons & Frames >3D Glass Frame 3

selections > select none
Step 8
copy / paste as new layer the tube « 12926131151_animaux_nikita »
(don’t forget to erase the watermark)

image > mirror > mirror horizontal
move the tube as shown on the final result
Step 9
image > add borders > check « symmetric » -->
2 pixels color 1
2 pixels color 2
2 pixels color 3
2 pixels color 1
apply your watermark – resize if necessary

Don't hesitate to write to Animabelle if you have any trouble with her tutorial
To be informed about her new tutorials, join her NewsLetter

If you created a tag with her tutorial and wish it to be shown,
send it to Animabelle !
It will be her pleasure to add it to the gallery at the end of the tutorial
don’t resize your tag under 800 pixels width if you want her to present your tag


My tag with my tubes

Back to the board of Animabelle's tutorials
Board 1 

|