

You will find the original tutorial here :
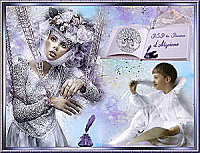
This tutorial is a personal creation.
Any resemblance with another one would be only pure
coincidence.
It is stricly forbidden to modify tubes, to change
their name or take off the matermarks,
To present them on your sites or blog,
To share them in groups,
to make a bank of images, or to use them on lucrative purposes.

Thank you to respect Alyciane’s
work and the tubers work.
Don’t hesitate to warn me if you have any trouble
with this translation,
and I’ll try to fix the problem as quickly as I can

Alyciane works with PSP 2020 and I work with PSP
2020 Ultimate
but you can follow this tutorial with another version
of PSP, however the result might be slightly different

Thank you Garances for testing Alyciane’s tutorials

Supplies
tubes - mask - alpha layer (Xero psp image)

open the tubes, duplicate, close the originals, and
work with the copies
double click on the preset to install or import
open the mask and minimize to tray
TIP 1 -> if you don’t
want to install a font -->
open it in a software as « Nexus Font » (or
other font viewer software of you choice)
as long as both windows are opened (software and font),
your font will be available in your PSP
TIP 2 -> from PSPX4,
in the later versions of PSP the functions « Mirror » and « Flip » have
been replaced by -->
« Mirror »has become --> image => mirror => mirror
horizontal
« Flip » has become --> image => mirror => mirror
vertical


Xero

Use the pencil to mark your place
along the way
hold down left click to grab and move it
 |

Realization
open the Alpha layer (it contains selections saved
on an alpha channel)
window => duplicate
close the original and work with the copy
selections => select all
open « image 1 » => edit => copy
edit => paste into selection
effects => image effects => seamless tiling => default
settings
adjust => blur => gaussian blur => 50
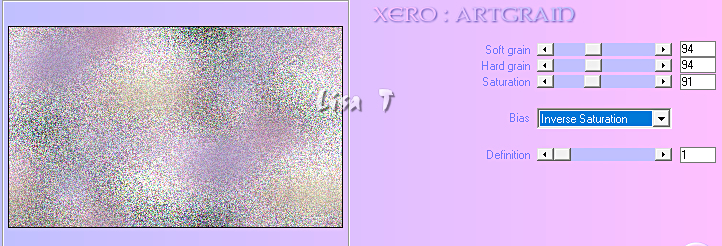
effects => plugins => Xero => Artgrain
effects => plugins => Graphics Plus => Cross Shadow
/ all setting on 50 except the last two => 51 / 78
copy / paste the deco « tube » as
new layer
adjust => sharpness => sharpen
layers => new raster layer
flood fill with color 1
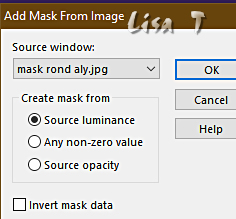
layers => new mask layer => from image
layers => merge => merge group
adjust => sharpness => sharpen
effects => 3D effects => drop shadow => 1 / 1
/ 100 / 1 / dark color
layers => new raster layer
in the layers palette, place this layer under the mask
layer
selections => load-save selection => from alpha channel
=> selection # 1
copy / paste image 2 into selection
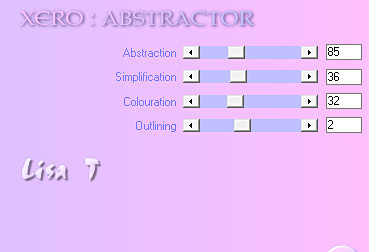
effects => plugins => Xero => Abstractor
selections => select none
selections => load-save selection => from alpha channel
=> selection # 2
copy / paste image 2 into selection
effects => plugins => Xero => Alienmist
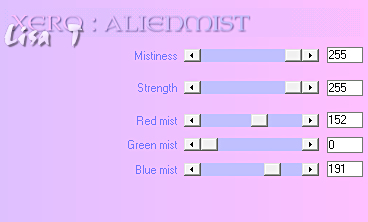
selections => select none
selections => load-save selection => from alpha channel
=> selection # 3
copy / paste image 2 into selection
effects => plugins => Xero => Artgrain / Mid-tones
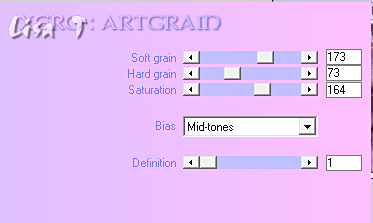
selections => select none
selections => load-save selection => from alpha channel
=> selection # 4
copy / paste image 2 into selection
effects => plugins => Xero => Artgrain / Mid-tones
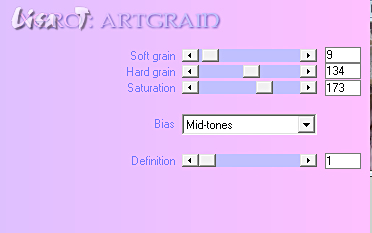
selections => select none
selections => load-save selection => from alpha channel
=> selection # 5
copy / paste image 2 into selection
effects => plugins => Xero => Artifax
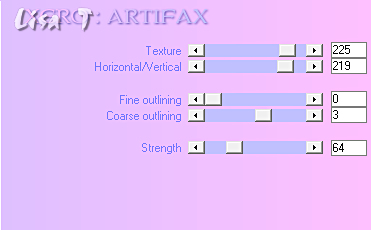
selections => select none
selections => load-save selection => from alpha channel
=> selection # 6
copy / paste image 2 into selection
effects => plugins => Xero => Artworx / Blobs
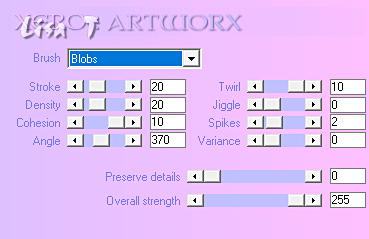
selections => select none
selections => load-save selection => from alpha channel
=> selection # 7
copy / paste image 2 into selection
effects => plugins => Xero => Artwork / Squares
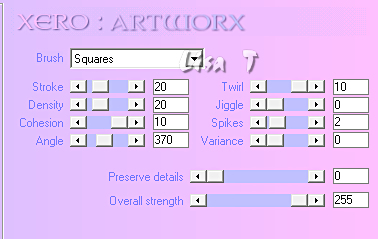
selections => select none
selections => load-save selection => from alpha channel
=> selection # 8
copy / paste image 2 into selection
effects => plugins => Xero => Bad Dream
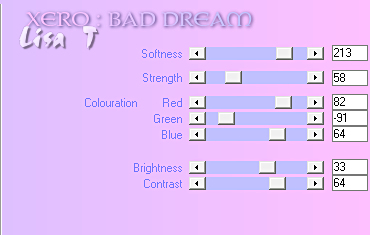
selections => select none
selections => load-save selection => from alpha channel
=> selection # 9
copy / paste image 2 into selection
effects => plugins => Xero => Carvaggio
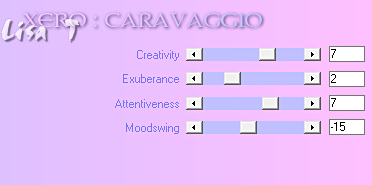
selections => select none
selections => load-save selection => from alpha channel
=> selection # 10
copy / paste image 2 into selection
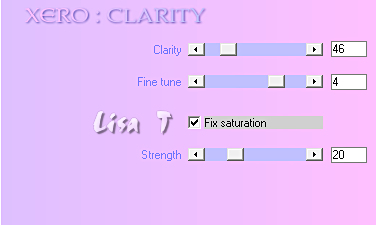
effects => plugins => Xero => Clarity
selections => select none
selections => load-save selection => from alpha channel
=> selection # 11
copy / paste image 2 into selection
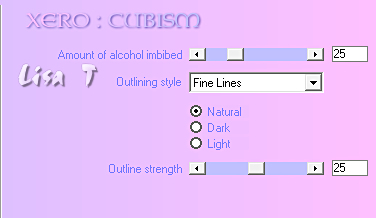
effects => plugins => Cubism / Fine Lines
selections => select none
selections => load-save selection => from alpha channel
=> selection # 12
copy / paste image 2 into selection
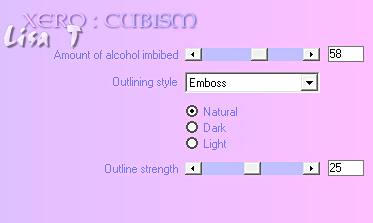
effects => plugins => Cubism / Emboss / natural
selections => select none
selections => load-save selection => from alpha channel
=> selection # 13
copy / paste the image of Luz Cristina into selection
selections => select none
highlight top layer
copy / paste the decorations provided (or choose others)
apply your watermark, merge all (flatten)
if you don’t want to animate your tag => selections
=> select none
image => resize to 1000 px Width
and save as... type .jpeg

My tag with my tubes


Don't hesitate to write to me if you have any trouble
with this tutorial
If you create a tag (using other tubes than those provided)
with this tutorial
and wish it to be shown, send it to me !
It will be a real pleasure for me to add it to the gallery
at the end of this translation


coming  soon soon

back to the boards of Alyciane’s tutorials
20 tutorials on each board
board 4 => 
at the bottom of each tutorial you will find the
arrows allowing you to navigate from one board to
another


|

